
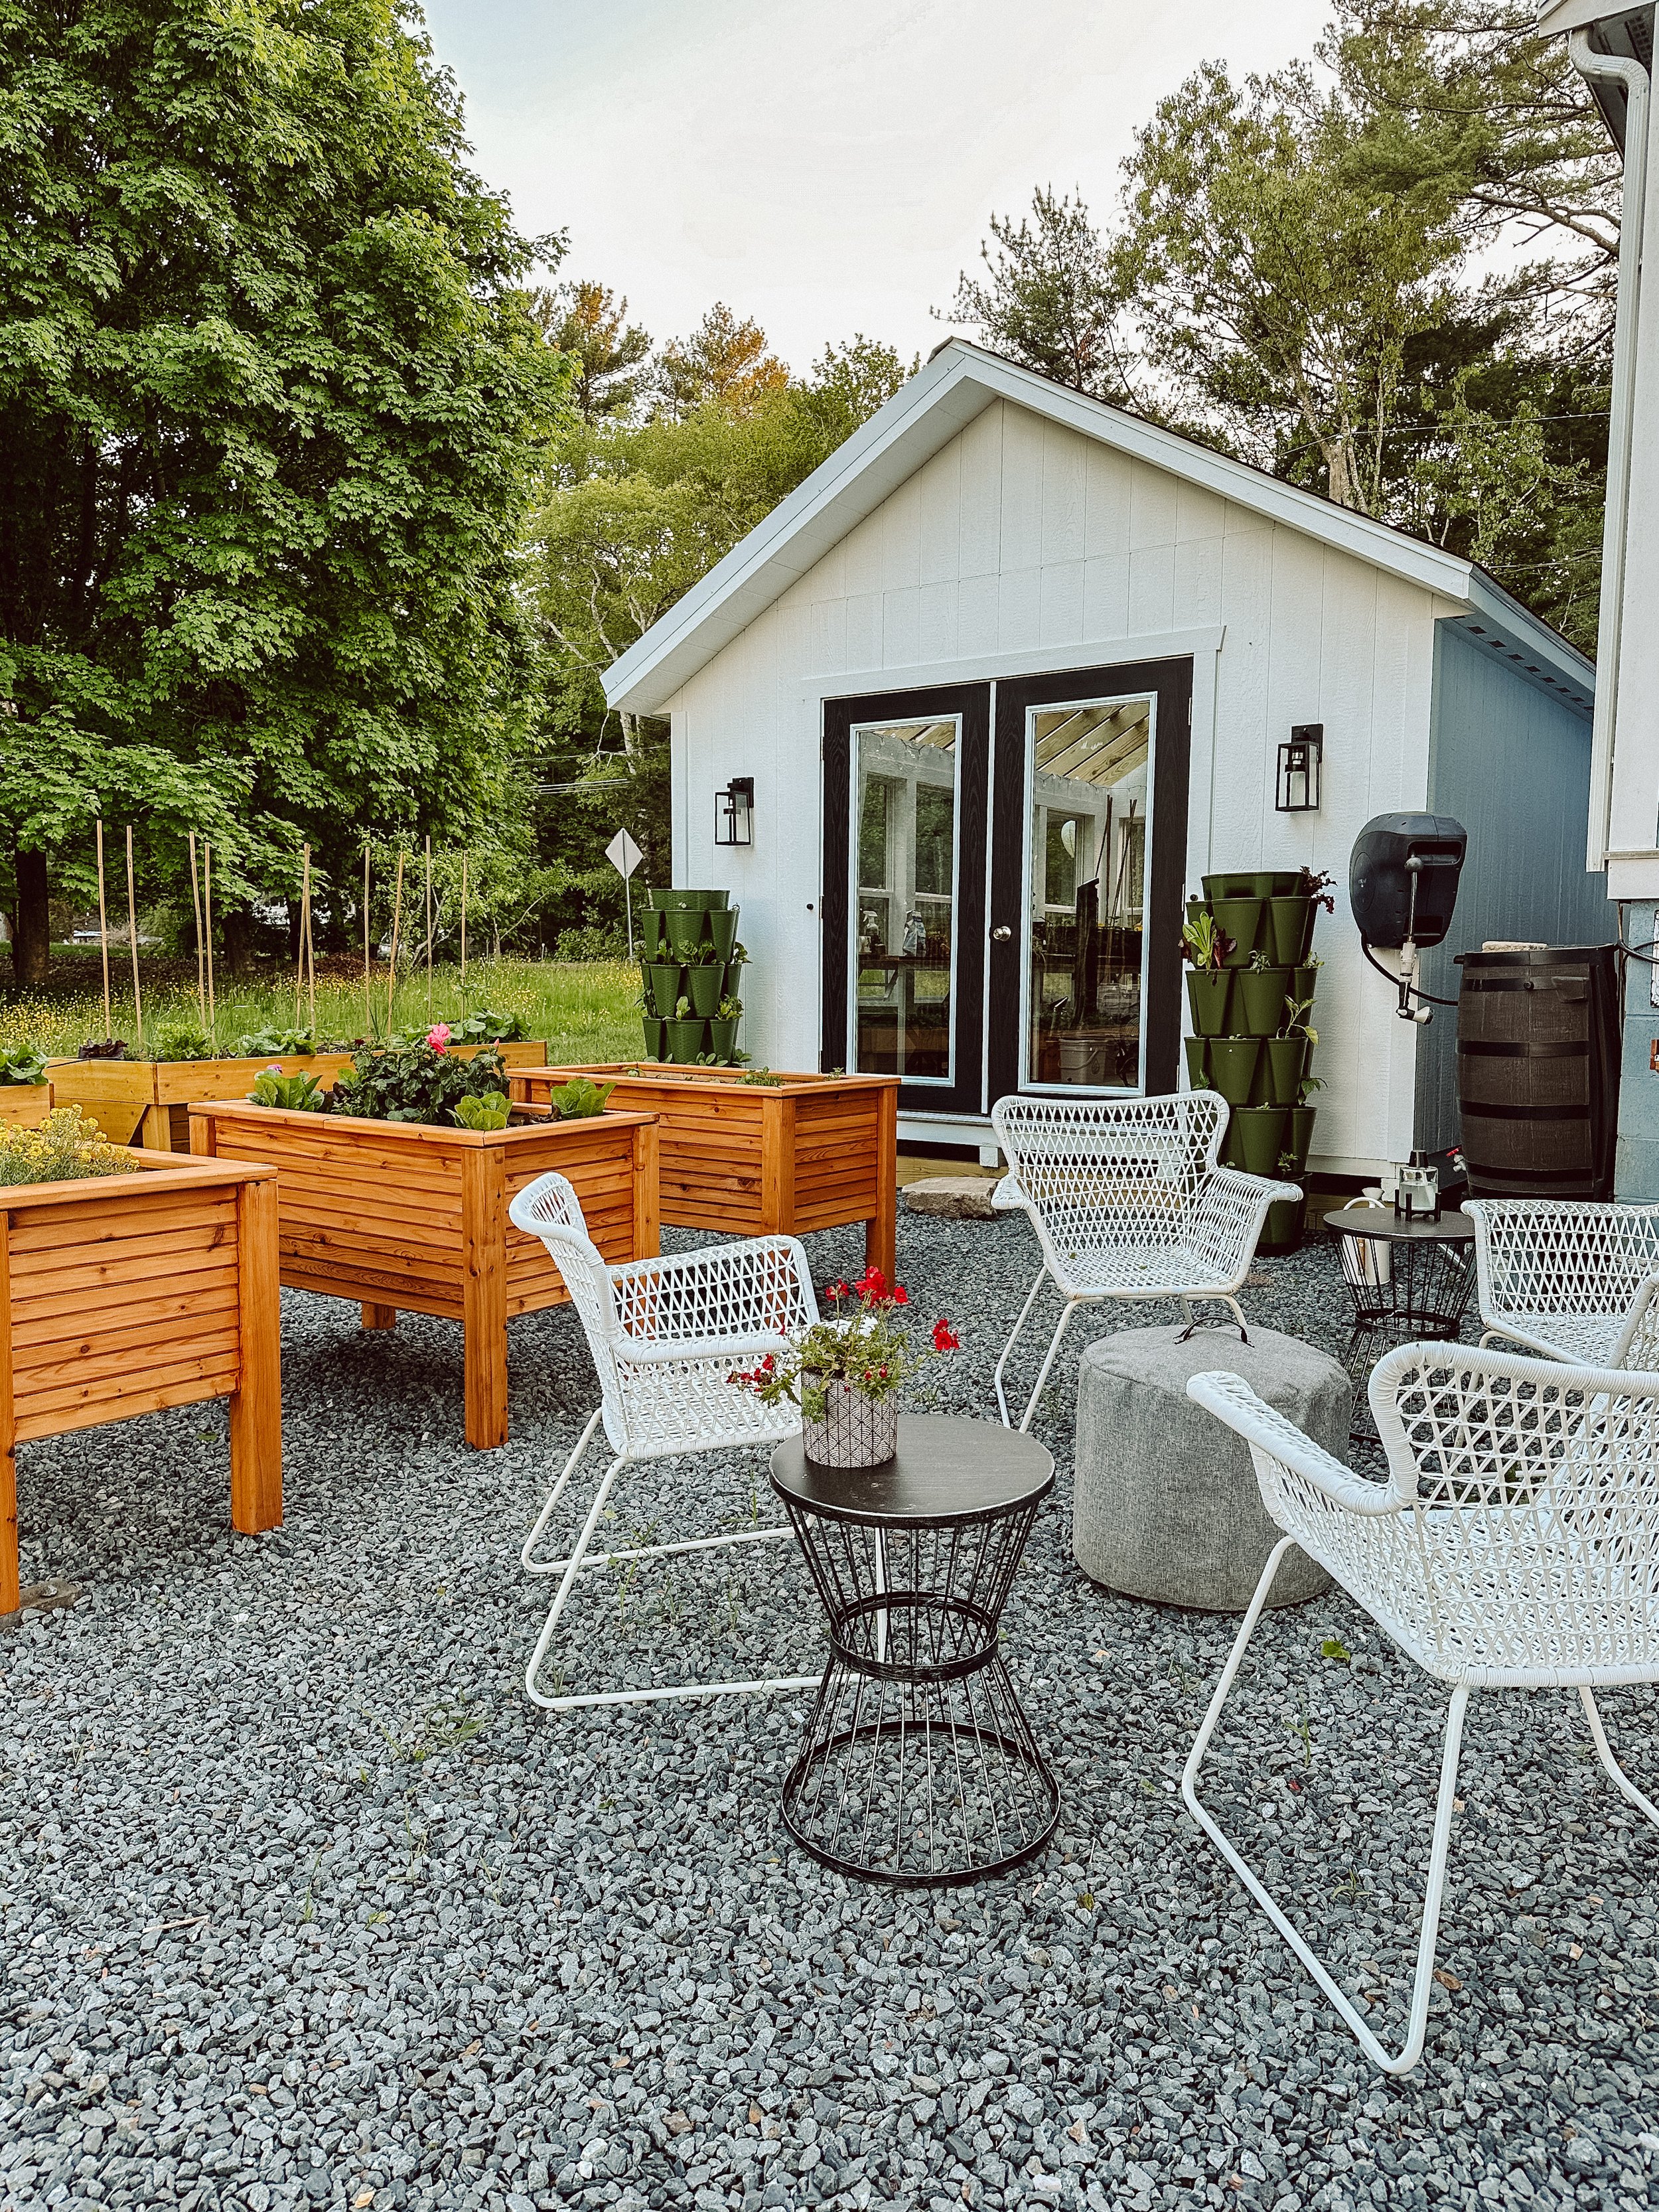
BACKYARD GARDENING MADE SIMPLE
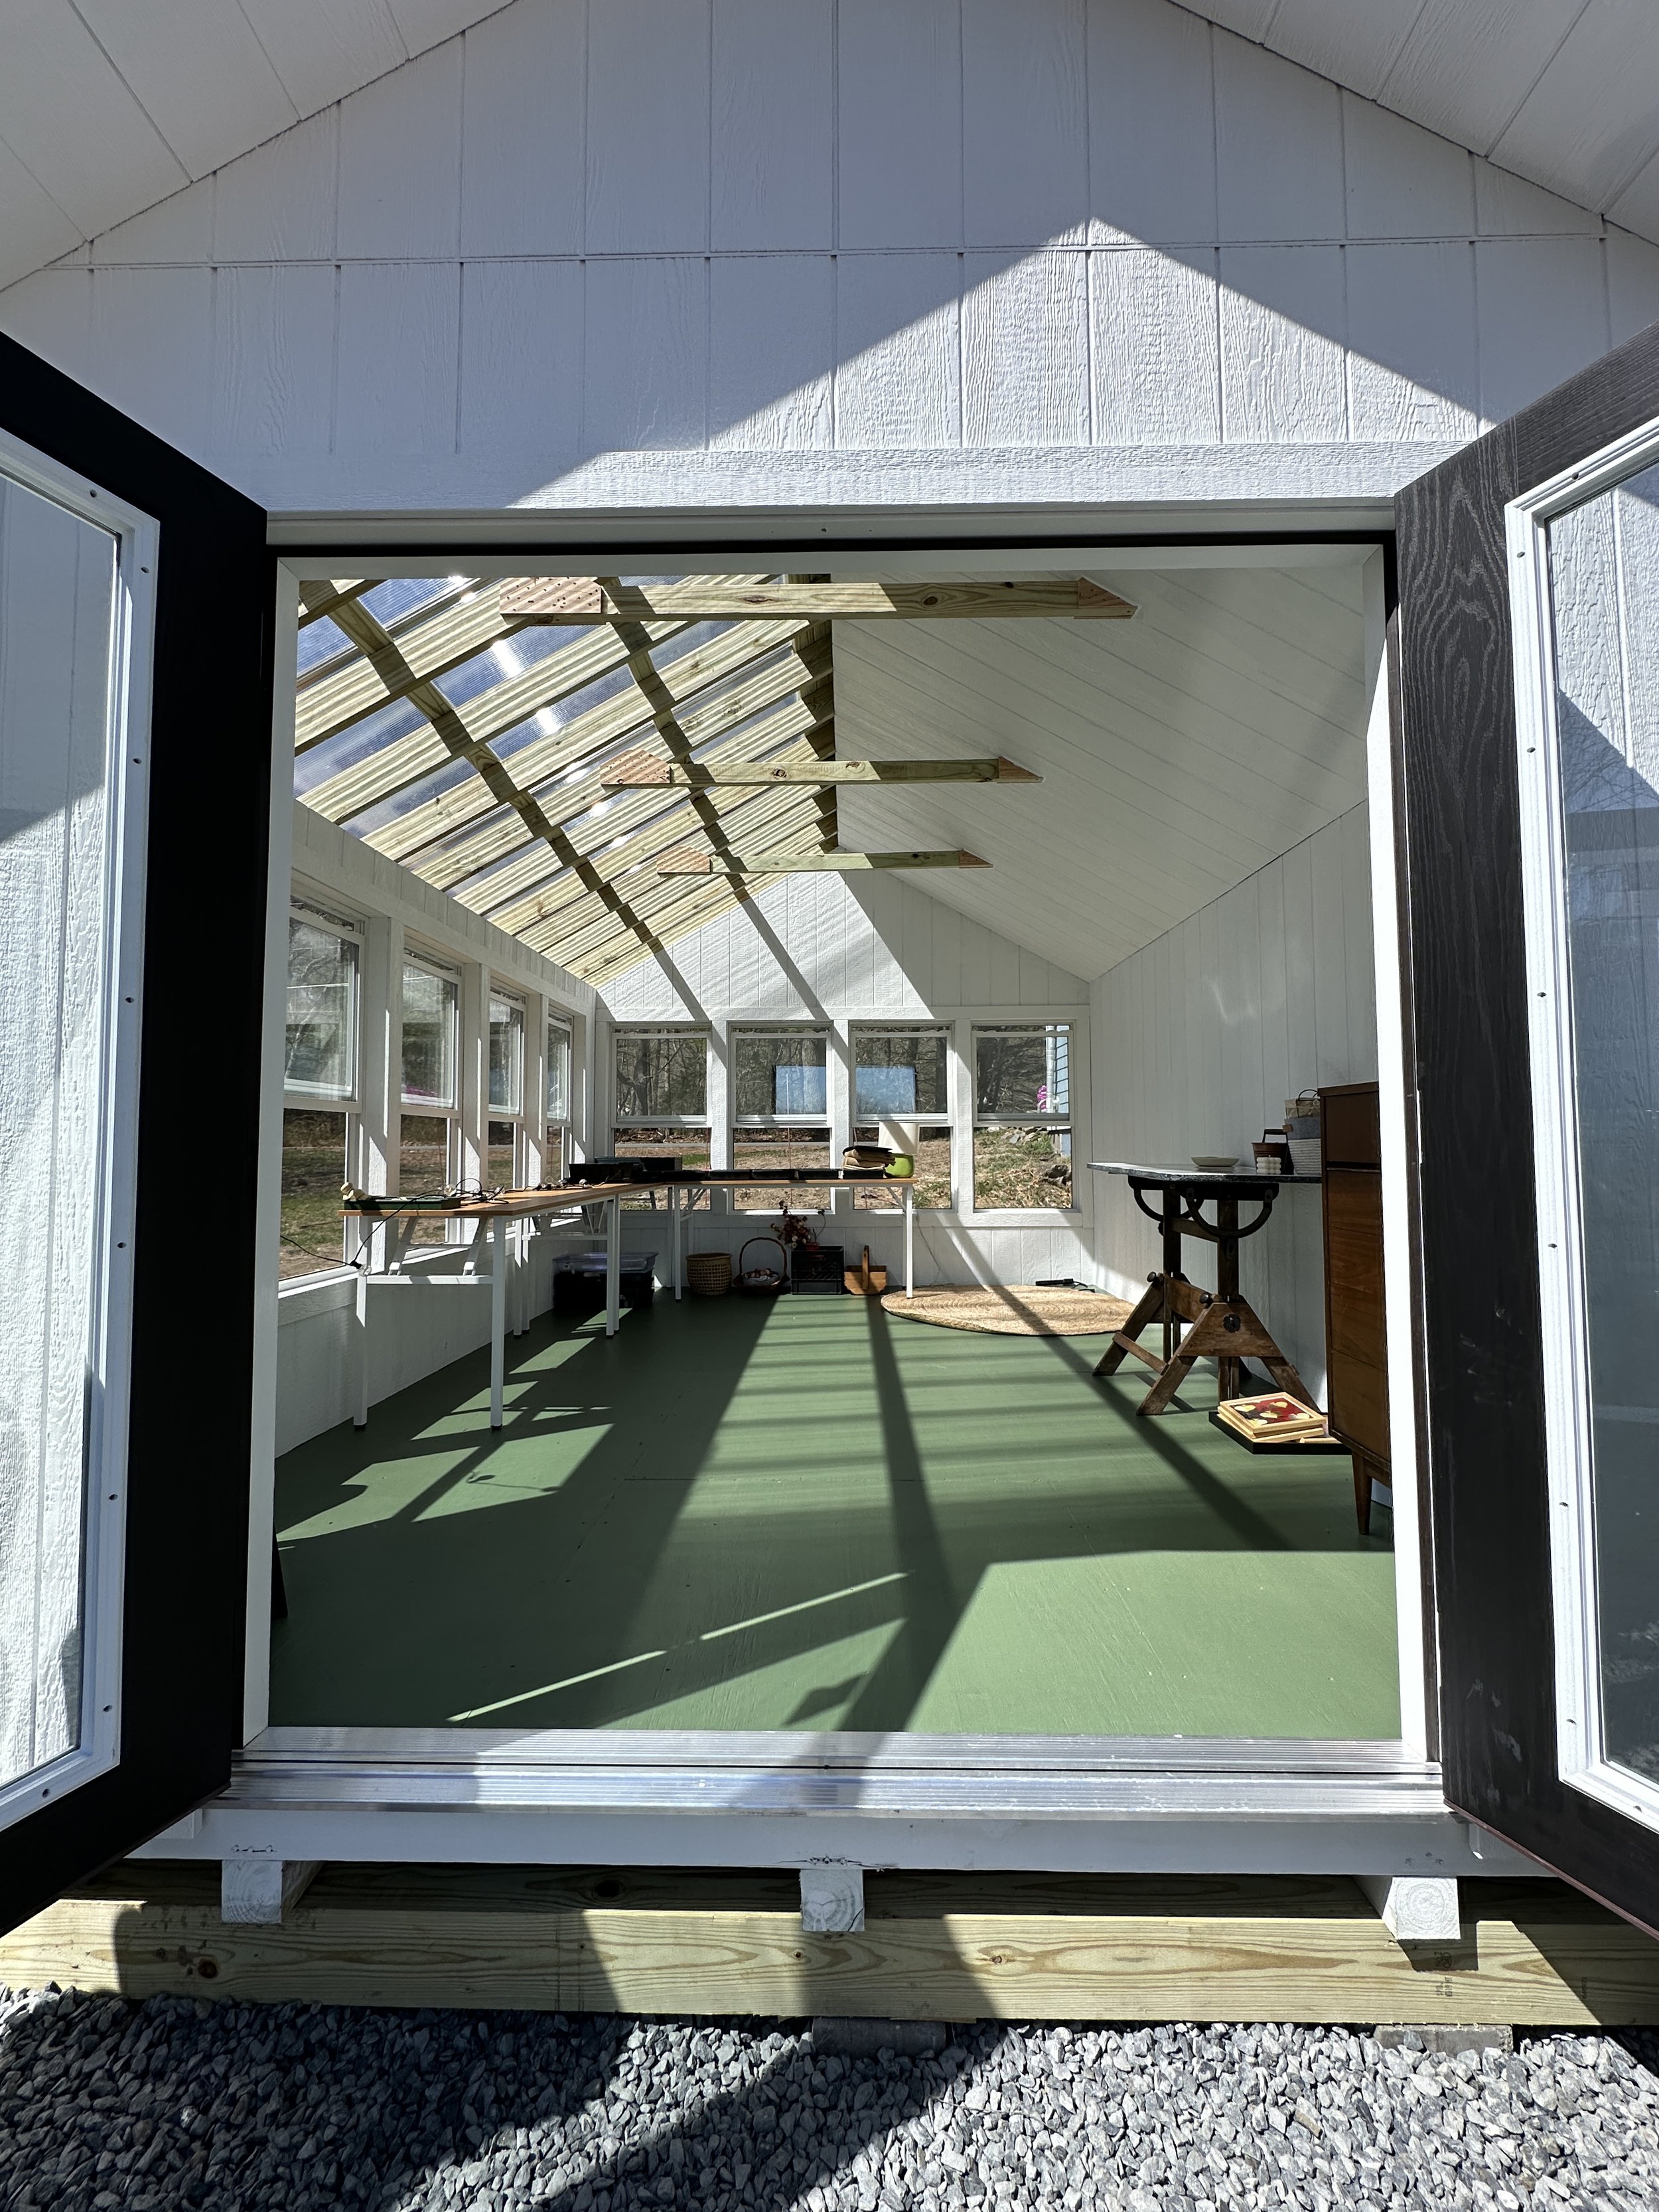
![Starting Seeds in a Greenhouse [Hometown Structures]](https://images.squarespace-cdn.com/content/v1/60e85024dc86d643da81c96a/52183bea-a751-44f0-a3fb-886eae74b696/IMG_9419.JPG)
Starting Seeds in a Greenhouse [Hometown Structures]
One of the things I was most excited about doing in my Hometown Structures Greenhouse is seed starting. With summer upon us, you might be thinking “seed starting is over for the year!” But if you’re trying to grow year round like I am, July and August are actually when we need to start planning our seed starting for our fall and winter gardens. So the cycle is beginning again and while a greenhouse makes seed starting easier in so many ways - with it comes some challenges that are unique to starting seeds in a greenhouse that we’re going to dive into today.

One of the things I was most excited about doing in my Hometown Structures Greenhouse is seed starting. With summer upon us, you might be thinking “seed starting is over for the year!” But if you’re trying to grow year round like I am, July and August are actually when we need to start planning our seed starting for our fall and winter gardens. So the cycle is beginning again and while a greenhouse makes seed starting easier in so many ways - with it comes some challenges that are unique to starting seeds in a greenhouse that we’re going to dive into today.
What’s the benefit of starting seeds in a greenhouse?
A greenhouse like mine from Hometown Structures allows you to control the temperature and environment, which means you can start seeds earlier in the spring than you would be able to outdoors. This gives your plants a head start on the growing season and can lead to a longer harvest.Greenhouses provide a more stable environment for seedlings to grow in, with consistent temperatures, humidity, and light. This can help to prevent them from becoming leggy or stressed, and can lead to stronger, healthier plants overall. You're also less limited to planting seeds that thrive in your local climate. A greenhouse allows you to grow plants that wouldn't normally survive outdoors in your area. Seedlings are vulnerable to pests, diseases, and harsh weather conditions. A greenhouse can help to protect them from these threats. And with a greenhouse, you have complete control over the environment your seeds are germinating in. This allows you to fine-tune the conditions to match the specific needs of each plant variety.
What are the key steps and considerations for successful seed germination?
Before Planting:
Choose high-quality seeds from a reputable source. Consider factors like your climate, desired harvest time, and gardening experience when selecting seeds. Different plants have different germination requirements. Research the specific needs of your chosen seeds, including ideal planting time, depth, light requirements, and any pre-treatment needs (like scarification or soaking). Seed packets often have this information. Use a well-draining, sterile seed starting mix. Avoid using garden soil directly, as it can be too dense and harbor pathogens.
Planting:
Plant seeds at the correct depth according to their size. A general rule is to plant seeds 2-3 times their diameter deep. Water the growing medium thoroughly before planting. After planting, keep the soil consistently moist but not soggy. A mister can be helpful for maintaining even moisture.Maintain the optimal temperature range for your seeds. Use a heat mat if necessary to provide warmth for seeds that prefer germination in warmer soil, and keep in mind that some seeds need light to germinate, while others prefer darkness. Follow the instructions for your specific seeds. You may need to cover the planting tray with plastic wrap or a humidity dome to retain moisture and create darkness if needed.
After Planting:
Once seedlings emerge, provide them with adequate light for strong growth. You may need to use grow lights if natural light is insufficient. Maintain consistent moisture levels. As seedlings grow, they will require more water. If you sowed multiple seeds per pot, thin them once seedlings have established true leaves to prevent overcrowding. Once seedlings have a few sets of true leaves, you can begin fertilizing them with a weak solution of liquid fertilizer.
Setting Up Your Greenhouse for Seed Starting
A clean environment is crucial for successful seed starting in your greenhouse. Seedlings are particularly vulnerable to fungal diseases and pests in their early stages. Fungus spores and bacteria that cause damping-off (a disease that attacks seedlings) can thrive in dirty environments. Sterilization helps eliminate these pathogens before they can harm your seedlings. Insects and other pests can also be attracted to leftover debris and organic matter. A clean environment reduces their harborage points. Cleanliness promotes healthy root development and prevents competition from unwanted microorganisms for nutrients and water.
Disinfecting Tools, Containers, and Surfaces:
Start by removing any leftover soil, plant material, or debris from your greenhouse, tools, and containers. A shop vac can be helpful for floors. Wash all surfaces, tools (pots, trays, trowels, etc.), and containers with warm, soapy water. This removes dirt, grime, and organic material that harbors pathogens.
There are a few options for disinfecting your greenhouse and equipment:
Bleach: Mix one part household bleach (5.25% sodium hypochlorite) to nine parts water. Soak containers and tools for 30 minutes. Rinse thoroughly afterwards. Caution: Bleach is corrosive and can damage some materials. Wear gloves and work in a well-ventilated area. Never mix bleach with other cleaning products.
Hydrogen Peroxide (3%): This is a gentler alternative to bleach. Apply directly to clean surfaces and tools with a spray bottle. Let it sit for at least 20 minutes, then wipe clean with a damp cloth. Hydrogen peroxide is safe for most materials.
Alcohol (70%): Similar to hydrogen peroxide, apply directly to clean surfaces and tools. Let it sit for a few minutes, then wipe clean. Alcohol evaporates quickly, making it a convenient option.
While new containers are generally sterile, it's still wise to wash them with soapy water before use. Allow everything to dry completely before using them for seed starting. Moisture can encourage fungal growth. Wash down greenhouse walls, floors, and benches with your chosen disinfectant solution. It's a good practice to clean and disinfect your greenhouse and equipment between each planting season.
Now that your tools are clean and sterilized, you can set your greenhouse up for success by organizing everything before you get started to optimize seed germination and seedling growth. Dedicate a well-lit, easily accessible area for seed starting. Shelving or a designated seed starting table is ideal. This area should be close to a water source for easy watering. Once seedlings emerge, they'll need space for continued growth. Staggered shelves or benches will maximize space utilization. Consider using a mobile bench for flexibility. Allocate space for storing seeds, pots, trays, tools, and other supplies. Hanging shelves, cabinets, or a designated storage area will keep things organized and within reach.
Optimizing Seed starting Conditions
Group plants together based on their light requirements. Seedlings needing high light should be placed closest to the light source (windows or grow lights). Shade-loving plants can be placed on lower shelves. Arrange plants according to their temperature needs. Heat mats can be used on lower shelves for warmth-loving seeds. A thermometer can help you monitor temperature variations within the greenhouse. Ensure proper air circulation to prevent fungal diseases. Avoid overcrowding plants and position them to allow for airflow between them. You may need to use small fans to create gentle air movement.
Utilize vertical space with shelves or hanging racks to maximize your limited footprint, and clearly label each pot or tray with the plant variety, planting date, and any special instructions. This will help you stay organized and track progress. Arrange everything to allow for easy access for watering, monitoring, and transplanting seedlings. Avoid placing heavy objects on high shelves. Use trays with wheels or place them on rolling benches for easy movement and rearranging. Use drip trays under pots to catch excess water and prevent moisture build-up on lower shelves.
Seed starting containers
Seedling trays
Trays come with multiple cells and are ideal for starting small seeds or seeds that don't require deep planting. Standard propagation tray have shallow cells (1-2 inches deep) and are perfect for starting most flower and vegetable seeds. Deep cell trays have a depth of 3-4 inches and are suitable for seeds with longer taproots. Choose a tray size that fits your workspace and the number of seeds you plan to start.
Pots
Individual pots are ideal for larger seeds or plants that need more root space early on. 3-4 inch pots are perfect for transplanting seedlings from trays or for starting larger seeds like tomatoes or peppers.
Small seeds don't need deep pots. Shallow trays or pots with minimal depth (1-2 inches) are sufficient. Larger seeds benefit from deeper pots (3-4 inches) to accommodate developing roots. Plastic is the most affordable and durable option. Biodegradable pots are eco-friendly but may dry out faster and are not reusable. Ensure your pots or trays have drainage holes to prevent waterlogging, which can rot seeds and seedlings.
Ideal Soil Mix for Seed Starting
Seedlings need a well-draining, sterile, and lightweight potting mix to germinate and grow successfully. Look for a mix that contains peat moss, perlite, and vermiculite. These ingredients provide good drainage, aeration, and moisture retention. Many seed starting mixes are available commercially and are formulated specifically for seedlings. These are a convenient option. Avoid using garden soil directly for seed starting. It can be too dense, harbor pathogens, and contain weed seeds.
Selecting Seeds and Planning Timing for Greenhouse Seed Starting
Choose seeds suited to your local climate. Consider factors like your growing season length and average temperatures. Pay attention to "days to maturity" listed on seed packets. This helps you plan your planting schedule to ensure your harvest falls within the frost-free window. Purchase seeds from reputable sources to ensure good quality and germination rates.
The key to successful seed starting is timing your plantings to coincide with the last frost date in your area. This is the average date of the last light frost in spring. You can find this information through websites like the Old Farmer's Almanac (https://www.almanac.com/gardening/frostdates) which allow you to search by zip code. Once you know your last frost date, you can create a seed-starting calendar. Look for the "days to maturity" listed on each seed packet. Count back the number of "days to maturity" from your last frost date. This will give you the recommended date to sow your seeds indoors. Add some buffer days to account for seed germination time (usually 5-10 days). This will give you your ideal seed starting date. Tender plants like tomatoes, peppers, and eggplants benefit the most from starting indoors for an earlier harvest. Consider staggering your plantings throughout the season to extend your harvest window. For some fast-growing vegetables like lettuce or spinach, you can practice succession planting. Sow seeds every few weeks directly outdoors after the last frost date for a continuous harvest.
Selecting suitable varieties for seed starting is crucial and requires considering your climate, growing season, available space, and seed quality. Choose varieties suited to your average temperatures. Consider both warm and cool season crops. Some plants won't tolerate frost, while others may even benefit from a light frost. Seed packets will typically indicate temperature preferences. Pay attention to a plant's light requirements (full sun, part shade, etc.). Not all plants will thrive in the amount of sunlight your greenhouse receives. Select varieties with maturity dates that fall within your frost-free window. Short season varieties are ideal for areas with shorter growing seasons. Consider how long each variety takes to mature from seed to harvest. Stagger plantings throughout the season for a continuous harvest.
Choose varieties that will fit comfortably within your greenhouse space when fully grown. Consider dwarf or compact varieties for limited space. Tomatoes, for example, come in bush and vining varieties, with bush tomatoes requiring less vertical space. Some plants sprawl outwards, while others grow vertically. Factor in the mature size and growth habit when choosing varieties to optimize space usage.
High-quality seeds from reputable sources will have better germination rates, meaning more seeds will sprout successfully. This saves you time and resources. Consider varieties with resistance to common diseases in your area. This can help reduce problems and improve your harvest. Heirloom varieties may have lower yields but produce seeds you can save for future plantings. Hybrids are often bred for high yields and disease resistance but don't produce true seeds. Choose vegetables, herbs, or flowers you and your family love to eat or use and once you have the basics down, try new and interesting varieties to expand your gardening experience.
Optimizing seed germination in your greenhouse
As mentioned before, using fresh, high-quality seeds from reputable sources increases your chances of successful germination. Some seeds require specific treatments like scarification (nicking the seed coat) or stratification (exposure to cold temperatures) to break dormancy and encourage germination. Research the needs of your specific seeds. Follow the recommended planting depth on seed packets. Planting too deep can hinder germination. Keep the growing medium evenly moist but not soggy. A mister can be helpful for maintaining consistent moisture levels. For seeds that prefer warm soil temperatures for germination, use a heat mat placed under your seed trays. Some seeds need light to germinate, while others prefer darkness. Follow the instructions on the seed packet. You may need to cover trays with plastic wrap or a humidity dome to retain moisture and create darkness if needed. Maintain some air circulation to prevent fungal diseases. Avoid overcrowding seedlings or creating stagnant air pockets. And clearly label each pot or tray with the plant variety, planting date, and any special instructions. This will help you track progress and avoid confusion.
Optimal Temperature and Humidity for Seed Germination
Different plant varieties have specific temperature ranges for optimal germination. Seed packets typically indicate the ideal temperature range. A general guideline is that Warm Season Crops (like tomatoes, peppers, eggplants) prefer temps between 70-80°F (21-27°C) and Cool Season Crops (like lettuce, spinach, kale prefer temps between 60-70°F (16-21°C)
Most seeds benefit from high humidity during germination. You can achieve this by covering seed trays with a clear plastic dome that helps trap moisture around the seeds and lightly misting the surface of the growing medium with a spray bottle to keep it moist. Use a thermometer and hygrometer to monitor temperature and humidity levels in your greenhouse. Make adjustments as needed to maintain optimal conditions for your seeds.
Seed germination is highly sensitive to temperature fluctuations. Maintaining a consistent temperature within the optimal range for your specific seeds is crucial for successful seed starting in your greenhouse. Enzymes play a vital role in seed germination. Consistent temperatures ensure optimal enzyme activity, which is essential for seed development and sprouting.Consistent temperatures promote even and synchronized germination across all your seeds within a tray. Fluctuations can lead to some seeds germinating earlier or slower than others, creating uneven growth. Seeds germinating in stable temperatures develop stronger root systems and shoots, leading to healthier and more vigorous seedlings overall.
Maintaining Consistent Temperature in a Greenhouse
Need to warm things up? Heat mats provide gentle bottom heat to the growing medium, raising the soil temperature to the desired level for germination. This is particularly beneficial for seeds that prefer warm soil temperatures. Place seed trays directly on top of a heat mat set to the recommended temperature for your seeds.
While maintaining warmth is important, proper ventilation is equally crucial. Ventilation helps prevent excessive heat build-up and removes excess moisture, which can lead to fungal diseases. Open vents or use fans strategically in your greenhouse to promote air circulation. However, avoid creating drafts that can chill seedlings. Use a thermometer to monitor the temperature in your greenhouse at different locations and times of the day. This will help you identify any hot or cold spots and adjust positioning or ventilation accordingly.
Do I need to use lights in my greenhouse?
Whether you need artificial lights for seed starting in your greenhouse depends on several factors. The primary factor is the amount of natural light your greenhouse receives. South-facing greenhouses with ample sunlight may not require artificial lights for all seeds. Different plants have varying light requirements. Some seeds germinate in darkness, while seedlings need sufficient light for healthy growth after germination. Research the specific needs of your chosen seeds. The length of daylight hours during your planting season also plays a role. Seedlings started in the shorter days of winter or early spring may benefit from supplemental lighting.
Greenhouses with limited natural light due to north-facing orientation, shading from trees, or insufficient window space will benefit from artificial lights. Seeds that require long periods of bright light for healthy growth, like tomatoes, peppers, and eggplants, may need supplemental lighting even in a well-lit greenhouse, especially during the shorter daylight hours. And if you're starting seeds very early in the season before daylight hours are long enough, or if you want to extend your growing season into fall, artificial lights will be necessary to provide sufficient light for seedlings. LED Grow Lights are the most popular and energy-efficient option for seed starting. They come in various sizes and spectrums suitable for seedling growth.
Watering and Humidity Management in a Greenhouse

Watering seeds in a greenhouse requires a delicate balance to avoid soil compaction, surface disturbance, and maintain optimal humidity for germination. Bottom watering is an excellent method for seed trays. Place the trays in a shallow dish filled with water. The water will wick up into the growing medium evenly, moistening the soil from below without disturbing the seeds or compacting the surface. You can also use a fine spray mister to gently apply water directly to the soil surface. Avoid using a forceful stream that can dislodge seeds or splash potting mix.
Controlling Humidity
Humidity Domes trap moisture around the seeds, creating a mini greenhouse environment with high humidity. They are particularly helpful during the germination stage for most seeds. While domes maintain humidity, it's crucial to provide some ventilation to prevent fungal diseases. Lift the domes slightly or create small ventilation holes to allow for some air circulation. Reduce reliance on domes as seedlings emerge. Group trays with similar moisture needs together. This allows you to target specific areas for humidity control. Instead of soaking the soil completely, alternate between light watering and misting the surface to maintain consistent moisture without oversaturation.
Use your finger to check the moisture level of the soil. The top inch should feel moist but not soggy. As seedlings mature, their watering needs will change. You may need to transition from misting to watering the soil directly as root systems develop. Once seedlings emerge, you may need to thin them to prevent overcrowding. This will improve air circulation and reduce competition for moisture and light.
Transplanting greenhouse Seedlings
Recognizing when your seedlings are ready for transplanting in your greenhouse is crucial for their successful establishment and growth. Most seedlings are ready for transplanting once they have developed several sets of true leaves (usually 2-4 sets) beyond the initial cotyledons (seed leaves). The stem should be thick and sturdy enough to support the seedling when transplanted. Avoid transplanting seedlings with thin, weak stems.The seedling should have reached a height appropriate for the variety. Refer to seed packet information or plant labels for specific guidelines.
Check the roots of the seedlings in their pots. If they appear root-bound, with roots circling the bottom or sides of the pot, it's definitely time to transplant. Look for healthy, white roots that are well-developed and branching out. Avoid transplanting seedlings with stunted or discolored roots. Seedlings should appear healthy and vigorous, with good color and no signs of disease or pests. When the second set of true leaves start touching their neighbors in the pot, it can also indicate they're ready for more space.
Fungus Gnats While Seed Starting in a Greenhouse
Adult fungus gnats are weak fliers and dislike moving air. Using small fans to create gentle air circulation can disrupt their breeding activity and make your greenhouse less hospitable to them. Fungus gnats thrive in moist environments. Bottom watering helps target moisture delivery to the root zone, minimizing excess moisture on the soil surface where fungus gnats lay their eggs.
Bacillus Thuringiensis Israelensis (BTI) is a biological larvicide that specifically targets fungus gnat larvae in the soil. It's a safe and effective option for organic gardening. Follow the product instructions for mixing and application rates. BTI is typically available as a powder or liquid concentrate that you can mix with water and drench the potting mix or use when bottom watering. Repeat applications every 2-3 weeks, especially during periods of high humidity or warm temperatures when fungus gnat populations tend to be higher.
Sticky traps won't eliminate fungus gnats entirely, but they can help monitor adult populations and track the effectiveness of your control methods. Place them near fungus gnat breeding areas, like around potted plants.
The key to controlling fungus gnats is using an integrated approach that combines these methods. By creating a less favorable environment for fungus gnats to breed (air circulation, bottom watering) and eliminating existing larvae (BTI), you can significantly reduce their population. Sticky traps will help you monitor their activity and adjust your control methods as needed. Remember, consistency is key! By implementing these practices regularly, you can effectively prevent fungus gnats from becoming a nuisance in your greenhouse and ensure a healthy environment for your plants.
Looking for a high quality pre-made greenhouse in Massachusetts? Hometown Structures offers the finest craftsmanship with custom designs in a wide variety of sizes perfect for the home gardener to give your plants the perfect climate to thrive in a protected environment, keep pests away from your plants, grow plants and food that don’t otherwise exist in your area/climate and extend your season with options including 8mm twin wall polycarbonate for optimal insulation, venting and windows. Every custom shed greenhouse comes with 50-Year LP Siding and 30-Year Collapse From Snow Warranty.
Tap here to visit their website to learn more and book a design consultation today.
![Where To Put A Greenhouse [Hometown Structures]](https://images.squarespace-cdn.com/content/v1/60e85024dc86d643da81c96a/307df33c-1e3a-430d-bf29-f07b1366d206/exported_A1716BE8-20F2-411F-A3BA-04FE5100085E.JPEG)
Where To Put A Greenhouse [Hometown Structures]
Probably the most important decision you will make in the process of designing, building and installing a greenhouse is choosing exactly where the final greenhouse structure will go. Pick the wrong spot and you’ll struggle with everything from temperature regulation to plant health to day to day functionality. Pick the right spot, and your greenhouse garden will be able to thrive.

Where Should You Put a Greenhouse?
Probably the most important decision you will make in the process of designing, building and installing a greenhouse is choosing exactly where the final greenhouse structure will go. Pick the wrong spot and you’ll struggle with everything from temperature regulation to plant health to day to day functionality. Pick the right spot, and your greenhouse garden will be able to thrive.
The elements ultimately dictate the best spot for your greenhouse more than any other factor, because sun and wind impact plant health the most. You probably already know that plants use sunlight as the primary energy source for photosynthesis, the process by which they convert light energy into food (glucose) - and adequate sunlight is vital for healthy growth, strong stems, and proper flower and fruit development. The amount of light a plant needs varies depending on the species. Some plants thrive in full sun, while others prefer partial shade. The total daily duration of sunlight also plays a role, with longer daylight hours generally promoting increased growth and productivity. But we want to be able to grow the widest variety of plants possible, so we need to learn the sun’s habits in your sky.
How to Track Your Sunlight
The sun's position in the sky changes throughout the day and seasons, and the intensity of sunlight varies depending on the time of day. Midday sun provides the strongest light, while morning and afternoon sun are less intense. Plants may have different needs for high-intensity vs. lower light periods. Throughout the day, surrounding structures and trees may cast shadows on your planting area. Knowing how these shadows move is essential to ensure your plants receive adequate sunlight during critical growth periods. Plus, the length of daylight hours changes significantly throughout the year.
There are several tools available to help you track sunlight patterns for your specific location. Websites and mobile apps allow you to enter your address and see the path of the sun across the sky at different times of the day and throughout the year. This helps visualize shading patterns and sunlight duration. Sunlight maps provide information about average daily sunlight hours in different regions. They can be helpful for understanding broad sunlight patterns in your area.
Ideal Sunlight Conditions for a Greenhouse
Plants have varying sunlight needs depending on the species. Full sun plants require at least 6-8 hours of direct sunlight daily for optimal growth and production. Examples include tomatoes, peppers, eggplants, most herbs, and many flowering plants. Partial shade plants prefer 4-6 hours of direct sunlight daily, with some protection from the afternoon sun. Examples include lettuce, spinach, kale, some herbs, and certain shade-tolerant flowers. Full shade plants thrive in areas with little to no direct sunlight. Examples include hostas, ferns, begonias, and impatiens.
Beyond these categories, some plants have even more specific sunlight preferences. Day length-sensitive plants require a specific number of daylight hours to flower or fruit. For example, some vegetables need long days to trigger flowering, while others are day-neutral and will flower regardless of day length.
What about wind?
Strong winds can physically damage delicate leaves and stems, stunt growth, and even uproot young plants. Excessive wind can also increase water loss through transpiration, stressing the plant. However, gentle air movement is beneficial for plants. It helps to strengthen stems, discourages fungal diseases (which thrive in still air), and aids in pollination. You should try to identify the prevailing wind directions in your backyard before deciding where to put a greenhouse. Prevailing winds are the winds that blow most frequently from a particular direction in your location. Knowing this helps you in several ways - Ideally, the long axis of your greenhouse should run perpendicular to the prevailing winds (but sun direction should take precedent). This allows wind to flow smoothly past the sides, minimizing stress on the structure, and through open doors and windows you can also position vents and fans to take advantage of prevailing winds for natural ventilation, drawing out hot air during warm seasons.
Strategically placed windbreaks can help to deflect strong winds away from the greenhouse structure while still allowing for air circulation through vents on the opposite side. Natural ventilation is most effective on breezy days. For consistent climate control, consider using a combination of natural ventilation and supplemental fans or ventilation systems, especially during calm periods or hot weather.
Making Your Greenhouse Accessible
Easy access to your plants allows for regular monitoring of their health, timely watering and fertilization, and prompt identification and treatment of any pest or disease problems. When you can easily reach your plants, you're less likely to cause accidental damage while tending to them. This minimizes stress on the plants, allowing them to focus their energy on growth and production. A well-placed greenhouse not only provides the perfect environment for your plants but also ensures ease of use and enjoyment.
Importance of Easy Access to Water for Irrigation
Greenhouse plants often require frequent watering, especially during hot weather or when growing water-loving plants. Having a close water source minimizes the time and effort spent on watering, allowing you to focus on other aspects of plant care. Easy access to water encourages consistent watering practices, reducing the risk of underwatering or overwatering your plants. Underwatering can stress plants and stunt growth, while overwatering can lead to root rot and other problems.
The ideal irrigation system for your greenhouse depends on its size, water source proximity, and the type of plants you grow. If your greenhouse is close to an outdoor faucet, you can directly connect a hose for watering. This is a simple and cost-effective solution for small greenhouses.
Installing a rainwater harvesting system can provide a sustainable source of water for your greenhouse, especially if you have a nearby roof or gutters. This is an eco-friendly option that reduces reliance on municipal water supplies.
For larger greenhouses or those located farther from a water source, a drip irrigation system can be a water-saving and efficient solution. Drip irrigation delivers water directly to the base of each plant, minimizing waste and maximizing water uptake by the roots.
Ease of Transporting Supplies
Greenhouse gardening often involves moving supplies like potting mix, fertilizer, tools, and harvested produce. A convenient location minimizes the distance you need to travel with these items, saving time and effort. Consider how you will transport larger items like bags of potting mix or wheelbarrows full of plants. Having a clear path and easy access to the greenhouse entrance is important. Wide doorways and walkways will make it easier to maneuver these items.
Does soil quality matter in a greenhouse?
If you plan on planting directly into the ground inside your greenhouse, good quality soil is essential for optimal plant growth. The soil should be fertile, well-draining, and have the appropriate pH level for your chosen plants. If the existing soil quality is poor, you may be able to amend it by adding organic matter like compost or aged manure. However, extensive amendments can be time-consuming and labor-intensive. In some cases, it might be easier to bring in fresh, high-quality topsoil.
Poor drainage can lead to waterlogging, where the soil becomes saturated and suffocates plant roots. This can cause root rot and hinder plant growth. A well-draining location is crucial for healthy plants. Ideally, the greenhouse should be placed on level ground to ensure proper water flow and drainage. Uneven ground can create pockets of waterlogging in low-lying areas.
If the existing soil is unsuitable or amending it seems impractical, you can opt for container gardening within your greenhouse. This allows you to use high-quality potting mix specifically chosen for your plants' needs.
Before finalizing your greenhouse location, it's wise to conduct a soil test. This will reveal the existing soil quality, pH level, and nutrient content. The test results can guide you in deciding whether amending the soil, bringing in topsoil, or opting for container gardening is the best approach. If the chosen location has good soil quality but poor drainage, consider grading the land to improve water flow away from the greenhouse. Installing drainage ditches or a French drain system can also be helpful.
How Does Climate Impact Greenhouse Location?
Understanding your local climate will help you create a greenhouse environment that thrives year-round. Research the average high and low temperatures in your area throughout the year. This will help you determine the heating and cooling needs for your greenhouse. Consider the potential for extreme temperatures, both hot and cold. This will help you choose appropriate ventilation strategies and select greenhouse materials that can withstand these extremes.
Even within a specific climate zone, there will be variations throughout the year. The angle of the sun changes throughout the year. In some cases, strategically positioning your greenhouse can take advantage of seasonal sunlight variations. For example, a south-facing greenhouse might be ideal for maximizing winter sunlight in colder climates. For hot summer months, consider implementing temporary shade solutions like shade sails or retractable awnings. This can help regulate temperature and prevent scorching of plants.
Zoning rules and your greenhouse
Before finalizing your greenhouse location, it's crucial to understand any zoning regulations and permitting requirements that might apply in your area. Different zoning districts may have regulations regarding the size, location, and type of structures allowed. These regulations can impact where you can place your greenhouse on your property. For example, there might be restrictions on how close the greenhouse can be to property lines or setbacks from the street.
Greenhouse classification: Depending on the size and intended use of your greenhouse, it might be classified as an accessory structure or a commercial operation. This classification can influence the applicable regulations.
Most localities require permits for building permanent structures, including greenhouses. The specific permit requirements can vary depending on the size and complexity of your greenhouse. The best way to determine the specific zoning regulations and permitting requirements in your area is to contact your local building department or zoning office. They can provide you with detailed information and any necessary forms or applications. Many municipalities have their zoning codes and permit information available online, but if you're unsure about the regulations or the permitting process, consider consulting with a contractor or architect familiar with local building codes. They can help you navigate the process and ensure your greenhouse project complies with all applicable regulations.
Future Proof Your Greenhouse
Greenhouses are long-term investments, and your needs and gardening aspirations may evolve over time. It’s important to future-proof your greenhouse by thinking ahead and planning for growth. Choose a location that allows for potential expansion of the greenhouse structure in the future. Consider how much additional space you might need to accommodate more plants, add work areas, or incorporate storage solutions. Think about whether you might want to add features like a potting bench, cold frame, or misting system in the future. Leaving some extra space around the perimeter will allow for these potential additions. That’s why it’s important to choose a location that provides easy access to all sides of the greenhouse. This will be helpful if you need to make modifications to the structure, electrical wiring, or ventilation system in the future. If you anticipate needing additional electrical outlets, water spigots, or heating elements in the future, consider burying conduit lines during initial construction. This will minimize disruptions when adding these features later.
Looking for a high quality pre-made greenhouse in Massachusetts? Hometown Structures offers the finest craftsmanship with custom designs in a wide variety of sizes perfect for the home gardener to give your plants the perfect climate to thrive in a protected environment, keep pests away from your plants, grow plants and food that don’t otherwise exist in your area/climate and extend your season with options including 8mm twin wall polycarbonate for optimal insulation, venting and windows. Every custom shed greenhouse comes with 50-Year LP Siding and 30-Year Collapse From Snow Warranty.
Tap here to visit their website to learn more and book a design consultation today.
![How Do Greenhouses Work? [Hometown Structures]](https://images.squarespace-cdn.com/content/v1/60e85024dc86d643da81c96a/7540ba0c-aebf-43b7-b204-830b61847e4a/F4758A4C-4751-419D-AA9C-CAB30DECDBC1.JPG)
How Do Greenhouses Work? [Hometown Structures]
A greenhouse is a structure primarily made of transparent materials, such as glass or plastic, designed to cultivate plants by harnessing sunlight and creating a controlled and protected growing environment. The purpose of a greenhouse is to extend the growing season for plants, protect them from adverse weather conditions like frost, excessive heat, or strong winds, and provide an optimal environment for growth by regulating temperature, humidity, and light levels.
What is the Purpose of a Greenhouse?
A greenhouse is a structure primarily made of transparent materials, such as glass or plastic, designed to cultivate plants by harnessing sunlight and creating a controlled and protected growing environment. The purpose of a greenhouse is to extend the growing season for plants, protect them from adverse weather conditions like frost, excessive heat, or strong winds, and provide an optimal environment for growth by regulating temperature, humidity, and light levels. They allow you to grow plants that may not otherwise grow well in your climate. Greenhouses are used for various purposes, including growing flowers, vegetables, fruits, and ornamental plants, as well as for research and experimentation in agriculture and botany. They are essential for commercial farming, allowing growers to produce crops year-round in regions with harsh climates or limited growing seasons.
Different types of greenhouses
Traditional/Even-Span Greenhouses are the most common type, characterized by a gable roof and straight sidewalls. They offer good space utilization and are suitable for a wide range of crops. However, ventilation options are more limited and they are susceptible to snow accumulation on the roof.
Quonset greenhouses have a semicircular shape, providing good wind resistance and snow shedding capabilities. They are often used in areas with harsh weather conditions. The main complaints with this style of greenhouse are less usable growing space compared to traditional designs and limited headroom near the sides.
Lean-To are attached to an existing structure, such as a house or a building, on one side. They are space-efficient and cost-effective, making them ideal for small gardens or limited spaces. Sunlight exposure may be limited depending on orientation and they may require modifications to the existing structure for proper attachment.
Dome-shaped structures offer excellent strength and stability, along with efficient use of space. They are popular for their aesthetic appeal and suitability for geodesic designs. However, their construction is more complex and there is limited headroom near the edges.
A-Frame structures have a triangular shape resembling the letter "A." They provide good ventilation and snow shedding capabilities, making them suitable for areas with heavy snowfall. They may have less usable growing space due to sloped sides and limited headroom near the edges.
Sawtooth greenhouses have a series of ridges and valleys along the roof, allowing for optimal light penetration and ventilation. They are commonly used in commercial operations. Construction is more complex and more materials are needed compared to traditional designs.
Greenhouses made primarily of glass provide maximum light transmission for optimal plant growth. They are often used for ornamental plants and high-value crops. They can be expensive and have less insulating properties
Plastic greenhouses utilize polyethylene or polycarbonate materials for covering. They are lightweight, cost-effective, and offer good insulation properties. The lifespan is more limited as they are susceptible to damage from UV rays and extreme weather conditions, and the materials are not sustainable.
How does a greenhouse work?
A greenhouse replicates and enhances the greenhouse effect through a process that involves trapping solar radiation within its enclosed space. Sunlight enters the greenhouse through transparent materials like glass or plastic. These materials allow short-wave solar radiation (mostly visible light) to pass through with relative ease. Once inside the greenhouse, the surfaces of the plants, soil, and other objects absorb the incoming solar radiation. This absorbed energy is then re-radiated as longer-wavelength infrared radiation (heat).
The greenhouse gases present within the greenhouse, such as carbon dioxide (CO2), water vapor (H2O), and methane (CH4), absorb a portion of this infrared radiation. These gases have molecules that can vibrate in resonance with the infrared radiation, trapping heat within the greenhouse.
As the greenhouse gases absorb infrared radiation, they re-emit a portion of it in all directions, including back towards the surfaces of the plants and structures inside the greenhouse. This process effectively traps heat energy within the enclosed space, creating a warmer environment than the surrounding air outside.
The enclosed space of the greenhouse allows for better regulation of temperature compared to the external environment. During the day, solar radiation heats up the greenhouse, and at night, the trapped heat keeps temperatures from dropping too low. Ventilation systems and other mechanisms can be used to manage temperature and humidity levels to create optimal growing conditions for plants.
What are greenhouses made of?
Greenhouses can be constructed from various materials, each with its own set of pros and cons. The choice of materials for a greenhouse depends on factors such as budget, climate, desired lifespan, aesthetic preferences, and intended use. Each material has its own advantages and disadvantages, and growers should carefully consider these factors when planning and constructing their greenhouse. Glass provides maximum light transmission for optimal plant growth. It is durable and long-lasting and aesthetically pleasing. Glass can be expensive to purchase and install., and fragile and prone to breakage. Glass also has limited insulation properties compared to other materials. Polycarbonate Panels offer good light transmission while diffusing sunlight to reduce glare. They are lightweight and impact-resistant with excellent insulation properties, retaining heat better than glass. It is not as clear as glass, which may reduce light quality slightly. Polycarbonate can yellow or become brittle over time with exposure to UV radiation and the initial cost may be higher than some other materials.
Acrylic Panels offer good light transmission with high clarity and they are lightweight and impact-resistant with better insulation properties than glass. However they can be susceptible to scratching and become brittle over time with exposure to UV radiation. Fiberglass Panels are lightweight and durable with good light transmission and diffused light properties. Plus they are resistant to corrosion and weathering. Fiberglass can yellow or become brittle over time with exposure to UV radiation and has a lower light transmission compared to glass or some plastics.
Metal Frames like aluminum or steel are strong and durable, resistant to rust and corrosion and lightweight and easy to assemble. However metal is a conductive material, which can lead to heat loss in colder climates and the initial cost may be higher than wooden frames. They also require insulation to prevent condensation and heat loss. Wood Frames offer a natural look and aesthetic appeal with good insulation properties and can be customized and easily modified. However, they are prone to rot, insect damage, and warping if not properly treated and require regular maintenance (painting, sealing) to prolong lifespan. The initial cost may be higher than metal frames.
What are the benefits of greenhouse gardening?
Greenhouses provide a controlled environment that extends the growing season by protecting plants from frost, cold temperatures, and adverse weather conditions. This allows for year-round cultivation of crops that may not thrive outdoors during certain times of the year, which makes them essential in short, cold growing climates like we have here in Massachusetts as they allow us to get a head start on long season crops and keep them protected later in the season. Greenhouses allow growers to create and maintain optimal growing conditions by regulating temperature, humidity, light levels, and ventilation. This controlled environment promotes healthy plant growth, reduces stress on plants, and minimizes the risk of pests and diseases.
With the ability to control environmental factors, greenhouse gardening often leads to higher crop yields and better quality produce compared to outdoor cultivation. Growers can optimize growing conditions to maximize productivity and harvests. Greenhouses provide a physical barrier that helps protect plants from pests, insects, and diseases. This reduces the need for chemical pesticides and fungicides, leading to healthier plants and safer produce.
Greenhouses can be designed with efficient irrigation systems that minimize water usage by delivering water directly to the plants' roots. Additionally, the enclosed environment reduces water loss through evaporation, leading to more efficient water use compared to outdoor gardening.
Greenhouses come in various sizes and designs, allowing growers to maximize space utilization and grow a wide range of crops in a relatively small area. Vertical gardening techniques can also be employed to further optimize space and increase production. Greenhouses offer flexibility in crop selection and cultivation methods, allowing growers to experiment with different plant varieties, growing techniques, and crop rotations. This versatility enables growers to adapt to changing market demands and consumer preferences.
Greenhouse gardening can be more environmentally sustainable than traditional outdoor farming practices. By minimizing the need for chemical inputs, reducing water usage, and optimizing resource utilization, greenhouse growers can reduce their environmental footprint and contribute to conservation efforts.
Looking for a high quality pre-made greenhouse in Massachusetts?
Hometown Structures offers the finest craftsmanship with custom designs in a wide variety of sizes perfect for the home gardener to give your plants the perfect climate to thrive in a protected environment, keep pests away from your plants, grow plants and food that don’t otherwise exist in your area/climate and extend your season with options including 8mm twin wall polycarbonate for optimal insulation, venting and windows. Every custom shed greenhouse comes with 50-Year LP Siding and 30-Year Collapse From Snow Warranty.
Tap here to visit their website to learn more and book a design consultation today.

Olla Watering System: Everything You Need to Know to Get Started
Did you know you can water your entire garden bed without lifting a finger and reduce your waste water by 70% for about $5 using just a clay pot? Today I’m going to show you how to make a self watering olla pot system for your own garden.
The Cottage Peach is reader-supported. When you purchase through links on our site, we may earn an affiliate commission at no additional cost to you. All opinions are our own.
Did you know you can water your entire garden bed without lifting a finger and reduce your waste water by 70% for about $5 using just a clay pot? Today I’m going to show you how to make a self watering olla pot system for your own garden.
What is an olla watering system?
Olla (pronounced oya) means “pot” in Spanish, but the concept of using ollas as an irrigation system goes back thousands of years and has been used in countless cultures around the world. An olla watering system is basically any type of unglazed clay pot that is buried beneath the soil with only a small amount sticking up above the surface and filled with water. You can tell that a pot is unglazed because it will be that classic terracotta red color with no shiny finish, glaze or paint. The water then leeches out of tiny holes or “pores” in the unglazed clay and is pulled through the soil to the roots of your thirsty plants using a process called soil moisture tension. This functions much the same way as osmosis, in that the water is trying to equalize to a certain level of moisture within the soil. This means your soil will never become overwatered either - if the soil is moist, the water stays in the pot until it is needed.
Why should you use an olla watering pot?
Watering the garden is a task that isn’t easy for everyone. Personally, I struggle with bending down and kneeling in the garden to water and weed because of my arthritis. When I was planning my garden this past spring I was in the middle of a bad flare and I knew I needed to choose an irrigation system that would ease some of the physical demands of gardening and allow me to continue growing all the fruits and vegetables I could without hurting myself. There are so many different watering systems available today, from drip irrigation to sprinklers, but I wanted to find something that was budget-friendly and used common everyday items.
An olla pot is perfect for garden irrigation because all you need is a clay pot and some type of lid. You only need to fill them every 2-5 days depending on your climate (hotter, dryer climates will be on the lower end of that spectrum and wetter, cooler climates on the higher end) and it takes just one minute or so to fill the pot from your watering can versus standing there for ages with a hose.
As of August 30, 2022, 38.23% of the U.S. and 45.53% of the Lower 48 states were in drought. With climate change on the rise, this number is only expected to get worse. I know in our tiny town we are under a water restriction notice for most of the summer, and this is a common issue in many neighborhoods. I’ve even heard a few reports that said to expect summer 2022 to be the coolest for the rest of our lives - and it felt like the hottest one yet. Not only does a watering restriction in your town eliminate hose watering as an option, it means any watering system you do use should be as efficient and waste as little water as possible.
Olla pots reduce wasted water by about seventy percent, since most of the moisture is held underground and not lost to surface evaporation. This is a huge savings over traditional watering methods and means you can significantly reduce your water consumption in our drought-prone climate. This will lower your water bill as well as make your homestead more environmentally friendly!
Olla pots also help you to grow happier and healthier plants. The root systems in your plants will also be healthier, as they reach out towards the underground water the roots will become larger and sturdier, keeping your plants from falling over. Most importantly, plants that are watered at the soil level are less prone to infection with certain fungal diseases that thrive in damp environments, since the leaves of your plants will not get wet as often. Because of the soil moisture tension phenomenon, your plants will also never be overwatered.

What is the best olla pot you can buy?
This DIY olla may not be for you if you can’t find genuine terracotta pots affordably in your area, or don’t have the time to make one yourself. If you can’t make your own olla, or you want hook up your ollas to an automatic rainwater harvesting system that will continuously refill your ollas for you from free rainwater collected from your roof, check out this automated olla watering system.
I added this drip irrigation/olla hybrid setup to 3 of my raised beds, and it’s made an already pretty hands-off system completely self-sustaining; water is collected from my roof into a 50 gallon barrel, flows automatically into reservoirs and down the irrigation tube into individual terracotta cups. Setup is easy - in my opinion, this is the perfect garden watering solution.
What plants grow well with olla pots?
There is some debate about whether olla pots work for any type of plant. Of course, all plants have different water needs and root systems. In my experience and from comments in my community, there doesn’t seem to be any plant that can’t thrive with an olla pot - from trees to squash, corn and beans, all the way down to simple lettuce. Experiment in your own garden and find what works best for you!
How do you make an olla watering system?
Here’s the supplies you will need to make an olla watering pot system:
1 eight to ten inch unglazed terracotta pot per 4x4 foot area - click here for the ones I use
Moldable glue if your pot has a hole in the bottom (I like sugru)
Plant saucer to use as a lid - click here for the lids I use
A rock or two to weight down your lid
You will want to start by calculating how many olla pots you will need. As a general rule of thumb, you should have one olla pot per four by four foot area in your garden. The olla pot can water up to two feet away from where it is buried, which means even if your garden is just two feet wide by eight feet long you’d want two olla pots - one every two feet.
If your olla pot has a hole in the bottom, you’ll need to cover this so the water you put in doesn’t just pour right out the bottom. You can cover the hole in the bottom of the olla pot with sugru moldable glue, caulking, clay, poster mounting putty, a cork or something similar.
Dig out a space to bury your olla pot in your garden bed. You can olla pots in raised beds or in-ground gardens, but you’ll need larger olla pots for in-ground beds, ten to twelve inches should be fine. The hole should be about as deep as your pot is tall - however, my raised beds are too shallow to fully bury the pot and they still work fine.
Place your olla pot into the hole and replace the soil around the edges of the olla.
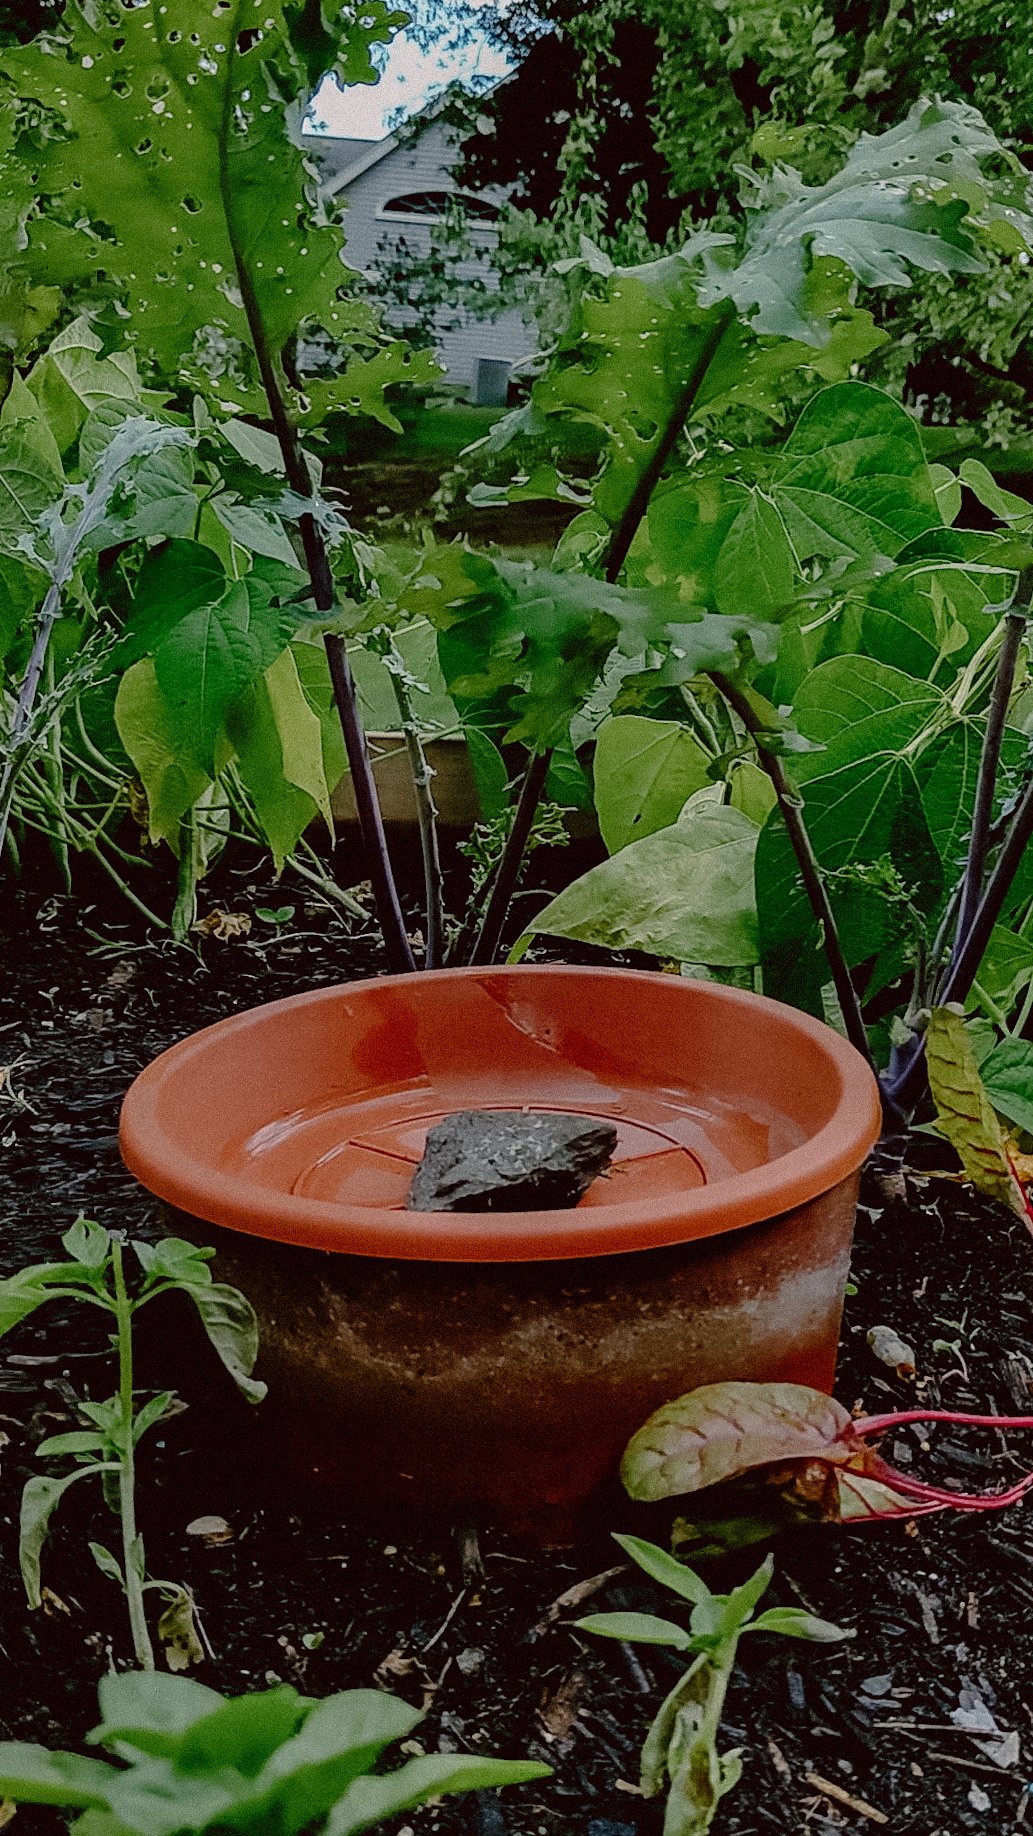
Fill the olla with water and cover with your chosen lid. This helps to keep bugs out and prevents the water from just evaporating before it has a chance to seep into the soil. My lid is very lightweight, so I chose to weigh it down with a rock and then decided to add even more small pebbles and rocks to create a watering station for pollinators.
Depending on your climate you will need to refill the olla every 2-5 days. I recommend checking it the day after you install to make sure there’s no leaks in your olla - if all the water is gone and it wasn’t a heat wave that day I’d check your seal and try again. Then check every other day until you get a sense for how often you need to refill the pot.
wILL YOU TRY THIS EASY WAY TO WATER YOUR GARDEN? lET ME KNOW IN THE COMMENTS IF YOU HAVE ANY QUESTIONS!
Other posts in this olla watering system series:
DIY OLLA WATERING SYSTEM INSTRUCTIONS
OLLA POTS FOR CONTAINER GARDENING
TROUBLESHOOTING OLLA POT PROBLEMS

Forcing Forsythia Indoors For Early Spring Blooms
Forcing spring bud branches to bloom inside is a fun and easy process. All you need is a pair of sharp clippers and a container to fill with water and place your cuttings in. Once you’ve gathered your supplies, head outside and look for a branch (or ten) that needs pruning. You can accomplish two tasks in one this way - prune off unwanted branches at the perfect time of year to do so, as well as bring some beautiful flowers indoors!

Spring is a time of new beginnings, and this is reflected in the blooms of many plants. I spend more distracted minutes than I care to admit staring out of windows each day hoping for a streak of color in the garden beds to bring life back into the cold and gray landscape of early spring. In my gardens, the first to appear are the purple crocuses, small and delicate. Following behind soon after will be the daffodils - cheerful yellow and white blooms to ring in the season and excellent flowers for your vase. Before long it is a cacophony of blossoms, from tulips with their vibrant colors and delicate blooms to lilac and hyacinths, fragrant flowers that come in a range of colors, from pastels to bright hues, and are a favorite of gardeners and florists alike.
I’ll be the first to admit that winter isn’t the easiest season for me. Living in New England, you’re forced to acclimate to the colder temperatures, but even after a lifetime spent in this northern climate I still struggle with just how long, cold and gray winter can be. My chronic pain is also made worse by colder weather affecting my joints. The only consolation is that spring is all the sweeter for it. You can’t miss what you can’t measure, and winter ensures that I never take the sweetness of spring for granted.
While I love each and every flower that appears, my favorite blooms this time of year are not the ones that poke their way up out of the thawing earth. I find inspiration in the dogwoods, cherry blossoms, magnolia and forsythia (a burst of sunshine) too. These flowering trees and shrubs are a beautiful addition to any spring landscape. But if you’re impatient like me, and the winter was long, you may find yourself wishing there was a way to speed things up a bit and enjoy a bit of spring in your own home. My favorite way to do just that? Take a trip outdoors (bundle up if you must!) and snip off a few of those wayward branches you were meaning to prune anyhow to force those spring bud branches to bloom indoors. This simple little trick is especially gratifying if you live with chronic pain like I do, and just need a quick way to feel connected with nature without putting additional stress on your body. Chronic illness can so easily take away parts of our identity (like being a gardener) if we let it. So I always like to prioritize small activities like this that reinforce my sense of self.
How can you force spring bud branches to bloom inside?
Forcing spring bud branches to bloom inside is a fun and easy process. All you need is a pair of sharp clippers and a container to fill with water and place your cuttings in. Once you’ve gathered your supplies, head outside and look for a branch (or ten) that needs pruning. You can accomplish two tasks in one this way - prune off unwanted branches at the perfect time of year to do so, as well as bring some beautiful flowers indoors!
Cut branches: Cut branches from deciduous trees or shrubs that have swollen buds, but have not yet started to leaf out. Ideal trees to use are cherry, plum, apple, or forsythia. Cut branches early in the morning while they are still dormant, using sharp pruning shears to make a clean, angled cut. To improve your chances of success, make some small cuts up the ends of the branches as well.
Hydrate: Place the cut branches in a container of warm water to allow them to hydrate and start absorbing water. You can add some flower food to the water to help extend the life of the blooms, but you don’t have to.
Condition the branches: Place the container in a cool, dark room for a day or two to help the branches adjust to indoor conditions.
Warmth and light: Move the container to a warm, bright room with indirect sunlight. This will help to promote the growth and blooming of the flowers.
Change water regularly: Check the water level in the container daily and change it regularly to prevent the growth of bacteria that could harm the blooms.
Wait: It may take several days to several weeks for the branches to start blooming, depending on the type of tree and the conditions in your home. Be patient, and enjoy the process of watching the flowers slowly start to appear.

Once the flowers have opened, you can arrange the branches in a vase and enjoy their beauty in your home. If you’re lucky, your branches may even develop roots in the water - you can try planting these outdoors when they are done blooming! Now you’ve pruned your plants, added beauty to your home AND propagated new ones for free. You can probably see why I love this little project so much!
How does forcing blooms work?
Forcing spring bud branches to bloom inside works by manipulating the environmental conditions that the branches experience, in order to encourage them to bloom earlier than they would naturally. By changing the temperature, light, and water conditions that the branches experience, you are effectively tricking the branches into thinking that spring has arrived earlier than it naturally would. This encourages the branches to bloom, allowing you to enjoy the beauty of spring in your home, even if the weather outside is still cold and dreary.
What plants can you force bloom indoors?
Many deciduous trees and shrubs can be used to force buds to bloom inside, but some work better than others. Here are a few species that are often used for this purpose:
Forsythia: This is a popular choice for forcing due to its bright yellow flowers that bloom early in the spring and its hardy nature.
Cherry: Cherry branches have delicate pink or white flowers that are very fragrant and make a beautiful addition to any room in your home.
Plum: Plum branches produce fragrant, delicate flowers in shades of pink or white.
Apple: Apple branches have delicate pink or white flowers that are lightly fragrant and make a beautiful addition to any room in your home.
Magnolia: Magnolia branches have large, fragrant flowers in shades of pink, purple, or white, and make a dramatic statement when displayed indoors.
Dogwood: Dogwood branches have delicate flowers in shades of pink or white, and are also prized for their attractive bark.
Quince: Quince branches have fragrant, bright pink flowers that bloom early in the spring, making them a popular choice for forcing.
Crabapple: Crabapple branches have delicate pink, red, or white flowers that are lightly fragrant and make a beautiful addition to any room in your home.
These are just a few examples of the many species that can be used. Play and experiment with different plants to see what works best for you.
What are the benefits of bringing fresh spring flowers inside?
There is a growing body of evidence to suggest that fresh flowers inside can have a positive impact on mental health. Here are a few of the key benefits:

Boosts mood: Research has shown that flowers can have an immediate impact on mood, making people feel happier and more relaxed, as well as more balanced and centered.
Improves memory: Studies have found that having fresh flowers in the home can improve memory, particularly in older adults.
Increases creativity: Flowers have been found to stimulate the mind and increase creativity, making them a great addition to workspaces or creative spaces.
Provides a connection to nature: Flowers are a reminder of the beauty and abundance of nature, providing a connection to the natural world and promoting feelings of peace and calm.
Bring fresh flowers inside have been shown to have a positive impact on mental health, helping people to feel happier, more relaxed, and more connected to the world around them.
Whether you enjoy having fresh flowers in your home, workspace, or creative space, the mental health benefits are undeniable.
Another benefit of this practice is that it intentionally forces you to spend time outdoors, at a time of year when the rainy spring weather may tempt you to stay cozied up inside. But anyone who has ever gone outdoors after a fresh spring rain shower will tell you there is a certain smell in the air during this time of year that cannot be replicated in summer, fall or winter. Scientists have actually named this phenomenon- “Petrichor” is the term for the unique, earthy smell associated with rain. It is caused by the water from the rain combining with certain compounds like ozone, geosmin, and plant oils in soil.
Even more impressive is the fact that soil contains a natural antidepressant; a microbe in the soil called Mycobacterium vaccae that is confirmed to stimulate serotonin production, leaving you feeling relaxed and happier. When you garden and work the soil, you actually inhale these beneficial bacteria in addition to having topical contact with it, making multiple points of entry for this natural stress reliever to enter your bloodstream. I see this as further proof of what I know intuitively as a gardener; spending time in nature in spring is a uniquely healing experience.

Asian Jumping Worms: What We Know
Last fall, I was digging in one of my garden beds to plant garlic when I came across the largest worm I had ever seen. Quickly, my heart jumped into my throat - I had heard about these extra large, extra wriggly worms and knew that they were not a good sign for my garden. This turned into a full on panic as I dug up various spots throughout the yard and found they were spread out across the entire acre of land. An infestation of jumping worms that I knew meant trouble for my soil health and ability to grow thriving vegetable plants in ground.
Last fall, I was digging in one of my garden beds to plant garlic when I came across the largest worm I had ever seen. Quickly, my heart jumped into my throat - I had heard about these extra large, extra wriggly worms and knew that they were not a good sign for my garden. This turned into a full on panic as I dug up various spots throughout the yard and found they were spread out across the entire acre of land. An infestation of jumping worms that I knew meant trouble for my soil health and ability to grow thriving vegetable plants in ground.
To my horror, as I began frantically googling, it slowly dawned on me that there is surprisingly little known about these worms and how to effectively eradicate them. Cutting them in half just causes one worm to duplicate into two, burning them seems cruel, and when I tried to drown them in a bucket of water, they somehow managed to quickly climb out…and that my friends is how I ended up with a gallon size baggie of worms frozen in my freezer. Freezing them felt like the most ethical way to deal with them, as they basically just go into a deep sleep and never wake up, but still - I was left nauseous and horrified.
What are jumping worms?
Jumping worms, scientifically known as Amynthas spp., are a group of invasive earthworms native to East Asia. They are also commonly referred to as crazy worms, snake worms, or Alabama jumpers. These worms are distinguished by their unique behavior of thrashing and writhing vigorously when handled or disturbed, which gives them the appearance of "jumping." Unlike traditional earthworms, which burrow deep into the soil, jumping worms typically reside in the upper organic layer, where they feed on decaying organic matter, leaf litter, and root systems.
One of the most alarming characteristics of jumping worms is their ability to quickly degrade the soil structure and organic matter. They consume large quantities of organic material and leave behind castings that, unlike earthworm castings, are devoid of nutrients, altering the composition and texture of the soil in negative ways. This rapid decomposition can lead to significant changes in soil fertility, moisture retention, and nutrient availability, detrimentally affecting plant growth and ecosystem dynamics.
Jumping worms are highly adaptable and can thrive in various environments, including forests, gardens, and agricultural fields. They reproduce rapidly and have been known to easily outcompete native earthworm species, disrupting soil ecosystems and native plant communities. Additionally, their presence can attract predators and disrupt food webs, further impacting the balance of local ecosystems. While they die back in areas with cold winters, their microscopic eggs survive the chill to hatch next spring.
Due to their invasive nature and destructive impact on soil health, jumping worms pose a significant threat to natural ecosystems and agricultural systems alike. Efforts to control and manage their spread are essential to mitigate their negative effects and protect biodiversity.
How do you identify jumping worms?
Jumping worms are very large and often have a translucent, milky-white to grayish-brown coloration, with a slightly iridescent sheen. Jumping worms have a slim, cylindrical body with a smooth and uniform appearance. One of the most distinctive characteristics of jumping worms is their behavior when handled or disturbed. They exhibit a unique thrashing or writhing motion, resembling "jumping" or "dancing." When picked up or exposed to light, jumping worms may quickly retract and thrash around vigorously.
Jumping worm vs earthworm
But how can you tell jumping worms from beneficial garden earthworms? Unlike earthworms,The clitellum on a jumping worm is milky white to gray-colored, smooth and completely encircles the body of the worm. In contrast, the clitellum of European earthworms does not wrap entirely around the worm. Jumping worms are generally larger in size compared to traditional earthworm species, typically ranging from eight to twelve inches in length.
How did jumping worms get to the USA?
Jumping worms are native to East Asia, specifically regions such as Japan, Korea, China, and parts of Southeast Asia. Within their native range, they play a role in ecosystem processes and are part of the natural soil fauna. The introduction of jumping worms to new regions outside of their native range is attributed to human activities.
There are several common pathways through which jumping worms can be inadvertently transported. Jumping worms may be transported via potted plants, root balls, or soil associated with ornamental plants. They can hitch a ride in nursery stock or gardening supplies, allowing them to spread to new locations. The movement of mulch, compost, or soil amendments from infested areas can facilitate the spread of jumping worms. These materials may contain eggs, cocoons, or even adult worms, which can establish new populations when introduced to suitable habitats.
Landscaping projects, such as transplanting, grading, or soil disturbance, can inadvertently spread jumping worms to new areas. Construction projects, garden renovations, and land clearing activities may disturb soil ecosystems, allowing jumping worms to be dispersed. Outdoor recreational activities, such as hiking, camping, fishing, and gardening, can also inadvertently transport jumping worms from infested areas to new locations. Soil clinging to footwear, equipment, or vehicles can serve as a means of transport.
Once introduced to new regions, jumping worms can establish populations rapidly, aided by their prolific reproduction and ability to thrive in a variety of habitats. Their invasive nature and disruptive effects on soil ecosystems highlight the importance of preventing their spread and implementing measures to manage and control their populations in affected areas.
Where have jumping worms been found?
As an invasive species, jumping worms have been reported in numerous countries and regions, including:
United States: Jumping worms have been documented in many states across the U.S., including but not limited to:
Midwest: Illinois, Indiana, Iowa, Michigan, Minnesota, Missouri, Ohio, Wisconsin
Northeast: Connecticut, Maine, Massachusetts, New Hampshire, New York, Pennsylvania, Vermont
Southeast: Alabama, Georgia, North Carolina, South Carolina, Tennessee, Virginia
West: California, Oregon, Washington
Canada: Reports of jumping worms have emerged in several provinces, such as Ontario and Quebec.
Europe: Jumping worms have been observed in countries like the United Kingdom, France, Germany, Belgium, and the Netherlands.
Australia: There have been reports of jumping worms in various parts of Australia, although they are not as widespread as in some other regions.
Asia: In addition to their native range in East Asia, jumping worms have also been reported in other parts of Asia due to human-mediated transport.
How to get rid of jumping worms
Managing and controlling jumping worms requires a multifaceted approach that aims to limit their spread, reduce their populations, and mitigate their impact on ecosystems. While complete eradication of jumping worms may be challenging, various strategies can help manage and control their populations. We need to raise awareness among the public, gardeners, and landscapers about the threat posed by jumping worms and the importance of preventing their spread.
To reduce the spread of jumping worms, we should minimize the transport of soil, mulch, compost, and plant materials from infested areas to uninfested sites, especially during landscaping, gardening, and restoration activities, and establish monitoring programs to track the distribution and abundance of jumping worms in affected areas. We can also implement practices that disrupt jumping worm populations such as solarizing soil, although these methods may also impact native soil organisms and soil structure.
How to kill jumping worms
Chemical control methods for jumping worms are currently limited, and there are no widely accepted chemical treatments specifically targeting jumping worms. Some studies have explored the potential use of certain soil amendments, such as lime or biochar, to modify soil conditions and suppress jumping worm populations, although more research is needed to evaluate their effectiveness and potential impacts.
It is not known if jumping worms have any potential natural enemies, predators, or parasites that could be used as biological control agents, and this approach requires careful consideration to avoid unintended consequences and ecological disruptions. It is not safe to feed jumping worms to chickens or use them as fish bait, because they retain heavy metals and toxins from the soil.
An integrated approach combining prevention, monitoring, cultural practices, and research is essential for managing and mitigating the impacts of jumping worms on ecosystems and agricultural systems. Effective management strategies will require ongoing collaboration, adaptive management, and interdisciplinary efforts to address this invasive species threat.
It may seem like managing jumping worms is a hopeless endeavor, but while some adaptation is required and additional measures are needed to control soil health and quality, there are many home gardeners learning through experience different ways to keep jumping worms from destroying their gardens. The reality is that soil health needs to be a priority through aggressive composting and mulching efforts, which are practices that every gardener should be employing for thriving plants regardless of whether or not they have jumping worms in their garden beds yet. This is still a relatively new issue that is actively being researched, so many new developments are possible in the coming years that could help to control invasive jumping worms in the United States.