
DIY Olla Pot Lid Ideas: Keeping Bugs Out and Water In
The Cottage Peach is reader-supported. When you purchase through links on our site, we may earn an affiliate commission at no additional cost to you. All opinions are our own.
Making your own DIY ollas can be as simple or complex as you want it to be. But, if you're going to keep bugs, dirt and other debris out of your ollas it's important to make sure and put a lid on them. Since I'm often asked what lid to use for ollas, I wanted to share some creative and practical lid options for olla pots, from repurposed materials to DIY crafts.
Olla lids aren't just important for preventing pest problems and keeping out debris, they also help prevent water evaporation so you don't have to refill your ollas as often. And since reducing water usage is a big reason why many of us love to use olla watering systems in our gardens, having a lid is pretty non-negotiable! If you need full instructions for how to make a diy olla, you can tap here. But if you're just looking for olla lid options, keep reading below!
DIY Olla Lid Ideas
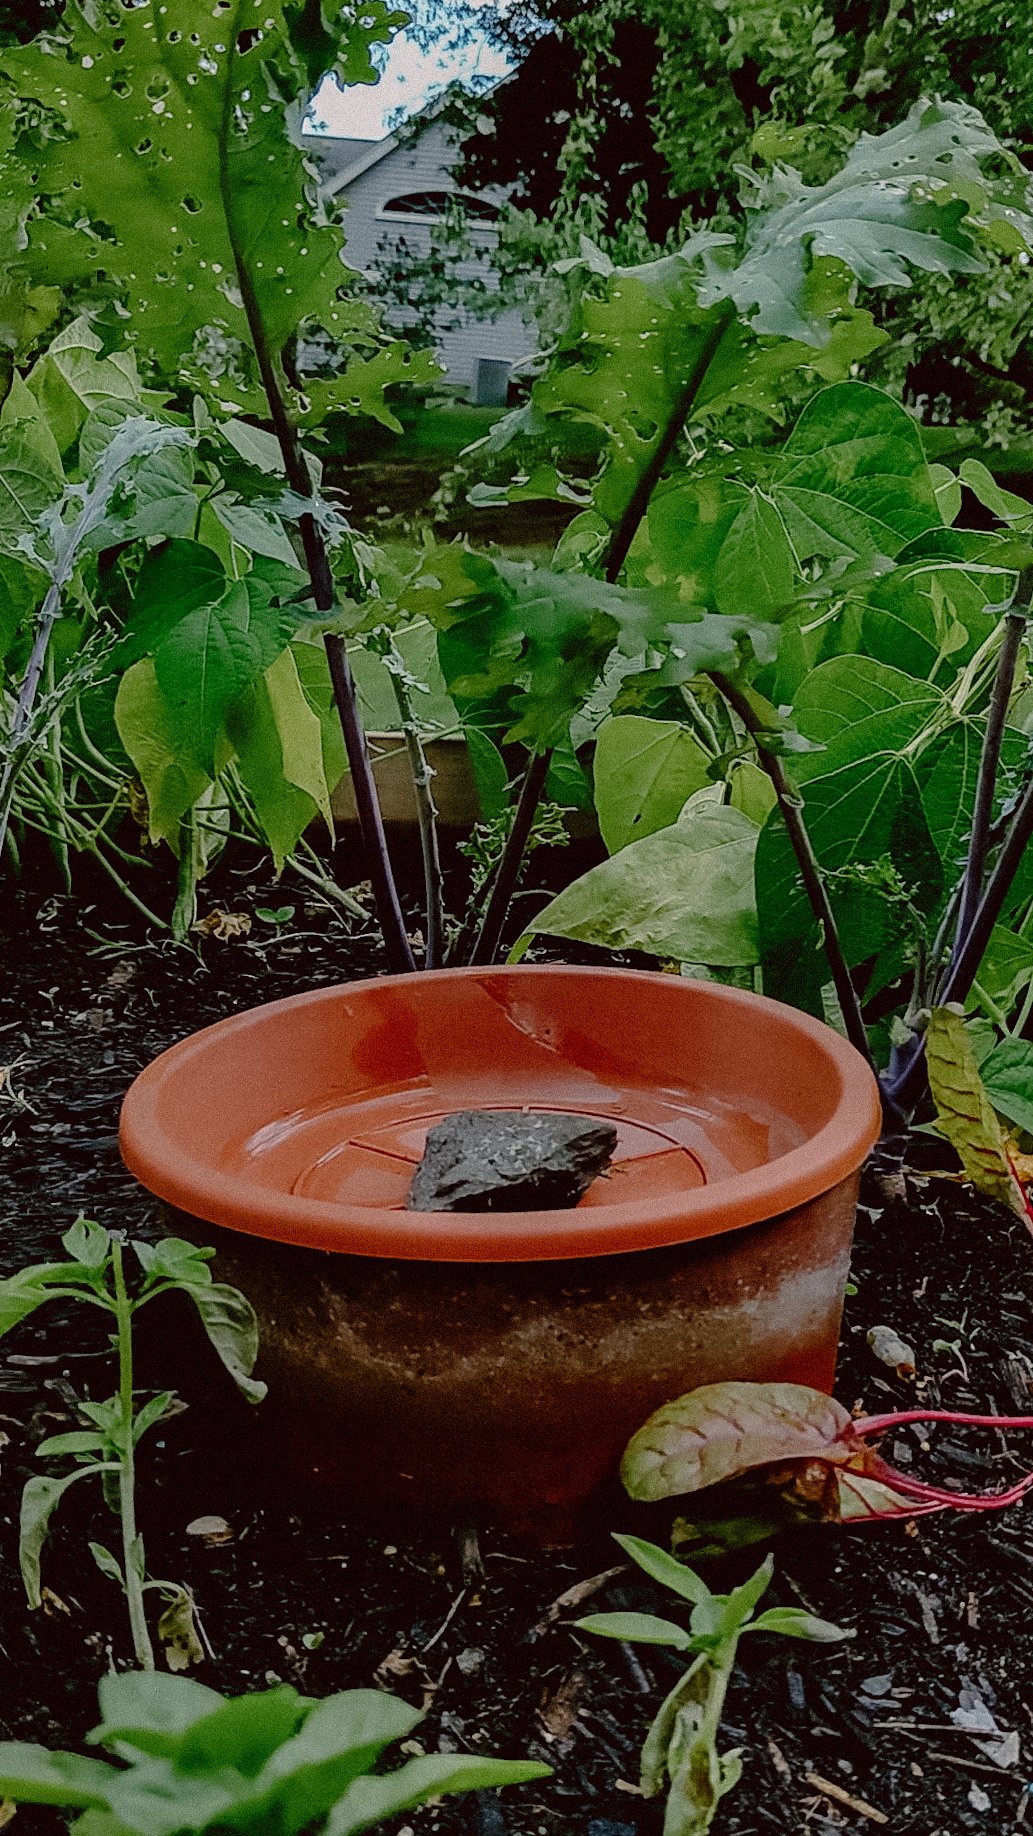
You can use terracotta saucers as olla lids. These can be found at garden centers or repurposed from broken pots. They are the perfect size for many olla pots and provide a classic look that matches the terracotta coloring of the olla itself. They also usually weigh enough on their own without needing additional rocks etc to keep them from blowing away in the wind. However, since they are porous they may still allow a decent amount of water to be lost to evaporation.
Repurposing plastic lids from yogurt containers, sour cream containers, or other food storage containers is a great way to keep these items out of the landfill - just make sure that they are food-safe if you are growing edible plants. Since this option is very lightweight, you'll need to add small stones, marbles or something else heavy to keep it from blowing away.
A chipped china plate destined for the garbage or picked up secondhand at your local thrift store can easily serve a new purpose in your garden as an olla lid. Bonus points if it's got a pretty design on it to bring some life and personality to your garden space! These can be a bit fragile to have in the garden, so be sure to handle with care and be mindful of any sharp edges.
If you have large flat flagstones around your garden, these can also be used as lids. Ensure they are heavy enough to stay in place but not so heavy that they crack the olla pot. Sometimes these collect dirt and can get messy and hard to move around if you have hand pain or weakness, and be mindful of any sharp edges with these too.
You can also cut a piece of wood to size to use as a lid and decorate with paint or woodburning. However a wood lid won't last as long as the other options listed above as it weathers and is exposed to the elements.
Benefits of Using an olla with a Lid
A lid will significantly reduce water evaporation, meaning you will need to refill your olla pot less often. This is especially important in hot and dry climates. It will help keep insects, birds, and other pests out of your olla pot's water. This is important for maintaining water quality and preventing diseases. It's important to make sure the lid fits snugly on the olla pot to prevent pests and debris from entering and if you're using a lid made from a lightweight material, make sure it is heavy enough to stay in place but not so heavy that it cracks the olla pot.
Since some lid options have a lip on them, water can collect and stand inside of it. This water can grow algae and bacteria, as well as serve as a breeding ground for mosquitoes. But by adding small decorative stones or marbles to fill the space inside the lid, you can weigh the lid down as well as reduce the amount of water that's able to collect on the surface and even create a pollinator watering station since the rocks will provide resting spots for your local bees to stop and have a drink!
WHAT IS AN OLLA WATERING SYSTEM?
Olla (pronounced oya) means “pot” in Spanish, but the concept of using ollas as an irrigation system goes back thousands of years and has been used in countless cultures around the world. An olla watering system is basically an unglazed eight to ten inch terracotta pot that is buried beneath the soil with only a small amount sticking up above the surface and filled with water. The water then leeches out of tiny holes or “pores” in the unglazed clay and is pulled through the soil to the roots of your thirsty plants using a process called soil moisture tension. This functions much the same way as osmosis, in that the water is trying to equalize to a certain level of moisture within the soil. This means your soil will never become overwatered either - if the soil is moist, the water stays in the pot until it is needed. The downsides of DIYing a system like this are that it can be hard to identify true terracotta - and other types of clays have different properties that make them not as well suited for this job. Plus, you have to fill each one manually every 2-5 days depending on how hot it is and most importantly they take up a lot of room in the garden beds. But thankfully, with the Thirsty Earth system all of those cons are eliminated.
WHY SHOULD YOU USE A Thirsty Earth OLLA WATERING System?
Hauling around a watering can and standing with a hose for 45 minutes isn't exactly a walk in the park for everyone, especially folks like me with arthritis. This past spring, I was right in the middle of a flare-up when I planted my garden. I knew I needed a way to water my plants without turning myself into a pretzel!
Imagine this: you water your plants, but most of the water just sits on top and bakes away in the sun. olla watering systems stop that waste! The water seeps out of the pot slowly, right where your plants need it most - at their roots. This fancy trick can slash your water use by up to 61%. Less water wasted means a lighter water bill and a happier planet.
Olla watering systems aren't just about saving water, they're also all about growing healthy plants! Since the water seeps out underground, plant roots stretch out searching for that moisture. This makes them stronger and helps your plants stand tall. Olla watering systems also keep the leaves of your plants dry, making it harder for fungus and disease to spread. And the slow release of water means your plants get the perfect amount to drink, never too much.
Basically, olla watering systems create happy, healthy plants that can take on anything. But, each olla can only cover an area of about 2 feet all around it (depending on the system you use, but this is true for the ThirstyEarth ollas). So depending on the size and shape of your garden, you'll need to keep this in mind when choosing your olla placement.
Thirsty Earth Olla Watering System Review

Since it can be hard to find genuine terracotta pots affordably in your area, and they take up a lot of space in the garden, the Thirsty Earth olla watering system can be a good compromise that allows you to actually hook up your ollas to an automatic rainwater harvesting system that will continuously refill your ollas for you on it’s own from free rainwater collected from your roof. Plus they are about the size of a water bottle, so they don’t waste precious planting space. I added the Thirsty Earth system to two of my raised beds, and since the system is super easy to customize to whatever garden bed configuration you have, you don’t have to worry about not having the right parts or enough pieces to get it done. The website does a great job of showing you exactly how to lay out the cotta cups and it’s made an already pretty hands-off system completely self-sustaining; water is collected from my roof into a 50 gallon barrel, flows automatically into reservoirs and down the irrigation tube into individual terracotta cups. Setup is easy thanks to the push to connect fittings that come with every kit. You just lay out your cups, cut the included tubing to size and connect everything with the fittings. No need to understand plumbing or any special building skills and you won't need any special tools either. Once everything is set up, you can leave it all summer and the reservoir will refill automatically from your rain barrel or you can manually refill it about once a week. I know it sounds too good to be true, but it really is that easy.
Other posts in this olla watering system series:
DIY OLLA WATERING SYSTEM INSTRUCTIONS
OLLA POTS FOR CONTAINER GARDENING
TROUBLESHOOTING OLLA POT PROBLEMS
