
BACKYARD GARDENING MADE SIMPLE
![Make Bread with NO Kneading Required [Recipe]](https://images.squarespace-cdn.com/content/v1/60e85024dc86d643da81c96a/0ae84a1b-0ddf-419f-a7e4-0d9087a8d8bd/PXL_20230120_190120755.PORTRAIT.jpg)
Make Bread with NO Kneading Required [Recipe]
Dear fresh baked bread,
I knew I first loved you before I had ever actually experienced you myself. From the moment I read Heidi for the first time as a child, I absorbed the imagery of a goatherd enjoying bread and cheese on the mountainside wrapped in a simple cloth with great excitement. Fresh bread became an elusive Thing that I knew I someday wanted to acquire, though it still did not occur to me in the era of Fruit Roll-Ups and Poptarts that fresh bread was something just anyone could make. Fresh bread had nooks and crannies to hold copious amounts of butter, a tough outer crust giving way to a soft and springy interior. Fresh bread was the stuff of dreams.
The Cottage Peach is reader-supported. When you purchase through links on our site, we may earn an affiliate commission at no additional cost to you. All opinions are our own.

Dear fresh baked bread,
I knew I first loved you before I had ever actually experienced you myself. From the moment I read Heidi for the first time as a child, I absorbed the imagery of a goatherd enjoying bread and cheese on the mountainside wrapped in a simple cloth with great excitement. Fresh bread became an elusive Thing that I knew I someday wanted to acquire, though it still did not occur to me in the era of Fruit Roll-Ups and Poptarts that fresh bread was something just anyone could make. Fresh bread had nooks and crannies to hold copious amounts of butter, a tough outer crust giving way to a soft and springy interior. Fresh bread was the stuff of dreams.
As I entered my teenage years, you became a real presence in my life, but I still saw your production as the domain of a skilled artisan with decades of experience. If I didn’t know better, I would have thought bread could only be made in the dark hours of morning, in a warm and quiet bakery commanded by a flour dusted, apron-clad master. Still, we were overjoyed at the discovery of another local bakery and enthusiastically paid for our loaves to be mixed, shaped and baked by another’s hand.
That all changed with no-knead bread. Simple to make and requiring just a handful of ingredients, suddenly my mother was filling our home with the unmistakable scents of that elusive bakery on a weekly basis. You materialized as a crusty, rustic loaf just like the ones I imagined from the books of my childhood. No knead dutch oven bread shattered my limiting belief that bread was reserved for an elite group of bakers and transformed fresh bread from a special treat into a daily occurrence. This easy bread opened the floodgates into a whole new world - one of yeast and gluten and eventually, sourdough.
And here is where we hit a rough patch in our love story. Beloved by the masses, sourdough and I just weren’t compatible. Like a mismatched couple, we disagreed a lot. I tried so hard to love you…but…I thought sourdough was too fussy. My dough rebelled, turning a toxic, angry pink color in my fridge. I tried again, only to lose my next starter to neglect once more. Sourdough and chronic illness aren’t very good friends. I couldn’t adhere to a regular baking schedule, and my dough couldn’t accept my inconsistency. When I could muster the energy (and courage!) to bake it, it failed more often than not, with texture issues I endlessly tried to remedy with more or less rise time, different kneading methods, and different ratios of water. Spending hours (days!) preparing a loaf of bread only to have it come out inedible was completely deflating. I was thoroughly turned off from baking bread by this experience. I slipped back into my limiting belief that bread - REAL bread, the bread I loved - could only be produced by a master (who was willing to waste hundreds of pounds of flour in the process of learning)
To be honest, I forgot about no knead bread for a few years. My mom’s baking phase had sputtered out, and I moved into my own place, and suddenly there wasn’t any fresh bread to be had any more. So thoroughly discouraged by my sourdough baking experience, I said to myself and others that I “just wasn’t a very good baker” and “didn’t enjoy baking bread”. I’ve always been the sort of person who picks the most complex project to learn how to knit, which often leads to an all-or-nothing mentality that can completely make or break my experience in learning anything new. This is a dangerous gamble that has led me to abandon more projects than I care to admit. I became aware that I have little patience for the hours of practice mastery requires. This was something I was determined to change about myself, little by little. I knew that to avoid discouragement I needed to start small.
“How about sandwich bread?” A small voice in my mind said.
“I do like sandwiches” I replied warily.
The first few loaves were just ‘meh’ - but ‘meh’ was infinitely better than ‘inedible brick of flour and water’...so I kept going.
The next batch was just a little bit better.
And the batch after that, near perfection.
Suddenly I had it - I had grasped onto a strand of knowledge, of understanding, that could carry me through the more complex recipes I wanted to try. I had started small, understood the principles, waited for it to click into place, and now there was a framework for taking the next step, and the one after that.
I could have danced across the kitchen with a loaf in each arm. I may have done just that.
Rolls came next. Dainty and cute, perfectly portioned and held under the tension of a glutenous web. Packed tightly together in a round pie tin they rose and baked under my supervision. In my excitement I could not wait for them to cool to begin pulling them apart at the seams, glazing the tops with honey and spreading thick pats of butter along the inside. It was the best roll I have had in my 30 years of life.
“But what about the no knead bread?” that little voice said.
I still had not remembered. But one fateful day when the relentless rain outside had my arthritic joints aching (a fact that I resented at 30, my bones protesting like that of an 80 year old) I found myself facing a conundrum - I wanted fresh bread, but kneading it was going to prove problematic.
I sometimes just stuff everything into my grandmother’s stand mixer when this is the case. It works just fine. But for some reason, today was different. Today I remembered the artisan no knead bread.
It’s an easy bread to bake, I promise. It won’t tire you out, or leave you disappointed. As far as bread recipes go, there is no mistaking this one for a flop. You can make no knead yeast bread at home this morning, and enjoy it with lunch tomorrow. This is a rustic loaf that goes well with soup, toasted and slathered with butter and then soaked into the soup itself to lap up all those deep flavors. I also enjoy it with a fried egg on top for breakfast, or transformed into french toast. The toppings you can add to bread are just about endless. Turn it into dessert with a layer of hazelnut spread, or cinnamon sugar and thick pats of fresh butter. Made into a grilled cheese with basil pesto and sliced tomato and a drizzle of balsamic vinegar it is the perfect small lunch for one.
The recipe we have always used in my house comes from Jim Lahey, owner of Sullivan Street Bakery. It was published in the New York Times and became one of the most popular recipes they ever published. Typically I try and share my own spin on things, but in this case the original stands so well on it’s own, no modification is needed.
Let’s get started.
No knead bread recipe from NYT Cooking:
3⅓ cups/430 grams all-purpose or bread flour, plus more for dusting
Generous ¼ teaspoon instant yeast
2 teaspoons kosher salt
Cornmeal or wheat bran, as needed
In a large bowl combine flour, yeast and salt. Add 1½ cups/345 grams water and stir until blended; dough will be shaggy and sticky. Cover bowl with plastic wrap. Let dough rest at least 12 hours, preferably about 18, at warm room temperature, about 70 degrees.
Dough is ready when its surface is dotted with bubbles. Lightly flour a work surface and place dough on it; sprinkle it with a little more flour and fold it over on itself once or twice. Cover loosely with plastic wrap and let rest about 15 minutes.
Using just enough flour to keep dough from sticking to work surface or to your fingers, gently and quickly shape dough into a ball. Generously coat a cotton towel (not terry cloth) with flour, wheat bran or cornmeal; put dough seam side down on towel and dust with more flour, bran or cornmeal. Cover with another cotton towel and let rise for about 2 hours. When it is ready, dough will be more than double in size and will not readily spring back when poked with a finger.
At least a half-hour before dough is ready, heat oven to 450 degrees. Put a 6- to 8-quart heavy covered pot (cast iron, enamel, Pyrex or ceramic) in oven as it heats. When dough is ready, carefully remove pot from oven. Slide your hand under towel and turn dough over into pot, seam side up; it may look like a mess, but that is OK. Shake pan once or twice if dough is unevenly distributed; it will straighten out as it bakes. Cover with lid and bake 30 minutes, then remove lid and bake another 15 to 30 minutes, until loaf is beautifully browned. Cool on a rack.
Are you nervous about baking break for the first time? I hope you’ll give this recipe a try if so. It really is fool-proof! Click here for the link to my favorite bread knife seen in the photo above.


Grow Food Outdoors All Year Long With Cold Frame Gardening
Living with arthritis as a gardener, I have formed a close bond with the land in order to better support my body. My immune system requires careful tending, and I find myself craving dark leafy greens, hearty soups and protein rich comfort foods as the weather turns cold. But in a cruel twist of fate, when my body craves these deeply nutritious foods most, the bitter cold of our New England winters do not accommodate a growing season which would allow me to cultivate all of the produce I wish to grow deep in December.
So how do we ask the land to sustain us through its deep hibernation? The answer may be found in the form of a simple wooden box called a cold frame.
As cold and snowy weather descends upon us here in the Northeast, I find my achy joints actively calling out for more attention. Living with arthritis as a gardener, I have formed a close bond with the land in order to better support my body. My immune system requires careful tending, and I find myself craving dark leafy greens, hearty soups and protein rich comfort foods as the weather turns cold. But in a cruel twist of fate, when my body craves these deeply nutritious foods most, the bitter cold of our New England winters do not accommodate a growing season which would allow me to cultivate all of the produce I wish to grow deep in December.
So how do we ask the land to sustain us through its deep hibernation? The answer may be found in the form of a simple wooden box called a cold frame.
This rustic frame set into the earth, snuggled up against the sunny south wall of our home provides us ample opportunities to tend, grow and gather even in the darkest days of winter. It can feel like pure magic to enjoy a diverse variety of produce even as we are cozy in our blankets beside the fire.
How does a cold frame work?
A cold frame works by creating something like a mini-greenhouse, trapping warm air through solarization inside of the box and insulating the plants within from the worst that winter has to offer. We control the temperature inside of the cold frame with a simple vent - the hinged lid can be propped open with different sized sticks to allow excess heat to escape on warmer days, but for the most part in our deep New England winters the lid stays firmly shut until we trudge through the knee deep snow to harvest.
Like many things in life, we cannot expect to circumvent nature entirely for our own benefit. Nothing in nature blooms all year. Try to plant delicate heat loving peppers, for example, and you will be met with disappointment. Similarly, the plants enjoy a slower season in winter, much the way we humans do. If you’re not convinced, I’d ask you to consider this: if the trees can take a break, so can you.
A cold frame is a lesson in slowing down and radically accepting things as they are. Your kale, radishes and lettuce will grow and thrive at a slower pace than you can expect in warmer seasons. The harvests are fewer, but more rewarding for the mere fact that they exist at all. And while a cold frame requires a certain amount of upkeep and planning in the beginning, this slowed down nature means that watering and weeding becomes virtually unnecessary in the coldest months.
Now, if you live in a climate that does not experience a cold winter season you may think a cold frame is unnecessary. Although, they continue to be useful even into the spring season here in New England since they make the perfect protected nursery in which to harden off your summer seedlings each spring. And if you can easily build one for cheap or free using reclaimed materials, why not give it a try?
Where should you put a cold frame?
You’ll want to choose a location for your cold frame that is protected from north winds and generally sunny. This means the best spot for your cold frame will have no shade from any trees, and preferably be placed with the back wall of the cold frame up against the south side of your house, shed or barn. If you don’t have a spot like this available, then anywhere without shade will do. You’ll just need to spend some extra effort properly insulating your box from the winds.
Speaking of howling winds, so long as it is protected from those north winds we discussed you shouldn’t worry yourself too much about creating something airtight. Your cold frame is not a greenhouse, and so we don’t expect it to function quite the same. Build your frame to be thick and sturdy, but don’t worry about every little seam and crack.
How to build a cold frame
If you have the time and physical ability, building a cold frame yourself is absolutely the most economical solution. Purchasing one ready-made can cost you anywhere from $60-$500 and quality issues on the low end of that budget will prevent you from getting many years of use out of it. Meanwhile, if you build one yourself it can be done for far less than the low end of that range and produce an end result that will be sturdy enough to continue providing shelter to your winter crop for years to come. While old windows can be fragile and prone to breaking, when they can be found for free I still find it a better option than a new piece of corrugated plexiglass.
We built our cold frame just as the first leaves began dusting the earth, making their final descent from the branches above. Pulling out the old wooden windows and reclaimed lumber from our basement, I didn’t really have a plan. This is the nature of projects on our little homestead - in order to put to rest my fears and limiting beliefs, I have a tendency to turn a blind eye to the specifics and figure things out as I go. “I’m just going to build a big rectangle, the size of the two windows combined, and stick the windows on top” I confidently told myself. It’s safe to say I don’t have a ton of confidence when it comes to building things, but I was betting that between the two of us, we could figure it out. A chill wind traveled across the field. I adjusted my hat over my cold ears and set to work.
This method of trial and error has generally served me quite well on this journey, and I’ve found it to be essential to growing plants in particular. A fussy Nasturtium in Georgia, for example, is going to have very different needs that one planted in Vermont. So why overwhelm ourselves with tips and tricks from every gardener in the land when we could simply plant, observe, expect failure and experiment until things go right?
You can use many different materials to build a cold frame - but the very best materials are the ones you already have. Our little pile of scrap lumber provided nearly everything we needed to create a sloped box on which to mount our hinges and old wooden windows.
The result was…lopsided. For some reason, the box wasn’t sitting level on the earth, the wood having twisted under tension at some point, unnoticed by our novice eyes. The old windows we used for a lid were chipping questionably safe paint flakes every time we opened and closed the hinges. But it was finished, and it was free, and so - in the ground it went. I packed straw around the exterior to fill in the gaps where the frame didn’t meet the soil and added extra in the space between the wall and the cold frame, set my plants in the earth and held my breath that I would discover an abundance of fresh food beneath the glass in a couple of months.
I suppose I shouldn’t have led with such an obvious spoiler, but the cold frame did work, and an abundance we did have, regardless of our lack of building skills. And so as its lessons compounded the cold frame became something more than a simple box to grow in. The weathered wood shines like a beacon, a reminder to ourselves that we can accomplish more than we think, and done is better than perfect.
What Can you grow in a cold frame?
Kale
Swiss Chard
Spinach
Radishes
Lettuce
Beets
Carrots
Arugula
Kohlrabi
Scallions
Parsley
Mustard
Best cold frames to buy
Don’t want to build your own cold frame? There are many pre-made options available that are built to last. I suggest looking for a cold frame that has a rot-resistant cedar base and shatterproof polycarbonate lid. If you already have raised beds, then a plant protection tent may be the best option for you as you can simply convert your raised beds into a cold frame for the winter months and then remove the tent structure in the summer heat. Here’s my recommendations for the best pre-made cold frames and tent frames you can buy:
The 3-Season Garden Protection Tent from Gardener’s Supply makes it easy to access plants within your raised bed and includes two covers and durable powder-coated steel frame. This tent provides 70% light transmission, 40" of head room at the peak, and has roll-up end windows for ventilation. A second cover protects against ravenous summer bugs and scorching sun. Three zippered doors on each cover provide easy access for tending and harvesting. Tie-downs secure the covers to the steel frame. Click to Shop
The Cedar Cold Frame from Gardener’s Supply is an attractive cold frame with a narrow footprint. The base is made from rot-resistant lumber with aluminum corners. The top is made with polycarbonate panels that diffuse light so plants don't "cook," and there are adjustable braces to hold panels at various intervals for ventilation. Click to Shop
Will you try cold frame gardening this year? Have you used a cold frame already? Comment and let me know!


10 Zero Waste Gardening Tools and Ideas
In all areas of our lives, from our hobbies to our habits, we have opportunities to either increase or reduce our impact on the environment and the effects of climate change. While the burden of fixing our climate crisis should not fall on the individual but the corporations that are responsible for the vast majority of damage done, every little bit you are able to do can help. The best part is, most of the ways we can reduce or eliminate our waste in gardening come at no additional effort or cost - it simply comes down to intentionally deciding on the plastic free or secondhand option instead (which is often cheaper anyway)

The Cottage Peach is reader-supported. When you purchase through links on our site, we may earn an affiliate commission at no additional cost to you. All opinions are our own.
In all areas of our lives, from our hobbies to our habits, we have opportunities to create or reduce our impact on the environment and the effects of climate change. While the burden of fixing our climate crisis should not fall on the individual but the corporations that are responsible for the vast majority of damage done, every little bit you are able to do can help. The best part is, most of the ways we can reduce or eliminate our waste in gardening come at no additional effort or cost - it simply comes down to intentionally deciding on the plastic free or secondhand option instead (which is often cheaper anyway)
What does zero waste mean? What is zero waste?
Zero waste is the principle or practice of sustainable living in which the participant commits to reducing or eliminating streams of waste in various aspects of their lives. This can include reducing water consumption, shopping the bulk food bins or repurposing household items at the end of their “useful” life, to name a few.
The concept of zero waste living can sound intimidating or difficult, but more often than not it is nothing more than a simple shift in your awareness and intention. It also does not mean you must completely eliminate all sources of waste in your life - despite the word “zero”, it is not an all or nothing game.
What kinds of waste are there?
Waste comes in all forms, in all areas of our lives. While the majority of waste filling landfills is produced by industrial operations, domestically, we waste food, water, energy, paper, packaging, furniture, clothes, computers, tires, appliances and more in unimaginable amounts. Americans send nearly 150 million tons of trash to landfills each year instead of recycling it, and we’re running out of space.
Where does waste go?
Waste goes into landfills, which typically cause the destruction of natural wildlife habitats in their construction. They are often lined in plastic. The average landfill size is 600 acres. With over 3,000 active landfills in the United States, as much as 1,800,000 acres of habitat have been lost. When waste breaks down in a landfill, methane gas is released. Methane is 84 times more effective at absorbing the sun’s heat than carbon dioxide, making it one of the most potent greenhouse gases and a huge contributor to climate change.
Food can’t break down in a landfill
Food waste needs oxygen in order to break down properly. Due to the fact that landfills are so tightly packed with waste of all kinds, food waste is often suffocated to the point where it cannot break down into the individual nutrients it is composed of and be reabsorbed into the earth, regenerating the soil. What happens if food doesn’t break down? It rots. When food rots in a landfill, it produces huge amounts of methane — a greenhouse gas at least 28 times as potent as carbon dioxide.
Here’s what the FDA has to say about the impacts of food waste:

“Food loss and waste is estimated to be roughly one third of the food intended for human consumption in the United States. When food is discarded, all inputs used in producing, processing, transporting, preparing, and storing discarded food are also wasted. Food loss and waste also exacerbates the climate change crisis with its significant greenhouse gas (GHG) footprint. Production, transportation, and handling of food generate significant Carbon Dioxide (CO2) emissions and when food ends up in landfills, it generates methane, an even more potent greenhouse gas.”
This is why zero waste food is so important, and we can do this easily with composting! (More information on that below)
Ways to incorporate zero waste principles into your garden
We live in an era that romanticizes convenience in all forms. Of course it’s easy to see where these ideas might apply to a zero waste home, but this also extends to our hobbies, including gardening. You can’t visit the local garden center without being bombarded with gadgets and tools promising to make garden tasks easier, faster or better. But the fact is that humans have been gardening successfully for hundreds of years, without many of these interventions. Certainly there are tools that make gardening more accessible for those of us with chronic illness or pain that find it challenging, but here I’m primarily referring to situations where there is a perfectly good alternative with less packaging, that is made without plastic which can never break down once it reaches the end of its useful life.
I’m sure you’ve heard this before, but the key concepts behind achieving a zero waste lifestyle are to reduce, recycle and repurpose. But how do you apply these concepts in the garden?
I recommend intentionally shifting your mindset.
When something breaks and needs to be replaced in the garden, first ask yourself “Can this be repaired?” if not, ask “can it be repurposed?” and if you still cannot find a use for the broken item, ask “can it be recycled?”
With these three simple questions, you’ll be well on your way to intentionally incorporating zero waste practices into your garden routine. But here’s a few ideas for zero waste gardening to get you started:

Reuse food containers for produce storage
Pop your zucchini in an old bread bag, pureed pumpkin in salsa jars and fresh picked berries in plastic yogurt tubs - all of which make excellent replacements for disposable freezer bags or plastic wrap. You’re keeping those items out of the waste stream AND preventing the addition of another piece of waste from the disposable products you skip using.
Wrap produce in damp cloths
Not only are you avoiding the use of disposable cling wrap, you’ll extend the life of your vegetables and avoid having to send them to the compost all together. In fact, learning the best storage methods for every fruit or vegetable that you grow is the best way to reduce food waste.
Save shower water for plants
Before you close this page in disgust, I’m not saying you have to save your DIRTY shower water. But how long are you running that shower before you even get in? Simply place an empty 5 gallon bucket under the faucet until you’re ready to get in, then pour that excess water on your garden beds when you go out to water.
Make vegetable stock
By being proactive and saving any cut offs from your carrot and onion ends, as well as any whole vegetables you won’t be able to use before they go bad and freezing until you have a full gallon bag to work with you can make simple and nutritious vegetable stock - just add your collected scraps to a pot of boiling water and simmer covered for 1-4 hours.
Compost
Landfills lack the oxygen that compostable items need to fully decompose. By putting biodegradable items into the compost instead of the trash, you can save huge amounts of waste from the landfill. We have an outdoor compost pile as well as Lomi - an indoor countertop composter that allows us to compost all sorts of things we couldn’t put in a regular compost pile including meat, dairy and bioplastic packaging which would take years to fully decompose in a traditional compost pile.
Save cardboard for kindling/weed barrier
Any child who has ever built a fort out of a box will tell you that cardboard has infinite uses, and the garden is no exception.
Buy second hand garden clothing/tools
When you choose second hand gardening tools, hats and aprons you’re keeping precious items from the landfill, giving them a new life and best of all these items have generally already withstood the test of time, so you can count on them to last.
Take care of what you have to make tools last
Once you have those second hand tools, make sure and do your research on the best way to maintain them. Click here for my post all about the best ways to maintain your gardening tools.
Repurpose branches for stakes/trellis
Nobody likes a plastic trellis, and even the pretty wooden ones available at garden centers hardly last me one season. Building a natural trellis using sticks and branches is simple and rewarding, and fits in well with the natural landscape you’re working in. Plus, at the end of the year you can just chuck them back in the woods if they’re broken or place aside to reuse again.
Use jute twine instead of nylon
According to GoodOnYou, producing nylon creates nitrous oxide, a greenhouse gas that is 300 times more potent than carbon dioxide…Manufacturing nylon is a very thirsty process; large amounts of water are used for cooling the fibers, which can be a source of environmental contamination and pollution. Treehugger says that nylon production is associated with the same negative environmental impacts as fossil fuels, including exacerbating the climate crisis. It’s safe to say that nylon is definitely not biodegradable, unlike its natural cousin jute twine. Because jute is compostable and biodegradable and requires fewer resources to grow and produce, it is considered a future-proof sustainable fiber.
I hope this post all about zero waste gardening ideas was helpful! what tricks do you use in the garden to reduce, reuse and repurpose? Comment below and let me know!
![Make This Natural Herbal Face Steam With Just 5 Ingredients [Recipe]](https://images.squarespace-cdn.com/content/v1/60e85024dc86d643da81c96a/5aa8b75d-bcc6-484a-8f82-d457ecc55806/Herbal+Face+Steam+Recipe+by+The+Cottage+Peach-3.jpg)
Make This Natural Herbal Face Steam With Just 5 Ingredients [Recipe]
Our skin bears the burden of our carelessness on a daily basis - in the driest season, when the air itself is parched of moisture, we still can’t seem to keep up with our eight glasses of water a day, leaving our skin dry and dull - especially when less sunlight is still to be found. And so all sorts of ailments befall us, from chapped lips to premature aging and flaky foreheads. I’ll be the first to admit that as much as I enjoy my skincare routine, it easily falls to the wayside due to my chronic illness or general busyness, my exterior being low on my list of priorities when my joints are aching.
What can we do about dry skin, besides simply hydrating with water and moisturizer? At this point in the season, our skin needs more than simple maintenance. We need a repair. And the best way to jump start this process is to incorporate the spa-like but deceptively simple practice of an herbal face steam.
The Cottage Peach is reader-supported. When you purchase through links on our site, we may earn an affiliate commission at no additional cost to you. All opinions are our own.
Our skin bears the burden of our carelessness on a daily basis - in the driest season, when the air itself is parched of moisture, we still can’t seem to keep up with our eight glasses of water a day, leaving our skin dry and dull - especially when less sunlight is still to be found. And so all sorts of ailments befall us, from chapped lips to premature aging and flaky foreheads. I’ll be the first to admit that as much as I enjoy my skincare routine, it easily falls to the wayside due to my chronic illness or general busyness, my exterior being low on my list of priorities when my joints are aching.
What can we do about dry skin, besides simply hydrating with water and moisturizer? At this point in the season, our skin needs more than simple maintenance. We need a repair. And the best way to jump start this process is to incorporate the spa-like but deceptively simple practice of an herbal face steam.
What does face steaming do?
The heat from face steams loosens oils to aid in the removal of unwanted substances, like excess sebum (oils produced by your skin follicles), dirt and bacteria.
Since acne is caused by excess sebum trapped in your follicles prompting bacteria growth, face steams help combat acne.
When your pores are open and warm, they can more easily absorb hydration as well as any skincare products you apply afterwards.
The heat from the steam also results in increased circulation, promoting healing.
Face steaming is also a meditative, calming practice you can incorporate into your mindfulness routine.
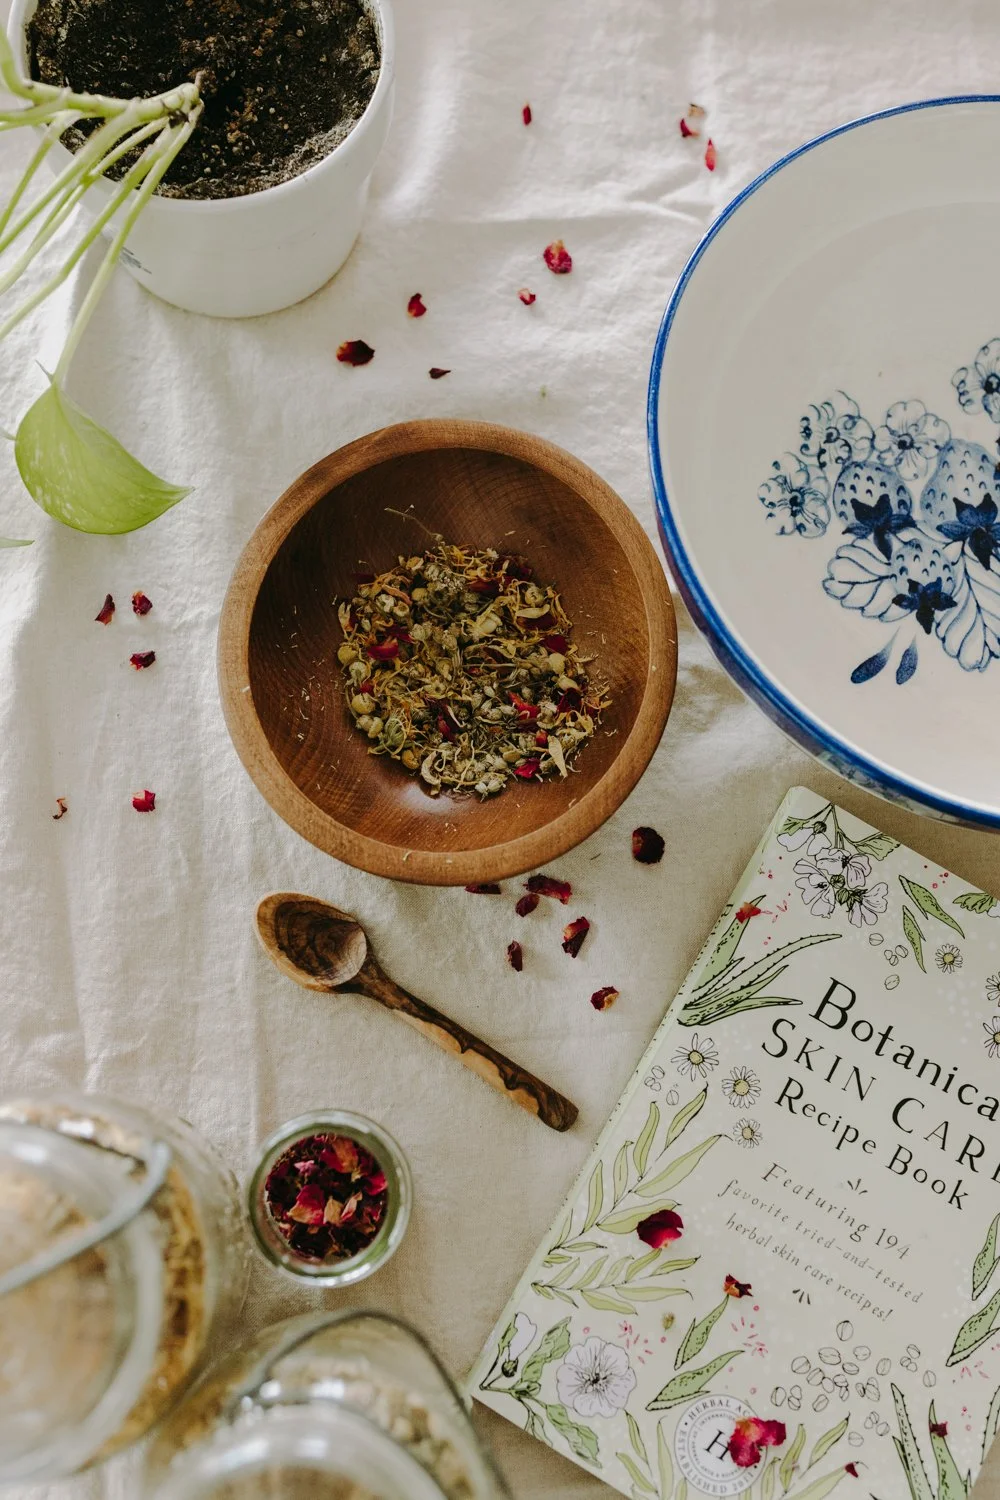
I’ll get into all of the details for how to make your own diy face steam at home below, but first let's talk a bit about the individual plants, flowers and herbs we will be using in this recipe. You’ll only need four herbs for this project, but if you feel like substituting something for one listed below there’s no harm in making the recipe your own. You’ll be able to mix up a batch in less than 5 minutes, and be well on your way to a calming self care ritual that is affordable, natural and zero-waste.
This recipe comes from the Botanical Skincare Course from Herbal Academy and its corresponding book of recipes - you can see my full review of this in depth course here and sign up for classes by clicking here.
Benefits of Chamomile
Because chamomile has anti-inflammatory properties in the form of powerful antioxidants including polyphenols and phytochemicals, it helps to protect against long-term and short-term skin inflammation. Chamomile may also accelerate cell and tissue regeneration, promoting healing. It is also antifungal, antibacterial, and antiseptic. With all these powerful actions, this beautiful apple scented bloom may help to treat an active acne breakout, reducing bacteria and cleansing the skin, whilst also preventing future breakouts.
Benefits of yarrow
Yarrow is a flowering herb that grows in North America, Europe, and parts of Asia. Herbal legend has described that yarrow (Achillea millefolium) was named after Achilles, the Greek mythical hero who used it to stop the bleeding wounds of his soldiers during the Trojan War in 1200 BC. In Medieval times, yarrow leaves were rolled up and stuffed in the nose to stop bleeding. It is particularly beneficial in reducing inflammation; it's effective in speeding healing, reducing the appearance of wrinkles, reducing redness, unclog pores, calm irritation and reduce acne scars.
Benefits of lavender
Aside from its lovely scent, lavender’s anti-inflammatory, antimicrobial, and antifungal properties make it an incredibly useful plant for our skin. It can soothe and calm skin, help fight acne, and even help heal minor cuts and burns. It is useful for rashes and skin irritations caused by medical conditions such as psoriasis, rosacea, and eczema. Some studies have shown that the antioxidants in lavender may even help to reduce wrinkles.
Benefits of thyme
Thyme has been widely acknowledged as one of the most used herbs since as far back as ancient Egypt. Thyme belongs to the Lamiaceae, also known as mint, family. Due to thyme’s high thymol content, it kills bacteria and fungus. Thyme has the benefit of antifungal and antiseptic properties. With its circulatory and medicinal properties, Thyme fortifies the skin and provides relief from itching and tightness caused by dry skin.
Find these herbs and more by tapping here to visit my favorite online herb shop!

History of facial steaming
Face steaming is a part of an Ayurvedic therapy called 'Swedana', that helps to remove toxins from the skin and deeply cleanses the pores. Turkish hammam bathhouses, which were both social and wellness hot spots for cleansing and relaxing in steamy rooms, are one of the earliest examples of steaming as self care—their origins can be traced back to the Roman empire. The first commercial face steamer was produced in 1903, though of course you don’t need any special tools to steam your face - a large bowl and a towel to drape over your head are all that is necessary.
Does steam actually open your pores?
Using warm water to “open” your pores is technically impossible. Since your pores aren't muscles, they can't voluntarily open and contract, so hot water and steam won't open your pores. What steam can do is loosen the sebum (oil) in your face, allowing it to slide out of the pores easily when you wash with cleanser. So why do your pores look “smaller” when you apply certain treatments? It’s actually caused by tiny blood vessels expanding in your skin, causing minor swelling that pushes the pores closer together. The size of your pores is dictated by the amount of collagen in your skin, genetics and many other factors. It cannot be permanently altered.
Face steams are so easy to make and use - in their most basic form, all you need is hot water! Of course, adding herbs, aromatic oils and other compounds to the hot water can result in a supportive infusion with multiple benefits. I encourage you to experiment with different herbal combinations that you are drawn to. If you don’t like one of the scents of the ingredients listed below, sub it out for rose petals or something else. Herbal steams for your face also make sweet and thoughtful gifts for birthdays and holidays alike - blended together they can create a beautiful rainbow effect. I have blended cornflower, rose and lavender for a blue red and purple confetti that looked amazing packed into tiny clear glass test tube vases with a little cork topper.
If you are just learning about herbalism, facial steams are a great easy beginner DIY skincare project and introduction to herbal remedies, using plants that are considered generally safe for most. And if you find you have sensitive skin that can’t tolerate many products directly applied to your face, a steam can be a gentle way to incorporate these herbs into your routine without a direct topical application.
You will need a large bowl that is glass or ceramic. We don’t want to use plastic or anything that may contain other harmful chemicals that could vaporize and be released into the steam through the hot water. You will also want to grab a lightweight small towel to cover your head with and trap the steam inside a little makeshift tent. I wouldn’t use a heavier bath towel as it could place undue strain on your neck and the last thing we need is a sore neck from what is supposed to be a relaxing experience! I do also recommend choosing a spot where you can comfortably sit at a height where the bowl is resting on a table you do not have to stoop or bend to relax in front of, and (though I know how tough this can be!) eliminate all distractions - you don’t want a child asking where their favorite bear is or TikTok notification to startle you into splashing yourself with the hot water!
Once your blend is ready, put your phone on silent and unplug, allowing yourself to fully embrace these few minutes of peace and tranquility in your busy day, unwinding and resetting your face and heart for the challenges to come and giving yourself permission to just be.
Herbal face steam by Herbal Academy
An herbal steam with antimicrobial and antiseptic herbs can be a lovely way to pamper and support irritated, acne-prone skin.
Ingredients
2 tbsp chamomile (Matricaria chamomilla) flower
2 tbsp lavender (Lavandula spp.) flower bud
2 tbsp yarrow (Achillea millefolium) aerial parts
2 tbsp thyme (Thymus vulgaris) aerial parts
2 quarts (64 fl oz) water
Directions
● Combine herbs in a wide glass or ceramic bowl.
● Heat water to boiling, then pour over herbs.
● Sit comfortably with face positioned 10 inches from the bowl—close enough to feel the steam, but not so close as to be burned by it.
● Cover head with a towel, creating a tent over your head and the bowl.
● Steam face for approximately 5 minutes.
● Splash cool water on face and gently pat dry with a clean towel.
Will you try this recipe? Learn herbalism with Herbal Academy by clicking here


![The Power of Nature: How To Make Infused Oregano Oil for Your Health and Wellness [Recipe]](https://images.squarespace-cdn.com/content/v1/60e85024dc86d643da81c96a/1682625337753-AFI1M6MRRMDQ5CBNY2TX/unsplash-image-Fl2Ki3_GZIU.jpg)
![Make This Easy + Natural Botanical Hand Salve [Recipe]](https://images.squarespace-cdn.com/content/v1/60e85024dc86d643da81c96a/b57698b0-de70-4101-afaf-7af57788237d/Herbal+Face+Steam+Recipe+by+The+Cottage+Peach-1.jpg)
![How to Build a Bird Feeder [Tutorial]](https://images.squarespace-cdn.com/content/v1/60e85024dc86d643da81c96a/1674059559898-89P7CA2E2E9QRBF8WBHT/unsplash-image-_m66w5WWVO4.jpg)
How to Build a Bird Feeder [Tutorial]
Like many young people, I thought my grandpa might have some kind of magic. You see, he was one of those people who seemed to be friends with the birds in a way not many of us are. He could merely step out into his yard and with a few quick whistles summon all varieties of backyard birds to his palm or his shirt pocket, where they would enter into a conversation of chirps and intense eye contact that fascinated me. To be honest, looking back I’m still fairly certain that it was some sort of magic. Even through the rose colored glasses of childhood, I know deep in my bones that he understood something of nature that many people do not. Could he have known that these moments he spent with me and the birds, carving whistles from fallen horse chestnuts, would become a part of my own origin story as a naturalist? Far from an expert though I might be, he showed me what it meant to be a student of nature long before I grew my own garden or made my own companions in the rabbits and toads that keep me company as I sow, weed and water. I learned from him that all wildlife has value, no matter how small. That bird song deserves our attention. And of course, I learned that feeding birds is just plain fun.
Why have a bird feeder? Here’s some of the benefits of backyard birds in your yard:

The Cottage Peach is reader-supported. When you purchase through links on our site, we may earn an affiliate commission at no additional cost to you. All opinions are our own.
Like many young people, I thought my grandpa might have some kind of magic. You see, he was one of those people who seemed to be friends with the birds in a way not many of us are. He could merely step out into his yard and with a few quick whistles summon all varieties of backyard birds to his palm or his shirt pocket, where they would enter into a conversation of chirps and intense eye contact that fascinated me. To be honest, looking back I’m still fairly certain that it was some sort of magic. Even through the rose colored glasses of childhood, I know deep in my bones that he understood something of nature that many people do not. Could he have known that these moments he spent with me and the birds, carving whistles from fallen horse chestnuts, would become a part of my own origin story as a naturalist? Far from an expert though I might be, he showed me what it meant to be a student of nature long before I grew my own garden or made my own companions in the rabbits and toads that keep me company as I sow, weed and water. I learned from him that all wildlife has value, no matter how small. That bird song deserves our attention. And of course, I learned that feeding birds is just plain fun.
Why have a bird feeder? Here’s some of the benefits of backyard birds in your yard:
Pollination
Backyard birds do much of the same work as the insect pollinators we are all familiar with when it comes to spreading seed and supporting plant growth - both good and bad. For example, the reason you almost exclusively find poison ivy along fences and underneath trees is because birds eat the berries, digest them and then “plant” them while sitting on branches or fence posts.
Pest control
Birds eat bugs - the largest ones eat rodents too. Aside from the beloved garden worm, they also eat flies, ants, moths, aphids and ticks…and if you’re luckier than me, they’ll even help with your cabbage moth problem by eating the larvae before they have a chance to totally decimate your kale crop (ask me how I know)
Weed control

Birds eat seeds, including weed seeds! Birds can help manage invasive species that you do not want growing on the land with their snacking. This is also why it is so important not to completely clear-cut your dead garden for the fall and winter - leave it up as a vital food source for the local wildlife and cut back in the spring before new growth forms instead.
Conservation
Creating an environment that is inviting and safe for backyard birds offers us the chance to give back through conservation of these important species. The more trees and shelter your can provide throughout the land, the better for all your neighborhood birds (and other wildlife!)
Education
What better way to teach your children the importance of wildlife than to observe it in your own backyard, as I did as a child with my grandfather.
Bird song
I have yet to meet a person who doesn’t enjoy the warbling, chirping, sing-songing symphony of bird song in the summertime.
What is a bird feeder?
A bird feeder is some type of container hung from a high up spot and filled with bird food that allows birds to land and eat safely. A bird feeder can be made of many different things - read on for some of my favorite DIY bird feeder ideas!
So you want to know how to build a bird feeder. Thanks to decades of experience, I’ve made my fair share of zero waste bird feeders for free, with repurposed materials you probably have in your house right now. Here are some of my favorite DIY bird feeders you can make today:
Fruit string garlands: This is a simple bird feeder. Pop some popcorn the night before and leave it out so it gets a bit stale since it’s easier to thread this way. The next day, cut up various fruits (apples, oranges and blueberries work well) With a needle and thread, pierce through your fruit chunks and popcorn in an alternating pattern until you have a good length of garland. Simply drape your finished garland over a couple of branches and you’re done.
Empty can on its side: Create a bird feeder station by piercing a hole in the bottom of your empty tin can and thread a piece of sturdy twine all the way through the inside of the can, through the opening and the hole you created, making a large loop over the top. Secure the twine so that the can can lay on it’s side when hung and add a layer of birdseed to the “floor” of the can.
TP roll covered in peanut butter + seeds: Kids love this easy bird feeder! It’s a little bit messier, but easy and fun. Spread a thin layer of peanut butter over the exterior of the toilet paper roll. Pour your birdseed into a tray or baking sheet and then slowly roll the tube in the seeds to coat the outside with seed. Thread a piece of sturdy twine through the interior of the tube and secure, making a big loop from which to hang your TP roll!
Cookie cutter ornament bird feeder: Combine 2 envelopes of gelatin with ⅔ cups boiling water. Stir 2 cups of birdseed into this and press firmly into your cookie cutters. Use a toothpick to form a small hole that you can pass twine through to hang your ornament outside. Allow to dry overnight.
Pinecone bird feeder: Similar to the TP roll craft above, you’re going to spread a thin layer of peanut butter over the pine cone and roll in seeds on a tray. Securing a piece of twine may be a little trickier on this one - but just try and wrap it around the top of the pinecone and form a loop for hanging.
Hollowed out orange with toothpick ledges: Cut your orange in half and scoop out the inside. Save for a snack for later, or incorporate into the fruit garland idea above. Poke 8 holes evenly around the cut edge of the orange. Thread twine through 4 of these holes and have them meet at the top to form a hanging basket. Poke toothpicks in the remaining 4 holes to serve as ledges the birds can stand on. Fill the empty orange with seed and hang.
Egg carton: Take the lid off of an egg carton and poke holes in the four corners of the bottom piece. Thread twine through the four holes you just made to create hanging loops. Pour bird seed into the divots that the eggs would normally rest in and hang! I think this is the best bird feeder you can make with minimal effort.

It’s important to be mindful about choosing a bird seed blend that is meant for birds in your area when considering a bird feeder DIY. If possible, choose an organic variety to avoid exposing your bird neighbors to unwanted pesticides or other chemicals. Bird seed is the safest thing to feed your backyard birds. Here are some foods that aren’t safe for backyard birds:
Bread
Spoiled seed
Chips
Anything with sugar
Honey
Salt
Milk
How to keep squirrels away from bird feeders

Let’s be honest; you’re going to have a tough time finding any bird feeder that is completely squirrel-proof, and DIY bird feeders do not have any extra cages or protection on them to help in that regard. I accept that squirrels will probably take more than their fair share from the snack I create, but you can try a couple of things to deter squirrels from investigating your bird feeder: Switch up your seed to see if there’s a variety they aren’t interested in (squirrels do not like safflower seed, nyjer seed, and white proso millet), try mixing cayenne powder into your bird seed (birds are not sensitive to the heat of capsaicin but squirrels are!) keep the ground clean of spilled seed underneath the bird feeder and place your bird feeders away from trees.
Where to place a bird feeder
According to Yard Envy, you should hang your finished DIY bird feeder in a place where your visiting birds feel safe from predators. Avoid open and noisy areas and hang your bird feeders at eye level or a little above. Do not hang feeders too close to any place where squirrels can jump on them, or so low that they are within a cat's reach.
How to attract birds to your feeder
According to Wild Birds Unlimited, birds generally find their food by sight. Placing your feeder where it will be visible to them should decrease the time it takes for birds to start feeding. Sometimes sprinkling some seed on the ground or on top of the feeder will let the birds know that you are open for business.

![Nature Activities for Winter: Snow Cream [Recipe]](https://images.squarespace-cdn.com/content/v1/60e85024dc86d643da81c96a/6720ab18-5211-4afe-8d88-3c7b20941ca5/PXL_20220107_170654271.jpg)
Nature Activities for Winter: Snow Cream [Recipe]
In the winter my scuffed up slippers are my constant companion, and I am always seeking out sources of external heat - much to my husband's dismay, that source is usually him. I like to pretend that his yelps as my icy toes are for comical effect, but the poor man puts up with a lot from me this time of year, my frozen appendages topping the list.
My body runs cold, so you might make the mistake of thinking that since I am always cold from my fingertips to my toes, I would avoid cold things at all costs. But no, I have one weakness, and it is ice cream. I’m told that it runs in the family, as evidenced by the sheer number of “ice cream breakfasts” I experienced as a child during sleepovers at my grandparents house. But how could I not enjoy ice cream all season long? I may be shivering from the internal cold of my own creation but I will not deny myself a dish of chocolate chip cookie dough or mint flavor ice cream, no matter how many degrees below zero it may be.
The Cottage Peach is reader-supported. When you purchase through links on our site, we may earn an affiliate commission at no additional cost to you. All opinions are our own.
In the winter my scuffed up slippers are my constant companion, and I am always seeking out sources of external heat, and stuffing my toes under the cat.
My body runs cold, so you might make the mistake of thinking that since I am always cold from my fingertips to my toes, I would avoid cold things at all costs. But no, I have one weakness, and it is ice cream. I’m told that it runs in the family, as evidenced by the sheer number of “ice cream breakfasts” I experienced as a child during sleepovers at my grandparents house. But how could I not enjoy ice cream all season long? I may be shivering from the internal cold of my own creation but I will not deny myself a dish of chocolate chip cookie dough or mint flavor ice cream, no matter how many degrees below zero it may be.
Here in New England, it’s important to know which ice cream shops stay open throughout the winter months - a short list to be sure, but an essential one. It is a unique sort of camaraderie that you share with others in line for ice cream on a chill January day, bundled up to your ears but clutching that cup or cone like your very life depends on it. Despite the lack of options for open ice cream stands in winter, the line is always short and I can quickly grab my treat and be on my way, whisking the cup-with-a-cone-on-top situation into the belly of my warm vehicle. But there is one type of ice cream that requires a very specific set of winter circumstances to be enjoyed, and that is the elusive Snow Cream.
If you’ll allow me to take you back to my childhood once again, let’s journey back in time to 1996; specifically Season Two, Episode Five of Little Bear (a children’s show with no known modern rival to match its particular blend of slow, simple outdoor living, whimsical and kind friends and adventure): Snowed in at the cabin. Emily’s grandmother teaches everyone how to make snow cream and they sing this cheery tune which still manages to worm its way into my subconscious every snowfall more than 25 years later:
“Whether the weather be cold,
Or whether the weather be hot,
We’ll weather the weather,
Whatever the weather,
Whether we like it or not”
Once winter has really truly settled in, I begin waiting, and watching, for the perfect circumstances to arrive. Fresh, fluffy snowfall is a requirement for this snow ice cream recipe, and it cannot be grown or bought. We are at mother nature’s mercy on this one, which makes the end result that much more special, a truly local and seasonal food. Of course it helps if you are snowed in and bored too, (maybe throw a power outage in there as well) looking for a way to pass the time that doesn’t involve card games or chucking wads of crumpled paper at each other and pretending you don’t know who’s at fault (other people do this too, right?!).

I may seem biased by my nostalgia but you’ll just have to take my word for it; snow cream lives up to the hype. It is winter magic in a bowl. It is all of the delights of the wonder of childhood manifested in physical form. Which is really just a pretty way of saying - it’s delicious. Simple. And you probably have everything you need to make snow ice cream in your house right now (well, except maybe the snow…but you can’t pick that up at the supermarket, so you’ll just have to watch the weather for that one)
How does something so crunchy and icy become a creamy, rich winter treat with only 5 ingredients? It’s not alchemy, though it may feel that way at times. This is an easy way to have your children’s eyes lighting up on a dreary winter day,
If you’re wondering how to make snow ice cream, my first recommendation is to watch Episode Five of that 1996 Little Bear epic because Emily’s grandma knows what’s up and will inspire you in ways I could never hope to achieve. But since this blog is *supposed* to be helpful, I’ll do my best to share the process here in my own words, with my own recipe for snow cream.
How to find the best snow to use for snow cream? Follow the same rules of foraging and keep away from areas near roadsides, buildings and any run-off areas. If you live in a polluted area, I’d suggest finding a friend in a more rural spot who wouldn’t mind sharing a bit of their snow. Try to time your “harvest” as soon after snowfall as possible in order to have the freshest, cleanest snow. Do not use snow that has footprints or animal prints in it. Most importantly of all: Never Eat Yellow Snow.
Snow cream is best made with heavy cream, but you can make snow cream with milk in a pinch as well. Vegan milk alternatives work, though personally I’d opt for the richest of the bunch - coconut cream. Really, snow cream is whatever your imagination says it can be, so any creamy liquid will do - I’d even try my hand a little tahini thinned with water if I was feeling experimental. The thing to remember about snow cream is that the ice portion (your snow) is literally just that - ice. It has no fat content on its own, which is what will transform this recipe into something truly rich and creamy like store-bought ice cream. So, the richer the better!
The next important ingredient is maple syrup. Can you use alternative sweeteners? Of course, this is your snow day after all. However, years of experience have taught me that maple syrup is the absolute best option for sweetening your snow cream dessert. There’s just something so earthy about maple syrup that pairs well with the fresh snow. But if you insist on coloring outside the lines on this one, try another deeply flavored sweetener like molasses, honey or brown sugar. This sweetness will give our snow cream the true dessert status it deserves.

Vanilla is added because snow is a blank slate, and we want to have a warm flavor to complement our cream of choice. You could also add any other flavorings you’d like to try now, like cocoa powder, cinnamon, peppermint or citrus. The beauty of this winter recipe is that you can make it as simple or complex as you like.
A pinch of salt will amplify the profile of your chosen flavorings, bringing them together in harmony - and before you decide to go rogue and skip this one, salt is not optional in my opinion. Just a small dash can make all the difference in your dessert tasting like the real thing.
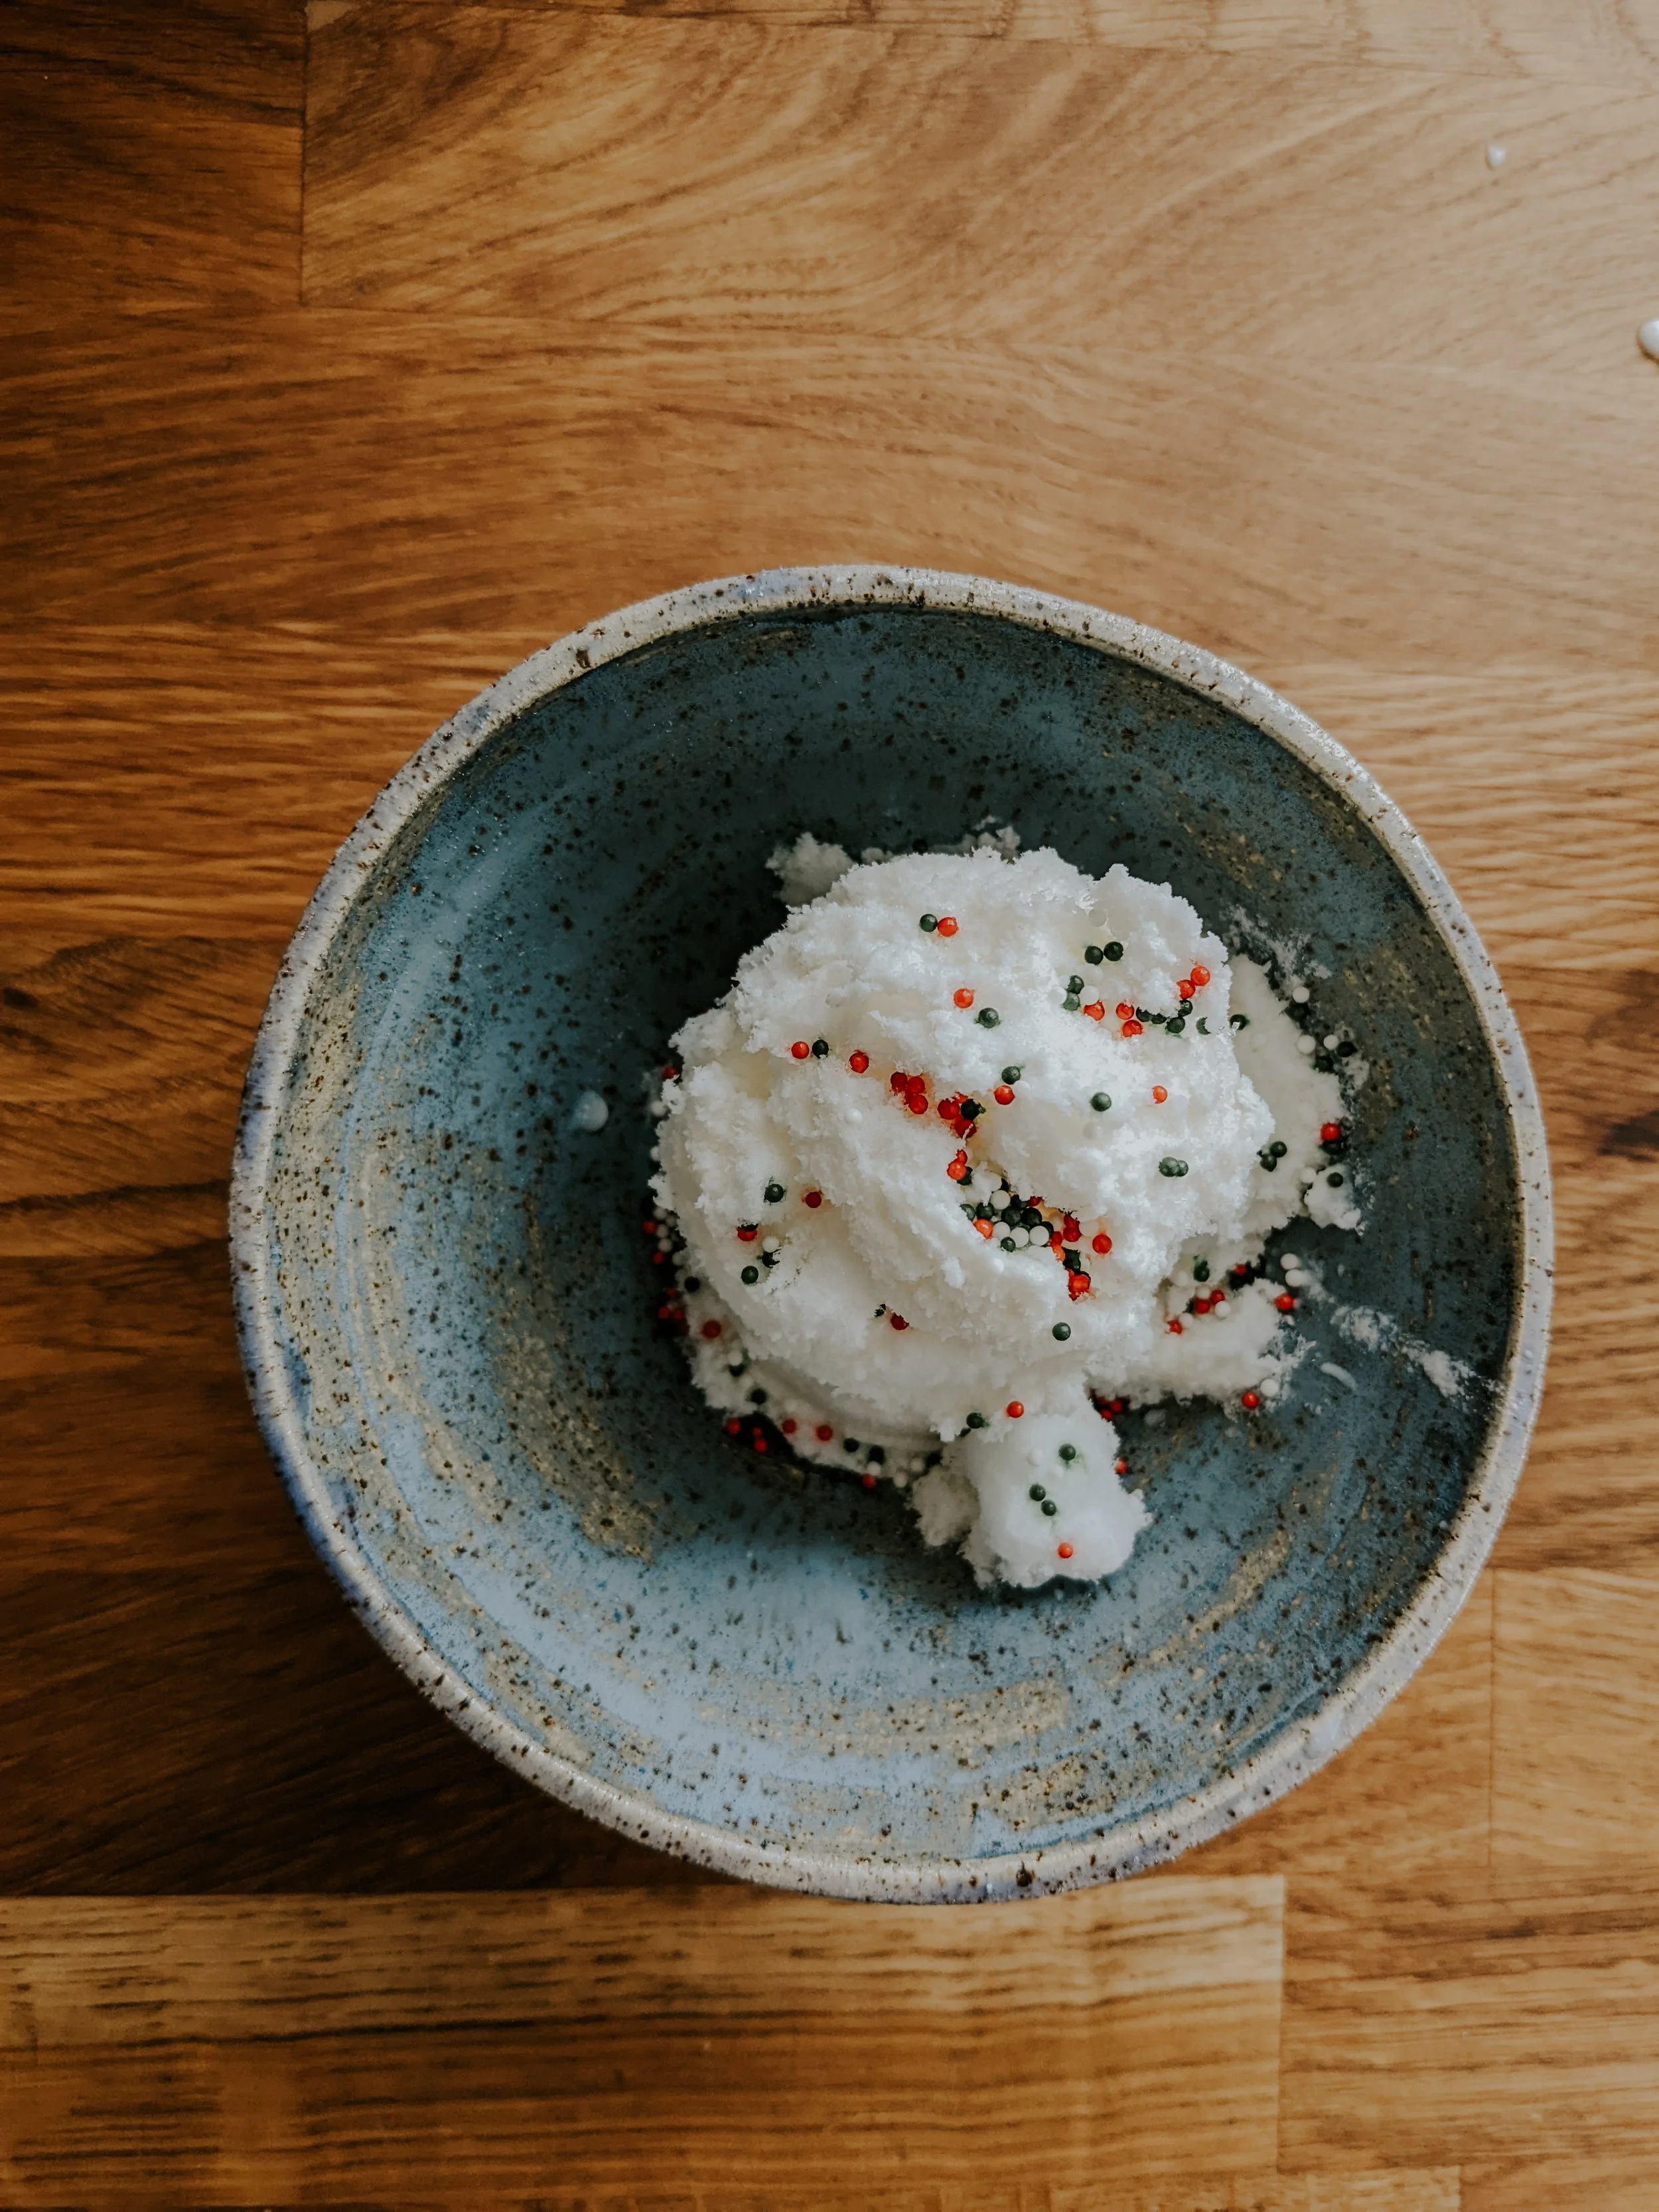
And last but not least, we’ll add a bit of winter cheer via the most joyful ingredient in your pantry: sprinkles! Use whatever you have on hand, but I opted for a traditional red, green and white variety. Small pieces work best with the delicate texture of snow cream. I don’t know about you but personally I will take just about any excuse to add sprinkles to my desserts, they are just so bright and fun. You could go along with a holiday theme or just go for the classic rainbow variety and no one would complain!
You’ll also want a large, sturdy bowl (thick walls will keep the snow insulated from the warmth of your kitchen and prevent it from melting too quickly), a whisk, spoons and bowls. Use whatever you have on hand, no need to get fancy with it when this treat will be gobbled up in a quick moment (although I do find it extra special to serve snow cream out of cute enameled mugs)

Snow Cream
Ingredients
- 8 cups fresh snow
- 1/2 can coconut cream
- 1 tsp vanilla
- 2 tbsp maple syrup
Instructions
- Combine all ingredients and serve immediately
How to make snow ice cream recipe:
Gather your ingredients and supplies, except for the snow. You’ll want to work quickly once you have the snow inside for the best texture, as it melts rapidly and does not refreeze well. You can also chill your bowl outside prior to harvesting the snow to slow the melting process, or bundle up and make the entire recipe outdoors.
Combine the coconut cream, maple syrup, vanilla extract and in your large bowl with the whisk. You want all the ingredients to be fully combined before you gather your snow.
Head outside and scoop up your clean snow into another large bowl. Pour the liquid mixture over the snow, stirring as you pour until the snow cream is fluffy, not saturated completely with liquid.
Scoop into individual bowls and top with sprinkles, or freeze dried fruit. Enjoy immediately - this treat melts fast!