
BACKYARD GARDENING MADE SIMPLE

Olla Pots and Companion Planting: Creating a Symbiotic Garden
I'll be the first to admit it: I'm a lazy gardener. If there's an easier way to do something so I can spend more time enjoying my plants and less time worrying about whether they have what they need, I'm going to do it! Combining olla watering systems with companion planting techniques could be all you need to create a thriving pest free and low maintenance garden this summer, no chemicals needed. Ollas, with their efficient and targeted water delivery, can play a key role in fostering a thriving and balanced garden ecosystem. They also eliminate the stress of inconsistent watering that can make them an easier target when pests do arrive. Stronger plants can combat those pests more easily, so by combining the two methods, you can create mutually beneficial relationships between plants, leading to healthier growth, increased yields, and natural pest control.
The Cottage Peach is reader-supported. When you purchase through links on our site, we may earn an affiliate commission at no additional cost to you. All opinions are our own.
I'll be the first to admit it: I'm a lazy gardener. If there's an easier way to do something so I can spend more time enjoying my plants and less time worrying about whether they have what they need, I'm going to do it! Combining olla watering systems with companion planting techniques could be all you need to create a thriving pest free and low maintenance garden this summer, no chemicals needed. Ollas, with their efficient and targeted water delivery, can play a key role in fostering a thriving and balanced garden ecosystem. They also eliminate the stress of inconsistent watering that can make them an easier target when pests do arrive. Stronger plants can combat those pests more easily, so by combining the two methods, you can create mutually beneficial relationships between plants, leading to healthier growth, increased yields, and natural pest control.
What is Companion Planting?
Companion planting is the practice of planting different crops in close proximity to each other to take advantage of their complementary characteristics. Basically, every veggie plant has a bestie (or a few!) that help it thrive. They're usually flowers or herbs. Some plants deter pests from their neighbors, while others attract beneficial insects that prey on those pests. Some plants provide shade or support for others, while others improve soil fertility or enhance the flavor of their companions. It really is amazing to see it in action, because it essentially creates a fully functioning natural ecosystem working with nature instead of against it, while also allowing for some really beautiful color and texture combinations that make gardens look more lush and full. Once I started including companion planting in my garden layout designs, I noticed I spent way less time hand picking munching bugs off my leaves and stressing over small harvests. It really goes to show that nature knows best!
Choosing the Right Plant Pairings for Your Olla Garden
The key to successful companion planting is choosing the right plant combinations. Some popular examples include:
Tomatoes and Basil: Basil repels pests that attack tomatoes and is said to enhance the flavor of the fruit.
Corn, Beans, and Squash: The "Three Sisters" of Native American agriculture support each other. Corn provides a stalk for beans to climb, beans fix nitrogen in the soil, and squash leaves shade the ground, suppressing weeds and conserving moisture.
Carrots and Onions: Carrots deter onion flies, while onions repel carrot root flies.
There's an endless variety of companion plant combinations that not only serve a purpose, but look totally beautiful at the same time. I always include flowers like nasturtiums and marigolds in my garden beds, because they are so multi-purpose - not only are they edible in and of themselves, they repel a wide variety of common garden pests that like to make your garden home and serve as trap crops to distract pests from the plants you don't want them to eat. And who doesn't love a little pop of floral in their summer garden salad? If you're new to companion planting, simply adding more flowers like these is a great way to start getting comfortable with the method and attract beneficial pollinators at the same time.
Olla Placement for Optimal Companion Planting
The strategic placement of your olla pots can maximize the benefits of companion planting. It's a good idea to place your plants that reqiure the most moisture closest to the olla - so for example, keeping your tomatoes in the inner ring of the ollas reach since they are high-moisture (or juicy!) plants, and placing the more Mediterranean crops such as herbs that like soil to be a little drier on the outside edges.
Additional Benefits of Combining Olla Watering and Companion Planting
In addition to promoting plant health and natural pest control, combining olla watering and companion planting can also help to conserve water, since ollas deliver water directly to the roots of plants, reducing water waste from evaporation and runoff. And, by encouraging a diverse range of plants, companion planting can improve soil fertility and structure. A diverse garden ecosystem is more resilient to pests and diseases. Companion planting can create a visually appealing and productive garden.
WHAT IS AN OLLA WATERING SYSTEM?
Olla (pronounced oya) means “pot” in Spanish, but the concept of using ollas as an irrigation system goes back thousands of years and has been used in countless cultures around the world. An olla watering system is basically an unglazed eight to ten inch terracotta pot that is buried beneath the soil with only a small amount sticking up above the surface and filled with water. The water then leeches out of tiny holes or “pores” in the unglazed clay and is pulled through the soil to the roots of your thirsty plants using a process called soil moisture tension. This functions much the same way as osmosis, in that the water is trying to equalize to a certain level of moisture within the soil. This means your soil will never become overwatered either - if the soil is moist, the water stays in the pot until it is needed. The downsides of DIYing a system like this are that it can be hard to identify true terracotta - and other types of clays have different properties that make them not as well suited for this job. Plus, you have to fill each one manually every 2-5 days depending on how hot it is and most importantly they take up a lot of room in the garden beds. But thankfully, with the Thirsty Earth system all of those cons are eliminated.
WHY SHOULD YOU USE A Thirsty Earth OLLA WATERING System?
Hauling around a watering can and standing with a hose for 45 minutes isn't exactly a walk in the park for everyone, especially folks like me with arthritis. This past spring, I was right in the middle of a flare-up when I planted my garden. I knew I needed a way to water my plants without turning myself into a pretzel!
Imagine this: you water your plants, but most of the water just sits on top and bakes away in the sun. olla watering systems stop that waste! The water seeps out of the pot slowly, right where your plants need it most - at their roots. This fancy trick can slash your water use by up to 61%. Less water wasted means a lighter water bill and a happier planet.
Olla watering systems aren't just about saving water, they're also all about growing healthy plants! Since the water seeps out underground, plant roots stretch out searching for that moisture. This makes them stronger and helps your plants stand tall. Olla watering systems also keep the leaves of your plants dry, making it harder for fungus and disease to spread. And the slow release of water means your plants get the perfect amount to drink, never too much.
Basically, olla watering systems create happy, healthy plants that can take on anything. But, each olla can only cover an area of about 2 feet all around it (depending on the system you use, but this is true for the ThirstyEarth ollas). So depending on the size and shape of your garden, you'll need to keep this in mind when choosing your olla placement.
Thirsty Earth Olla Watering System Review

Since it can be hard to find genuine terracotta pots affordably in your area, and they take up a lot of space in the garden, the Thirsty Earth olla watering system can be a good compromise that allows you to actually hook up your ollas to an automatic rainwater harvesting system that will continuously refill your ollas for you on it’s own from free rainwater collected from your roof. Plus they are about the size of a water bottle, so they don’t waste precious planting space. I added the Thirsty Earth system to two of my raised beds, and since the system is super easy to customize to whatever garden bed configuration you have, you don’t have to worry about not having the right parts or enough pieces to get it done. The website does a great job of showing you exactly how to lay out the cotta cups and it’s made an already pretty hands-off system completely self-sustaining; water is collected from my roof into a 50 gallon barrel, flows automatically into reservoirs and down the irrigation tube into individual terracotta cups. Setup is easy thanks to the push to connect fittings that come with every kit. You just lay out your cups, cut the included tubing to size and connect everything with the fittings. No need to understand plumbing or any special building skills and you won't need any special tools either. Once everything is set up, you can leave it all summer and the reservoir will refill automatically from your rain barrel or you can manually refill it about once a week. I know it sounds too good to be true, but it really is that easy.
Other posts in this olla watering system series:
DIY OLLA WATERING SYSTEM INSTRUCTIONS
OLLA POTS FOR CONTAINER GARDENING
TROUBLESHOOTING OLLA POT PROBLEMS
Comparing Olla Pots vs. Other Watering Systems: Which is Right for You?
It's safe to say that there is no one right way to water your garden. But if you're trying to make a decision about what watering system to use, I'd like to introduce my favorite - the olla watering system. Of course, every system has it's own unique benefits and potential drawbacks, so what makes ollas better than drip irrigation, soaker hoses, and traditional watering cans? At the end of the day, your decision should be based on factors such as water efficiency, ease of use, cost, and suitability for different plant types and garden sizes. But speaking as a long-time gardener who's tried them all and is always looking for ways to make gardening easier for people with physical limitations, limited time or energy, nothing even comes close to the accessibility of ollas. The best part is you can DIY them yourself, or get a ready to go kit for your garden. Still not convinced? Let me explain why ollas are so great.
The Cottage Peach is reader-supported. When you purchase through links on our site, we may earn an affiliate commission at no additional cost to you. All opinions are our own.
It's safe to say that there is no one right way to water your garden. But if you're trying to make a decision about what watering system to use, I'd like to introduce my favorite - the olla watering system. Of course, every system has it's own unique benefits and potential drawbacks, so what makes ollas better than drip irrigation, soaker hoses, and traditional watering cans? At the end of the day, your decision should be based on factors such as water efficiency, ease of use, cost, and suitability for different plant types and garden sizes. But speaking as a long-time gardener who's tried them all and is always looking for ways to make gardening easier for people with physical limitations, limited time or energy, nothing even comes close to the accessibility of ollas. The best part is you can DIY them yourself, or get a ready to go kit for your garden. Still not convinced? Let me explain why ollas are so great.
Pros of using an olla watering system
These unglazed clay pots are buried in the ground near plants, releasing water slowly through their porous walls. They are highly water-efficient, reducing evaporation and minimizing water waste (see below for more info on that). Plus, they are low maintenance, requiring infrequent refills. They also promote healthy root growth by providing a consistent moisture source.
Cons of using an olla watering system
Ollas have a limited coverage area of about two feet around the olla in all directions so you'll need more of them for a larger space. While they work in any type of soil, they won't be ideal for sandy soils, which drain quickly. Ollas can be fragile, and take up in ground planting space in the garden.
Pros of using Drip Irrigation
Drop irrigation uses a network of tubes and emitters to deliver water directly to plant roots. It is extremely water-efficient, minimizing evaporation and runoff. You can customize drip irrigation to suit various garden layouts and plant needs and it can be automated with timers for convenience whether you are away on vacation or just busy with other things.
Cons of using Drip Irrigation
Drip irrigation has a much higher upfront cost than ollas and installation complexity. You may need a professional to help you install it and it requires regular maintenance to prevent clogs and leaks. Drip irrigation may not be suitable for all soil types.
Pros of using Soaker Hoses
Porous soaker hoses release water slowly along their length, saturating the surrounding soil. It's an efficient water delivery method with minimal evaporation, easy to install and use, affordable and widely available.
Cons of using Soaker Hoses
Less precise water placement compared to drip irrigation. Can lead to overwatering if not monitored carefully. Not ideal for windy conditions, which can accelerate evaporation.
Pros of using Traditional Watering Cans
Hand-held containers like watering cans can be used to pour water directly onto plants. Watering cans are simple, inexpensive, and readily available, and offers control over water placement and quantity. Suitable for small gardens and container plants.
Cons of using Traditional Watering Cans
This method is time-consuming and labor-intensive. The chances of overwatering and inconsistent moisture levels are high. Can contribute to soil erosion and foliar diseases since the leaves are more likely to get wet.
Choosing the Right System
The best watering system for you will depend on several factors. Olla pots and watering cans are better suited for small gardens and container plants, while drip irrigation and soaker hoses are more efficient for larger areas. Consider the water needs of your specific plants. Some may thrive with the consistent moisture provided by olla pots, while others may prefer the deep watering of soaker hoses. Sandy soils may not be ideal for olla pots, as they drain quickly. Drip irrigation and soaker hoses are generally more versatile for different soil types. Olla pots and watering cans are typically more affordable upfront, while drip irrigation systems may require a larger initial investment. If you're looking for a low-maintenance solution, olla pots and drip irrigation with timers may be ideal. Watering cans and soaker hoses require more hands-on involvement.
WHAT IS AN OLLA WATERING SYSTEM?
Olla (pronounced oya) means “pot” in Spanish, but the concept of using ollas as an irrigation system goes back thousands of years and has been used in countless cultures around the world. An olla watering system is basically an unglazed eight to ten inch terracotta pot that is buried beneath the soil with only a small amount sticking up above the surface and filled with water. The water then leeches out of tiny holes or “pores” in the unglazed clay and is pulled through the soil to the roots of your thirsty plants using a process called soil moisture tension. This functions much the same way as osmosis, in that the water is trying to equalize to a certain level of moisture within the soil. This means your soil will never become overwatered either - if the soil is moist, the water stays in the pot until it is needed. The downsides of DIYing a system like this are that it can be hard to identify true terracotta - and other types of clays have different properties that make them not as well suited for this job. Plus, you have to fill each one manually every 2-5 days depending on how hot it is and most importantly they take up a lot of room in the garden beds. But thankfully, with the Thirsty Earth system all of those cons are eliminated.
WHY SHOULD YOU USE A Thirsty Earth OLLA WATERING System?
Hauling around a watering can and standing with a hose for 45 minutes isn't exactly a walk in the park for everyone, especially folks like me with arthritis. This past spring, I was right in the middle of a flare-up when I planted my garden. I knew I needed a way to water my plants without turning myself into a pretzel!
Imagine this: you water your plants, but most of the water just sits on top and bakes away in the sun. olla watering systems stop that waste! The water seeps out of the pot slowly, right where your plants need it most - at their roots. This fancy trick can slash your water use by up to 61%. Less water wasted means a lighter water bill and a happier planet.
Olla watering systems aren't just about saving water, they're also all about growing healthy plants! Since the water seeps out underground, plant roots stretch out searching for that moisture. This makes them stronger and helps your plants stand tall. Olla watering systems also keep the leaves of your plants dry, making it harder for fungus and disease to spread. And the slow release of water means your plants get the perfect amount to drink, never too much.
Basically, olla watering systems create happy, healthy plants that can take on anything. But, each olla can only cover an area of about 2 feet all around it (depending on the system you use, but this is true for the ThirstyEarth ollas). So depending on the size and shape of your garden, you'll need to keep this in mind when choosing your olla placement.
Thirsty Earth Olla Watering System Review
Since it can be hard to find genuine terracotta pots affordably in your area, and they take up a lot of space in the garden, the Thirsty Earth olla watering system can be a good compromise that allows you to actually hook up your ollas to an automatic rainwater harvesting system that will continuously refill your ollas for you on it’s own from free rainwater collected from your roof. Plus they are about the size of a water bottle, so they don’t waste precious planting space. I added the Thirsty Earth system to two of my raised beds, and since the system is super easy to customize to whatever garden bed configuration you have, you don’t have to worry about not having the right parts or enough pieces to get it done. The website does a great job of showing you exactly how to lay out the cotta cups and it’s made an already pretty hands-off system completely self-sustaining; water is collected from my roof into a 50 gallon barrel, flows automatically into reservoirs and down the irrigation tube into individual terracotta cups. Setup is easy thanks to the push to connect fittings that come with every kit. You just lay out your cups, cut the included tubing to size and connect everything with the fittings. No need to understand plumbing or any special building skills and you won't need any special tools either. Once everything is set up, you can leave it all summer and the reservoir will refill automatically from your rain barrel or you can manually refill it about once a week. I know it sounds too good to be true, but it really is that easy.
Other posts in this olla watering system series:
DIY OLLA WATERING SYSTEM INSTRUCTIONS
OLLA POTS FOR CONTAINER GARDENING
TROUBLESHOOTING OLLA POT PROBLEMS
Troubleshooting Olla Watering System Problems: Leaks, Clogs, and More
Troubleshoot your DIY ollas with this guide!
The Cottage Peach is reader-supported. When you purchase through links on our site, we may earn an affiliate commission at no additional cost to you. All opinions are our own.
Troubleshoot your DIY ollas with this guide!
Olla watering system leaking
If your olla pot is leaking, there could be a few causes. Start by examining the olla pot for any visible cracks or holes. These can occur due to manufacturing defects, accidental damage, or exposure to extreme temperatures. If the crack is small, it might be possible to seal it with a food-safe sealant. However, if the damage is extensive, the olla pot might need to be replaced. Olla pots are made from porous clay, which can allow water to seep through slowly. This is normal and not necessarily a leak. However, if the seepage is excessive, it could indicate that the pot is not made of true terracotta, causing watering to exit the pot too quickly through the side walls. If the olla pot has a drain hole that you've plugged, make sure it is properly sealed. An improperly sealed plug can allow water to leak out. Remove the olla from the garden, fill with water to look for leaks and check the seal for any damage or wear and tear. In rare cases, plant roots can grow into the olla pot and cause leaks. This is more likely to happen if the olla pot is buried too shallowly or if the plants are not properly spaced. If you suspect root intrusion, carefully remove the olla pot and check for any roots growing into it.
Olla watering system clogged
If the olla pot is buried in heavy clay soil or if the soil is not properly prepared before planting, soil and debris can clog the pores of the olla pot, preventing water from flowing out. This is more likely to happen in heavy clay soil. To prevent clogs, amend your soil with sand or coco coir. Over time, mineral deposits can build up inside the olla pot and cause clogs. This is more common in areas with hard water. To prevent mineral buildup, soak the olla pot in a solution of vinegar and water every few months. As mentioned earlier, plant roots can also grow into the olla pot and cause clogs. If you suspect root intrusion, carefully remove the olla pot and check for any roots growing into it.
Water isn't coming out of the olla watering system
If your olla isn't getting the soil damp within a two foot radius of the olla, it's most likely due to your olla not being made of true terracotta. This can happen with ollas made from "terracotta" purchased at big box stores, as they often use other types of clay dyed the same color as terracotta to cut costs. Other clay types may not work as well, because different clays have different levels of porosity.
If the olla pot is buried too deep or too shallow, it can take longer for the water to reach the roots of the plants or the olla may dry out. The olla watering system should be buried right up to the neck of the olla. If the soil around the olla pot becomes compacted, it can prevent water from flowing out. To prevent soil compaction, avoid walking on the soil around the olla pot and add a layer of mulch to help keep the soil loose. As mentioned earlier, clogged pores can also cause slow drainage. If you suspect clogged pores, try soaking the olla pot in a solution of vinegar and water.
Olla watering system is drying out too quickly
A lid will significantly reduce water evaporation, meaning you will need to refill your olla watering system less often. This is especially important in hot and dry climates. It will help keep insects, birds, and other pests out of your olla's water. This is important for maintaining water quality and preventing diseases. It's important to make sure the lid fits snugly on the olla watering system to prevent pests and debris from entering and if you're using a lid made from a lightweight material, make sure it is heavy enough to stay in place but not so heavy that it cracks the olla.
Bugs in olla watering system
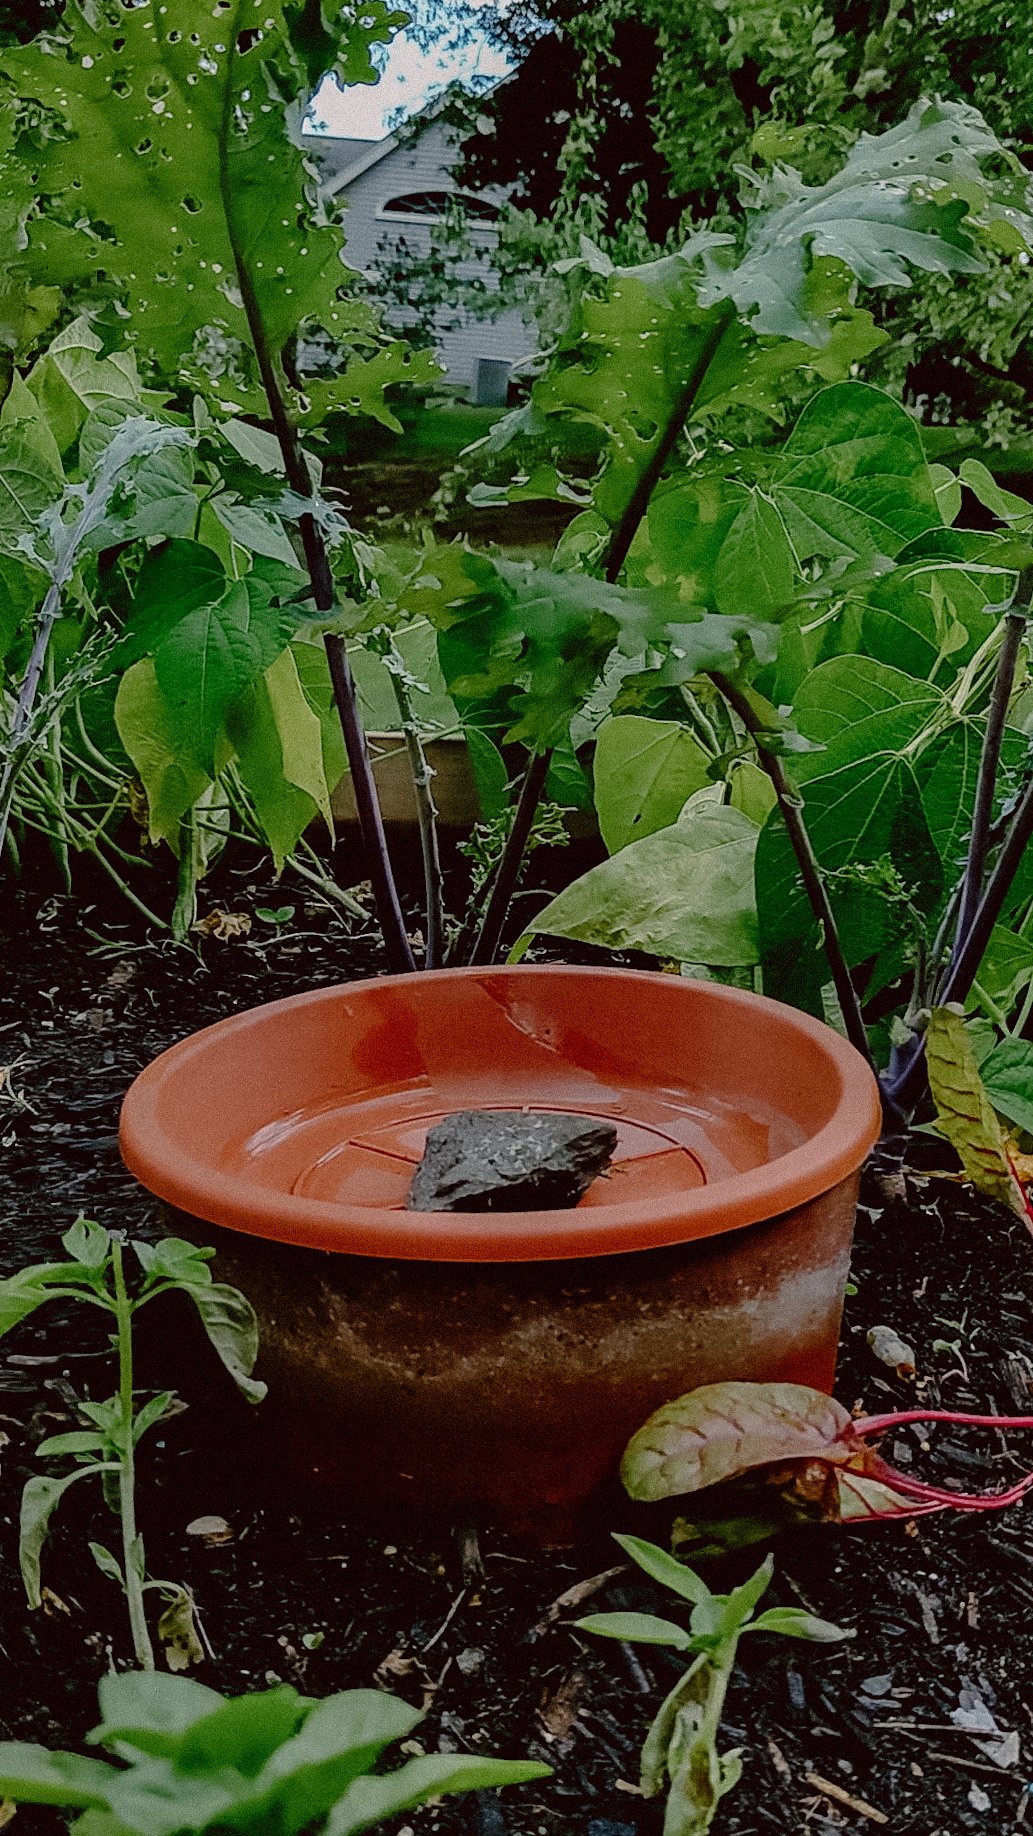
Since some lid options have a lip on them, water can collect and stand inside of it. This water can grow algae and bacteria, as well as serve as a breeding ground for mosquitoes. But by adding small decorative stones or marbles to fill the space inside the lid, you can weigh the lid down as well as reduce the amount of water that's able to collect on the surface and even create a pollinator watering station since the rocks will provide resting spots for your local bees to stop and have a drink!
Regular maintenance can help prevent problems with your olla pots. Inspect your olla pots regularly for any signs of damage or wear and tear. Clean them every few months to prevent mineral buildup and clogs. Proper installation is essential for the effective operation of olla pots. Make sure your olla pots are buried at the correct depth and in well-draining soil. The frequency of refilling your olla pots will depend on your climate and the type of plants you are watering. In hot, dry climates, you may need to refill your olla pots more frequently.
WHAT IS AN OLLA WATERING SYSTEM?
Olla (pronounced oya) means “pot” in Spanish, but the concept of using ollas as an irrigation system goes back thousands of years and has been used in countless cultures around the world. An olla watering system is basically an unglazed eight to ten inch terracotta pot that is buried beneath the soil with only a small amount sticking up above the surface and filled with water. The water then leeches out of tiny holes or “pores” in the unglazed clay and is pulled through the soil to the roots of your thirsty plants using a process called soil moisture tension. This functions much the same way as osmosis, in that the water is trying to equalize to a certain level of moisture within the soil. This means your soil will never become overwatered either - if the soil is moist, the water stays in the pot until it is needed. The downsides of DIYing a system like this are that it can be hard to identify true terracotta - and other types of clays have different properties that make them not as well suited for this job. Plus, you have to fill each one manually every 2-5 days depending on how hot it is and most importantly they take up a lot of room in the garden beds. But thankfully, with the Thirsty Earth system all of those cons are eliminated.
WHY SHOULD YOU USE A Thirsty Earth OLLA WATERING System?
Hauling around a watering can and standing with a hose for 45 minutes isn't exactly a walk in the park for everyone, especially folks like me with arthritis. This past spring, I was right in the middle of a flare-up when I planted my garden. I knew I needed a way to water my plants without turning myself into a pretzel!
Imagine this: you water your plants, but most of the water just sits on top and bakes away in the sun. olla watering systems stop that waste! The water seeps out of the pot slowly, right where your plants need it most - at their roots. This fancy trick can slash your water use by up to 61%. Less water wasted means a lighter water bill and a happier planet.
Olla watering systems aren't just about saving water, they're also all about growing healthy plants! Since the water seeps out underground, plant roots stretch out searching for that moisture. This makes them stronger and helps your plants stand tall. Olla watering systems also keep the leaves of your plants dry, making it harder for fungus and disease to spread. And the slow release of water means your plants get the perfect amount to drink, never too much.
Basically, olla watering systems create happy, healthy plants that can take on anything. But, each olla can only cover an area of about 2 feet all around it (depending on the system you use, but this is true for the ThirstyEarth ollas). So depending on the size and shape of your garden, you'll need to keep this in mind when choosing your olla placement.
Thirsty Earth Olla Watering System Review
Since it can be hard to find genuine terracotta pots affordably in your area, and they take up a lot of space in the garden, the Thirsty Earth olla watering system can be a good compromise that allows you to actually hook up your ollas to an automatic rainwater harvesting system that will continuously refill your ollas for you on it’s own from free rainwater collected from your roof. Plus they are about the size of a water bottle, so they don’t waste precious planting space. I added the Thirsty Earth system to two of my raised beds, and since the system is super easy to customize to whatever garden bed configuration you have, you don’t have to worry about not having the right parts or enough pieces to get it done. The website does a great job of showing you exactly how to lay out the cotta cups and it’s made an already pretty hands-off system completely self-sustaining; water is collected from my roof into a 50 gallon barrel, flows automatically into reservoirs and down the irrigation tube into individual terracotta cups. Setup is easy thanks to the push to connect fittings that come with every kit. You just lay out your cups, cut the included tubing to size and connect everything with the fittings. No need to understand plumbing or any special building skills and you won't need any special tools either. Once everything is set up, you can leave it all summer and the reservoir will refill automatically from your rain barrel or you can manually refill it about once a week. I know it sounds too good to be true, but it really is that easy.
Other posts in this olla watering system series:
DIY OLLA WATERING SYSTEM INSTRUCTIONS
OLLA POTS FOR CONTAINER GARDENING
TROUBLESHOOTING OLLA POT PROBLEMS
DIY Olla Pot Lid Ideas: Keeping Bugs Out and Water In
Making your own DIY ollas can be as simple or complex as you want it to be. But, if you're going to keep bugs, dirt and other debris out of your ollas it's important to make sure and put a lid on them. Since I'm often asked what lid to use for ollas, I wanted to share some creative and practical lid options for olla pots, from repurposed materials to DIY crafts.
The Cottage Peach is reader-supported. When you purchase through links on our site, we may earn an affiliate commission at no additional cost to you. All opinions are our own.
Making your own DIY ollas can be as simple or complex as you want it to be. But, if you're going to keep bugs, dirt and other debris out of your ollas it's important to make sure and put a lid on them. Since I'm often asked what lid to use for ollas, I wanted to share some creative and practical lid options for olla pots, from repurposed materials to DIY crafts.
Olla lids aren't just important for preventing pest problems and keeping out debris, they also help prevent water evaporation so you don't have to refill your ollas as often. And since reducing water usage is a big reason why many of us love to use olla watering systems in our gardens, having a lid is pretty non-negotiable! If you need full instructions for how to make a diy olla, you can tap here. But if you're just looking for olla lid options, keep reading below!
DIY Olla Lid Ideas
You can use terracotta saucers as olla lids. These can be found at garden centers or repurposed from broken pots. They are the perfect size for many olla pots and provide a classic look that matches the terracotta coloring of the olla itself. They also usually weigh enough on their own without needing additional rocks etc to keep them from blowing away in the wind. However, since they are porous they may still allow a decent amount of water to be lost to evaporation.
Repurposing plastic lids from yogurt containers, sour cream containers, or other food storage containers is a great way to keep these items out of the landfill - just make sure that they are food-safe if you are growing edible plants. Since this option is very lightweight, you'll need to add small stones, marbles or something else heavy to keep it from blowing away.
A chipped china plate destined for the garbage or picked up secondhand at your local thrift store can easily serve a new purpose in your garden as an olla lid. Bonus points if it's got a pretty design on it to bring some life and personality to your garden space! These can be a bit fragile to have in the garden, so be sure to handle with care and be mindful of any sharp edges.
If you have large flat flagstones around your garden, these can also be used as lids. Ensure they are heavy enough to stay in place but not so heavy that they crack the olla pot. Sometimes these collect dirt and can get messy and hard to move around if you have hand pain or weakness, and be mindful of any sharp edges with these too.
You can also cut a piece of wood to size to use as a lid and decorate with paint or woodburning. However a wood lid won't last as long as the other options listed above as it weathers and is exposed to the elements.
Benefits of Using an olla with a Lid
A lid will significantly reduce water evaporation, meaning you will need to refill your olla pot less often. This is especially important in hot and dry climates. It will help keep insects, birds, and other pests out of your olla pot's water. This is important for maintaining water quality and preventing diseases. It's important to make sure the lid fits snugly on the olla pot to prevent pests and debris from entering and if you're using a lid made from a lightweight material, make sure it is heavy enough to stay in place but not so heavy that it cracks the olla pot.
Since some lid options have a lip on them, water can collect and stand inside of it. This water can grow algae and bacteria, as well as serve as a breeding ground for mosquitoes. But by adding small decorative stones or marbles to fill the space inside the lid, you can weigh the lid down as well as reduce the amount of water that's able to collect on the surface and even create a pollinator watering station since the rocks will provide resting spots for your local bees to stop and have a drink!
WHAT IS AN OLLA WATERING SYSTEM?
Olla (pronounced oya) means “pot” in Spanish, but the concept of using ollas as an irrigation system goes back thousands of years and has been used in countless cultures around the world. An olla watering system is basically an unglazed eight to ten inch terracotta pot that is buried beneath the soil with only a small amount sticking up above the surface and filled with water. The water then leeches out of tiny holes or “pores” in the unglazed clay and is pulled through the soil to the roots of your thirsty plants using a process called soil moisture tension. This functions much the same way as osmosis, in that the water is trying to equalize to a certain level of moisture within the soil. This means your soil will never become overwatered either - if the soil is moist, the water stays in the pot until it is needed. The downsides of DIYing a system like this are that it can be hard to identify true terracotta - and other types of clays have different properties that make them not as well suited for this job. Plus, you have to fill each one manually every 2-5 days depending on how hot it is and most importantly they take up a lot of room in the garden beds. But thankfully, with the Thirsty Earth system all of those cons are eliminated.
WHY SHOULD YOU USE A Thirsty Earth OLLA WATERING System?
Hauling around a watering can and standing with a hose for 45 minutes isn't exactly a walk in the park for everyone, especially folks like me with arthritis. This past spring, I was right in the middle of a flare-up when I planted my garden. I knew I needed a way to water my plants without turning myself into a pretzel!
Imagine this: you water your plants, but most of the water just sits on top and bakes away in the sun. olla watering systems stop that waste! The water seeps out of the pot slowly, right where your plants need it most - at their roots. This fancy trick can slash your water use by up to 61%. Less water wasted means a lighter water bill and a happier planet.
Olla watering systems aren't just about saving water, they're also all about growing healthy plants! Since the water seeps out underground, plant roots stretch out searching for that moisture. This makes them stronger and helps your plants stand tall. Olla watering systems also keep the leaves of your plants dry, making it harder for fungus and disease to spread. And the slow release of water means your plants get the perfect amount to drink, never too much.
Basically, olla watering systems create happy, healthy plants that can take on anything. But, each olla can only cover an area of about 2 feet all around it (depending on the system you use, but this is true for the ThirstyEarth ollas). So depending on the size and shape of your garden, you'll need to keep this in mind when choosing your olla placement.
Thirsty Earth Olla Watering System Review
Since it can be hard to find genuine terracotta pots affordably in your area, and they take up a lot of space in the garden, the Thirsty Earth olla watering system can be a good compromise that allows you to actually hook up your ollas to an automatic rainwater harvesting system that will continuously refill your ollas for you on it’s own from free rainwater collected from your roof. Plus they are about the size of a water bottle, so they don’t waste precious planting space. I added the Thirsty Earth system to two of my raised beds, and since the system is super easy to customize to whatever garden bed configuration you have, you don’t have to worry about not having the right parts or enough pieces to get it done. The website does a great job of showing you exactly how to lay out the cotta cups and it’s made an already pretty hands-off system completely self-sustaining; water is collected from my roof into a 50 gallon barrel, flows automatically into reservoirs and down the irrigation tube into individual terracotta cups. Setup is easy thanks to the push to connect fittings that come with every kit. You just lay out your cups, cut the included tubing to size and connect everything with the fittings. No need to understand plumbing or any special building skills and you won't need any special tools either. Once everything is set up, you can leave it all summer and the reservoir will refill automatically from your rain barrel or you can manually refill it about once a week. I know it sounds too good to be true, but it really is that easy.
Other posts in this olla watering system series:
DIY OLLA WATERING SYSTEM INSTRUCTIONS
OLLA POTS FOR CONTAINER GARDENING
TROUBLESHOOTING OLLA POT PROBLEMS
Olla Pots for Container Gardening: A Guide for Balcony and Patio Gardeners
If you're wondering if you can use ollas in a container garden, the answer is yes! Container gardening is perfect for those with limited space, but it comes with it's own unique set of challenges (including watering) that an olla watering system can help with. I love container gardening from an accessibility standpoint, because it makes it possible for a lot more people to grow their own food. But, container gardens dry out much faster than in ground garden beds since they can heat up faster and have less volume to hold excess water in reserve. Which means if you're not careful, all it takes is one hot day or a weekend away to damage your plants. That's pretty unforgiving! Having backup systems in place not only reduces plant stress but also reduces wasted water lost to surface evaporation, a huge problem for container gardens in general that warm up so fast. But how do you know you're choosing the right sized olla watering system for your container garden?
The Cottage Peach is reader-supported. When you purchase through links on our site, we may earn an affiliate commission at no additional cost to you. All opinions are our own.
If you're wondering if you can use ollas in a container garden, the answer is yes! Container gardening is perfect for those with limited space, but it comes with it's own unique set of challenges (including watering) that an olla watering system can help with. I love container gardening from an accessibility standpoint, because it makes it possible for a lot more people to grow their own food. But, container gardens dry out much faster than in ground garden beds since they can heat up faster and have less volume to hold excess water in reserve. Which means if you're not careful, all it takes is one hot day or a weekend away to damage your plants. That's pretty unforgiving! Having backup systems in place not only reduces plant stress but also reduces wasted water lost to surface evaporation, a huge problem for container gardens in general that warm up so fast. But how do you know you're choosing the right sized olla watering system for your container garden?
Choosing the Right Olla Pot for Your Container Gardens
Upside down wine bottles and terracotta spikes aren't going to cut it. These fun gardening hacks may seem like the easy way out, but it comes at a cost. The upside down bottles don't regulate the flow of water based on the actual moisture content below the soil surface, which means it's easy to over water your plants. And terracotta spikes (while one step better than an upside down bottle) don't do the work ensuring optimal moisture distribution and root development since they are so small. My favorite olla watering system to use in container gardens is about the size of a water bottle, so it maximizes surface area while leaving the most amount of room for your plants around it - super important to consider in the limited space of a container garden.
Soil Selection for Olla Watering System Container Gardens
While olla watering systems are effective in any type of soil, in a container garden you can give your plants a leg up by choosing the right kind of soil since drainage is so much more important in a container garden to prevent water logging and promote healthy plant growth. Choose a high quality potting mix with as much organic matter as possible and a slow release fertilizer - container gardens require a lot more added nutrients to survive since they are cut off from the natural microbiome of in ground soil, but we want something light and fluffy that allows for good drainage if there's a heavy rain storm that still holds moisture well in dry seasons, so make sure it has a good amount of coco coir too (or peat moss, but that's less sustainable).
The Best Plants for Olla Pot Container Gardens
The good news is, even plants that normally don't thrive in container gardens will often perform better with the addition of an olla, as it eliminates a lot of the stress plants face when grown in containers. Experiment and see what works for you!
Guide to Planting with Olla Pots in Containers
Using an olla watering system in a container garden is pretty straightforward, but I do recommend starting with your soil and olla before adding plants. For any container under twenty four inches, you'll only need a single olla to keep the entire container well watered. But it should be placed directly in the center of the container to provide the most even amount of moisture throughout the whole pot. Once your container is full of soil, simply dig out a hole in the center so that your olla can rest flush with the surface of the soil - we want the olla to be almost completely buried so it's making the most contact with the soil possible and doesn't dry out. Then, add your plants around the olla, keeping the thirstiest plants like cucumbers or tomatoes closest to the olla.
Maintenance and Troubleshooting for Olla Pot Container Gardens
One of the most common concerns with olla water systems is preventing algae growth. But since ollas are made of terracotta, they keep the environment inside of the olla dark and cool - which algae doesn't like. So it typically isn't an issue. You may notice harmless moss, mildew or fungus growing on the outside of your olla as it ages. This should not affect the olla's performance, but you can scrub it off periodically with a diluted vinegar mixture.
Another concern is whether ollas are a breeding ground for mosquitoes. All the ollas I use in my garden have closed lids, so mosquitoes cannot access the water inside to lay their eggs. If your olla watering system is open for some reason, you can add mosquito dunks to the water to terminate the eggs and keep them from hatching. Mosquito dunks are made from BTI and totally safe to use in garden beds where you are growing food.
If you normally introduce fertilizer to your garden through your hose system, the good news is you can simplify that process using ollas as well by adding the liquid fertilizer directly into the olla itself.
WHAT IS AN OLLA WATERING SYSTEM?
Olla (pronounced oya) means “pot” in Spanish, but the concept of using ollas as an irrigation system goes back thousands of years and has been used in countless cultures around the world. An olla watering system is basically an unglazed eight to ten inch terracotta pot that is buried beneath the soil with only a small amount sticking up above the surface and filled with water. The water then leeches out of tiny holes or “pores” in the unglazed clay and is pulled through the soil to the roots of your thirsty plants using a process called soil moisture tension. This functions much the same way as osmosis, in that the water is trying to equalize to a certain level of moisture within the soil. This means your soil will never become overwatered either - if the soil is moist, the water stays in the pot until it is needed. The downsides of DIYing a system like this are that it can be hard to identify true terracotta - and other types of clays have different properties that make them not as well suited for this job. Plus, you have to fill each one manually every 2-5 days depending on how hot it is and most importantly they take up a lot of room in the garden beds. But thankfully, with the Thirsty Earth system all of those cons are eliminated.
WHY SHOULD YOU USE A Thirsty Earth OLLA WATERING System?
Hauling around a watering can and standing with a hose for 45 minutes isn't exactly a walk in the park for everyone, especially folks like me with arthritis. This past spring, I was right in the middle of a flare-up when I planted my garden. I knew I needed a way to water my plants without turning myself into a pretzel!
Imagine this: you water your plants, but most of the water just sits on top and bakes away in the sun. olla watering systems stop that waste! The water seeps out of the pot slowly, right where your plants need it most - at their roots. This fancy trick can slash your water use by up to 61%. Less water wasted means a lighter water bill and a happier planet.
Olla watering systems aren't just about saving water, they're also all about growing healthy plants! Since the water seeps out underground, plant roots stretch out searching for that moisture. This makes them stronger and helps your plants stand tall. Olla watering systems also keep the leaves of your plants dry, making it harder for fungus and disease to spread. And the slow release of water means your plants get the perfect amount to drink, never too much.
Basically, olla watering systems create happy, healthy plants that can take on anything. But, each olla can only cover an area of about 2 feet all around it (depending on the system you use, but this is true for the ThirstyEarth ollas). So depending on the size and shape of your garden, you'll need to keep this in mind when choosing your olla placement.
Thirsty Earth Olla Watering System Review
Since it can be hard to find genuine terracotta pots affordably in your area, and they take up a lot of space in the garden, the Thirsty Earth olla watering system can be a good compromise that allows you to actually hook up your ollas to an automatic rainwater harvesting system that will continuously refill your ollas for you on it’s own from free rainwater collected from your roof. Plus they are about the size of a water bottle, so they don’t waste precious planting space. I added the Thirsty Earth system to two of my raised beds, and since the system is super easy to customize to whatever garden bed configuration you have, you don’t have to worry about not having the right parts or enough pieces to get it done. The website does a great job of showing you exactly how to lay out the cotta cups and it’s made an already pretty hands-off system completely self-sustaining; water is collected from my roof into a 50 gallon barrel, flows automatically into reservoirs and down the irrigation tube into individual terracotta cups. Setup is easy thanks to the push to connect fittings that come with every kit. You just lay out your cups, cut the included tubing to size and connect everything with the fittings. No need to understand plumbing or any special building skills and you won't need any special tools either. Once everything is set up, you can leave it all summer and the reservoir will refill automatically from your rain barrel or you can manually refill it about once a week. I know it sounds too good to be true, but it really is that easy.
Other posts in this olla watering system series:
DIY OLLA WATERING SYSTEM INSTRUCTIONS
OLLA POTS FOR CONTAINER GARDENING
TROUBLESHOOTING OLLA POT PROBLEMS
Olla Watering System Placement Guide: Maximizing Water Efficiency in Your Garden
If you're considering how to use olla pots in your garden, you're probably concerned with where to place those olla pots. Since olla pots are a great way to decrease water waste lost to surface evaporation and keep your garden evenly watered, strategically placing olla pots in your garden to achieve optimal water efficiency is. Thankfully, olla pots are super flexible no matter what garden layout you have to work with, so you can easily position your olla pots for maximum benefit once you have these tips in mind. Since I use olla watering systems in all of my garden beds to eliminate the physical stress of watering, I've spent a lot of time observing the flow of water from ollas and learning the best way to arrange ollas for the biggest results
The Cottage Peach is reader-supported. When you purchase through links on our site, we may earn an affiliate commission at no additional cost to you. All opinions are our own.
If you're considering how to use olla pots in your garden, you're probably concerned with where to place those olla pots. Since olla pots are a great way to decrease water waste lost to surface evaporation and keep your garden evenly watered, strategically placing olla pots in your garden to achieve optimal water efficiency is. Thankfully, olla pots are super flexible no matter what garden layout you have to work with, so you can easily position your olla pots for maximum benefit once you have these tips in mind. Since I use olla watering systems in all of my garden beds to eliminate the physical stress of watering, I've spent a lot of time observing the flow of water from ollas and learning the best way to arrange ollas for the biggest results.
WHAT IS AN OLLA WATERING SYSTEM?
Olla (pronounced oya) means “pot” in Spanish, but the concept of using ollas as an irrigation system goes back thousands of years and has been used in countless cultures around the world. An olla watering system is basically an unglazed eight to ten inch terracotta pot that is buried beneath the soil with only a small amount sticking up above the surface and filled with water. The water then leeches out of tiny holes or “pores” in the unglazed clay and is pulled through the soil to the roots of your thirsty plants using a process called soil moisture tension. This functions much the same way as osmosis, in that the water is trying to equalize to a certain level of moisture within the soil. This means your soil will never become overwatered either - if the soil is moist, the water stays in the pot until it is needed. The downsides of DIYing a system like this are that it can be hard to identify true terracotta - and other types of clays have different properties that make them not as well suited for this job. Plus, you have to fill each one manually every 2-5 days depending on how hot it is and most importantly they take up a lot of room in the garden beds. But thankfully, with the Thirsty Earth system all of those cons are eliminated.
WHY SHOULD YOU USE A Thirsty Earth OLLA WATERING System?
Hauling around a watering can and standing with a hose for 45 minutes isn't exactly a walk in the park for everyone, especially folks like me with arthritis. This past spring, I was right in the middle of a flare-up when I planted my garden. I knew I needed a way to water my plants without turning myself into a pretzel!
Imagine this: you water your plants, but most of the water just sits on top and bakes away in the sun. olla watering systems stop that waste! The water seeps out of the pot slowly, right where your plants need it most - at their roots. This fancy trick can slash your water use by up to 61%. Less water wasted means a lighter water bill and a happier planet.
Olla watering systems aren't just about saving water, they're also all about growing healthy plants! Since the water seeps out underground, plant roots stretch out searching for that moisture. This makes them stronger and helps your plants stand tall. Olla watering systems also keep the leaves of your plants dry, making it harder for fungus and disease to spread. And the slow release of water means your plants get the perfect amount to drink, never too much.
Basically, olla watering systems create happy, healthy plants that can take on anything. But, each olla can only cover an area of about 2 feet all around it (depending on the system you use, but this is true for the ThirstyEarth ollas). So depending on the size and shape of your garden, you'll need to keep this in mind when choosing your olla placement.
Understanding Your Garden Layout
The first step in maximizing water efficiency with olla pots is to understand your garden's layout. Whether you have a small rectangular garden or a large, sprawling one, the size and shape will influence olla pot placement. Plus, different plants have varying water needs. Consider the types of plants you're growing and their spacing when placing olla pots. This could mean placing your thirstier plants like cucumbers and tomatoes (think anything that's super juicy to eat) closest to the ollas, so they get the most water. The amount of sun exposure your garden receives can affect water evaporation rates. Take sun exposure into account when positioning olla pots. If your garden is pretty shady, you won't need as many ollas as you would for a full sun garden. Soil type influences water retention and drainage, but ollas work in most soil types. In a heavy clay soil, you just may need a few extra. And don't worry if your garden is in ground or in raised beds or containers - ollas will work in any style of garden you're growing in. In fact, they're perfect for beds that tend to dry out really fast since they'll keep the water level much more consistent over time and eliminate the stress of leaving your garden when you go away on vacation!
Strategic Olla Pot Placement
Once you understand your garden's layout and unique characteristics, you can strategically place olla pots for optimal watering. In smaller gardens, for example a four by four foot square, placing your olla watering system in the center can provide adequate water distribution to all of surrounding plants in the garden bed. In one four by four foot square garden bed, you'll only need a single olla in the center since it can reach all the way around. Or, you can place one olla in the center of each corner for maximum water distribution in extremely dry climates.
For larger gardens, arranging olla pots in a grid pattern every two feet ensures consistent water availability throughout the space. Position olla pots between rows to provide water to multiple plants simultaneously and maximize your available planting space.
Olla Installation Tips
The perfect placement for your olla watering system won't be enough if they aren't installed correctly too. Ollas need to be buried right up to the top in order for the water to be deep enough to reach plant roots, so you'll have to dig down a bit. You should also consider mulching around olla pots with straw, wool or wood chips to help retain moisture and reduce water evaporation even further. Keep your olla pots clean and free of debris to ensure proper water flow and reduce the growth of fungus/mildew (it's harmless, but annoying), and regularly check soil moisture levels to adjust olla pot filling frequency as needed. You can check soil moisture by just sticking a finger about an inch down into the soil, no fancy moisture meter needed! With olla watering systems the soil may be dry on the surface which is fine, as long as you feel that moisture about an inch down below in a two foot radius from the ollas. But adding the layer of mulch can help to keep that top surface from becoming hydrophobic. Keep an eye on your reservoirs to make sure they aren't emptying out all the way since that can cause air to leak into the lines and keep in mind that weather will dictate how quickly those tanks empty, since the ollas will use less water during rainy season than a full on heat wave.
Thirsty Earth Olla Watering System Review
Since it can be hard to find genuine terracotta pots affordably in your area, and they take up a lot of space in the garden, the Thirsty Earth olla watering system can be a good compromise that allows you to actually hook up your ollas to an automatic rainwater harvesting system that will continuously refill your ollas for you on it’s own from free rainwater collected from your roof. Plus they are about the size of a water bottle, so they don’t waste precious planting space. I added the Thirsty Earth system to two of my raised beds, and since the system is super easy to customize to whatever garden bed configuration you have, you don’t have to worry about not having the right parts or enough pieces to get it done. The website does a great job of showing you exactly how to lay out the cotta cups and it’s made an already pretty hands-off system completely self-sustaining; water is collected from my roof into a 50 gallon barrel, flows automatically into reservoirs and down the irrigation tube into individual terracotta cups. Setup is easy thanks to the push to connect fittings that come with every kit. You just lay out your cups, cut the included tubing to size and connect everything with the fittings. No need to understand plumbing or any special building skills and you won't need any special tools either. Once everything is set up, you can leave it all summer and the reservoir will refill automatically from your rain barrel or you can manually refill it about once a week. I know it sounds too good to be true, but it really is that easy.
Other posts in this olla watering system series:
DIY OLLA WATERING SYSTEM INSTRUCTIONS
OLLA POTS FOR CONTAINER GARDENING
TROUBLESHOOTING OLLA POT PROBLEMS