
How To Make A DIY Cattle Panel Greenhouse [plans]

As a gardener living in New England, winter is kind of brutal. We only get about 5 really good months for growing food outdoors and the rest of the time the landscape is just brown and dead and dried out with no signs of life whatsoever, or everything is covered in a foot of snow. So I’m planning to utilize these DIY cattle panel greenhouse plans to grow food all winter long when nothing else will grow outside. But first, I wanted to touch on why this project is happening and my motivation behind this project.
Gardening For Mental Health
I have dealt with pretty bad anxiety most of my life. Being out in the garden has become an essential piece of protecting my mental health and reducing that anxiety. It seems backwards but honestly accepting the total lack of control I have over what happens in the garden has been super healing for me and having something to nurture and care for that sort of depends on me gives me a sense of purpose. Beyond that the sensory experience of literally having my bare hands in the soil is something that grounds me and is honestly just life giving. When I think about totally losing that outlet for the entire long winter I get a literal pit in my stomach to the point where I only half jokingly talk about wanting to just move somewhere warmer.
Gardening For Physical Wellness
With my arthritis and chronic pain I need to have options for moving my body that are gentle and consistent. Planting, checking on the plants, weeding and harvesting all offer me opportunities to move my body in a way that doesn’t necessarily cause more harm than good and just keeps me active and gives me an excuse to get outside for some fresh air - which if you know anything about winter in New England, it’s tough. It’s tough to convince yourself that you WANT to go out when it’s two degrees outside and everything just looks bleak. But with a hoop house I’ll have an excuse to really take a walk and check on things and just spend some time outside of the house during the day.
Another big motivation for me is that I love to experiment. The garden is like one big playground for adults. And I firmly believe adults need to play too. There are always puzzles to be solved, and it’s so rewarding when you try something new and it actually works.
Can You Really Grow Food In The Winter?
The concept of growing food all winter in our cold northern climate isn’t unheard of, but it’s definitely uncommon, I know I’m guilty of assuming it would be impossible whether because of the low temperatures or the shorter daylight hours and I’m just really psyched to be trying something new and sharing it with you so hopefully you can be inspired to give it a try and keep gardening all year round regardless of the weather conditions.
I’ve made it my job to empower you to feel confident in trying new things in the garden. Gardening is one of those life skills that builds confidence in other areas of life but you need to be a little brave to get started because there’s always this fear hanging over your head that you’ll put all this work in and the crops will still fail due to either you not knowing something you should or circumstances beyond your control like pests or disease. But gardening is also one of those things where if you can give yourself permission to make those mistakes you will learn and get better and grow in that confidence.

Change Your Climate + Move Your Garden Grow Zone 1.5 Zones Lower
Hoop houses are used by growers in all types of climates for many different reasons - but the main goal is climate control, whether that is to make the growing area colder using the artificial shade created or warmer by taking advantage of the insulating properties of the covered area to effectively move your grow zone south.
If you’ve never seen a hoop house before, you probably have and just didn’t realize it! The basic idea is that you form some sort of rounded roof structure using metal rods, cattle panel or pvc that bends down and is anchored to the ground and cover that with heavy duty greenhouse plastic that lets light in but keeps wind out and provides some insulation.
There’s a ton of different ways to build these and kits you can buy but for the purposes of this project, I’m specifically referring to a cold, totally unheated hoop house that can be used to grow year round in northern climates where I would otherwise be limited by the sub zero temps we experience here in Massachusetts.
So what am I NOT talking about? This is not a “cool” hoop house that might utilize some form of heat throughout the winter and require a double layer of greenhouse plastic, blowers and all that. I’m also not referring to this as a high tunnel because it’s kind of not. The terms are often used interchangeably, but in this case I’m going to be building a relatively small, low structure. It’s going to be about 7 feet across and 12.5 feet long with just enough room to stand up in the center. When I think high tunnel I think high ceilings, built in irrigation, venting fans and the whole nine yards which is great but just not the goal for this particular project.
We can’t talk about unheated hoop houses without acknowledging the king of organic winter gardening, Eliot Coleman. This guy is one hundred percent the inspiration behind this project and my main resource in planning this project. If you’re considering doing something similar with a hoop house the very first thing you should do is grab his book “The Winter Harvest Handbook” because it’s going to go into even further detail on exactly how this all works on a larger market garden scale from someone with literally 40 plus years of experience growing in an extremely cold climate at scale. A lot of the concepts and strategies I am going to be talking about are straight from Eliot. One of the things I love about Eliot is he outright says in his book that he WANTS people to innovate on his strategies, take what he’s done and run with it and make it their own so I’m excited to follow in his footsteps here and put my own spin on it.
It’s so easy to get bogged down in the research with an unfamiliar project like this and end up not actually starting because you get overwhelmed, and my method for avoiding this is to kind of pick one expert and latch onto their resources as my kind of main resource going forward and then if I have specific questions as I’m going through the material, google is my best friend. It helps that his climate isn’t too far off from mine, and it’s actually “worse” in that it’s colder so realistically I should have an even easier time growing some of these crops overwintered.
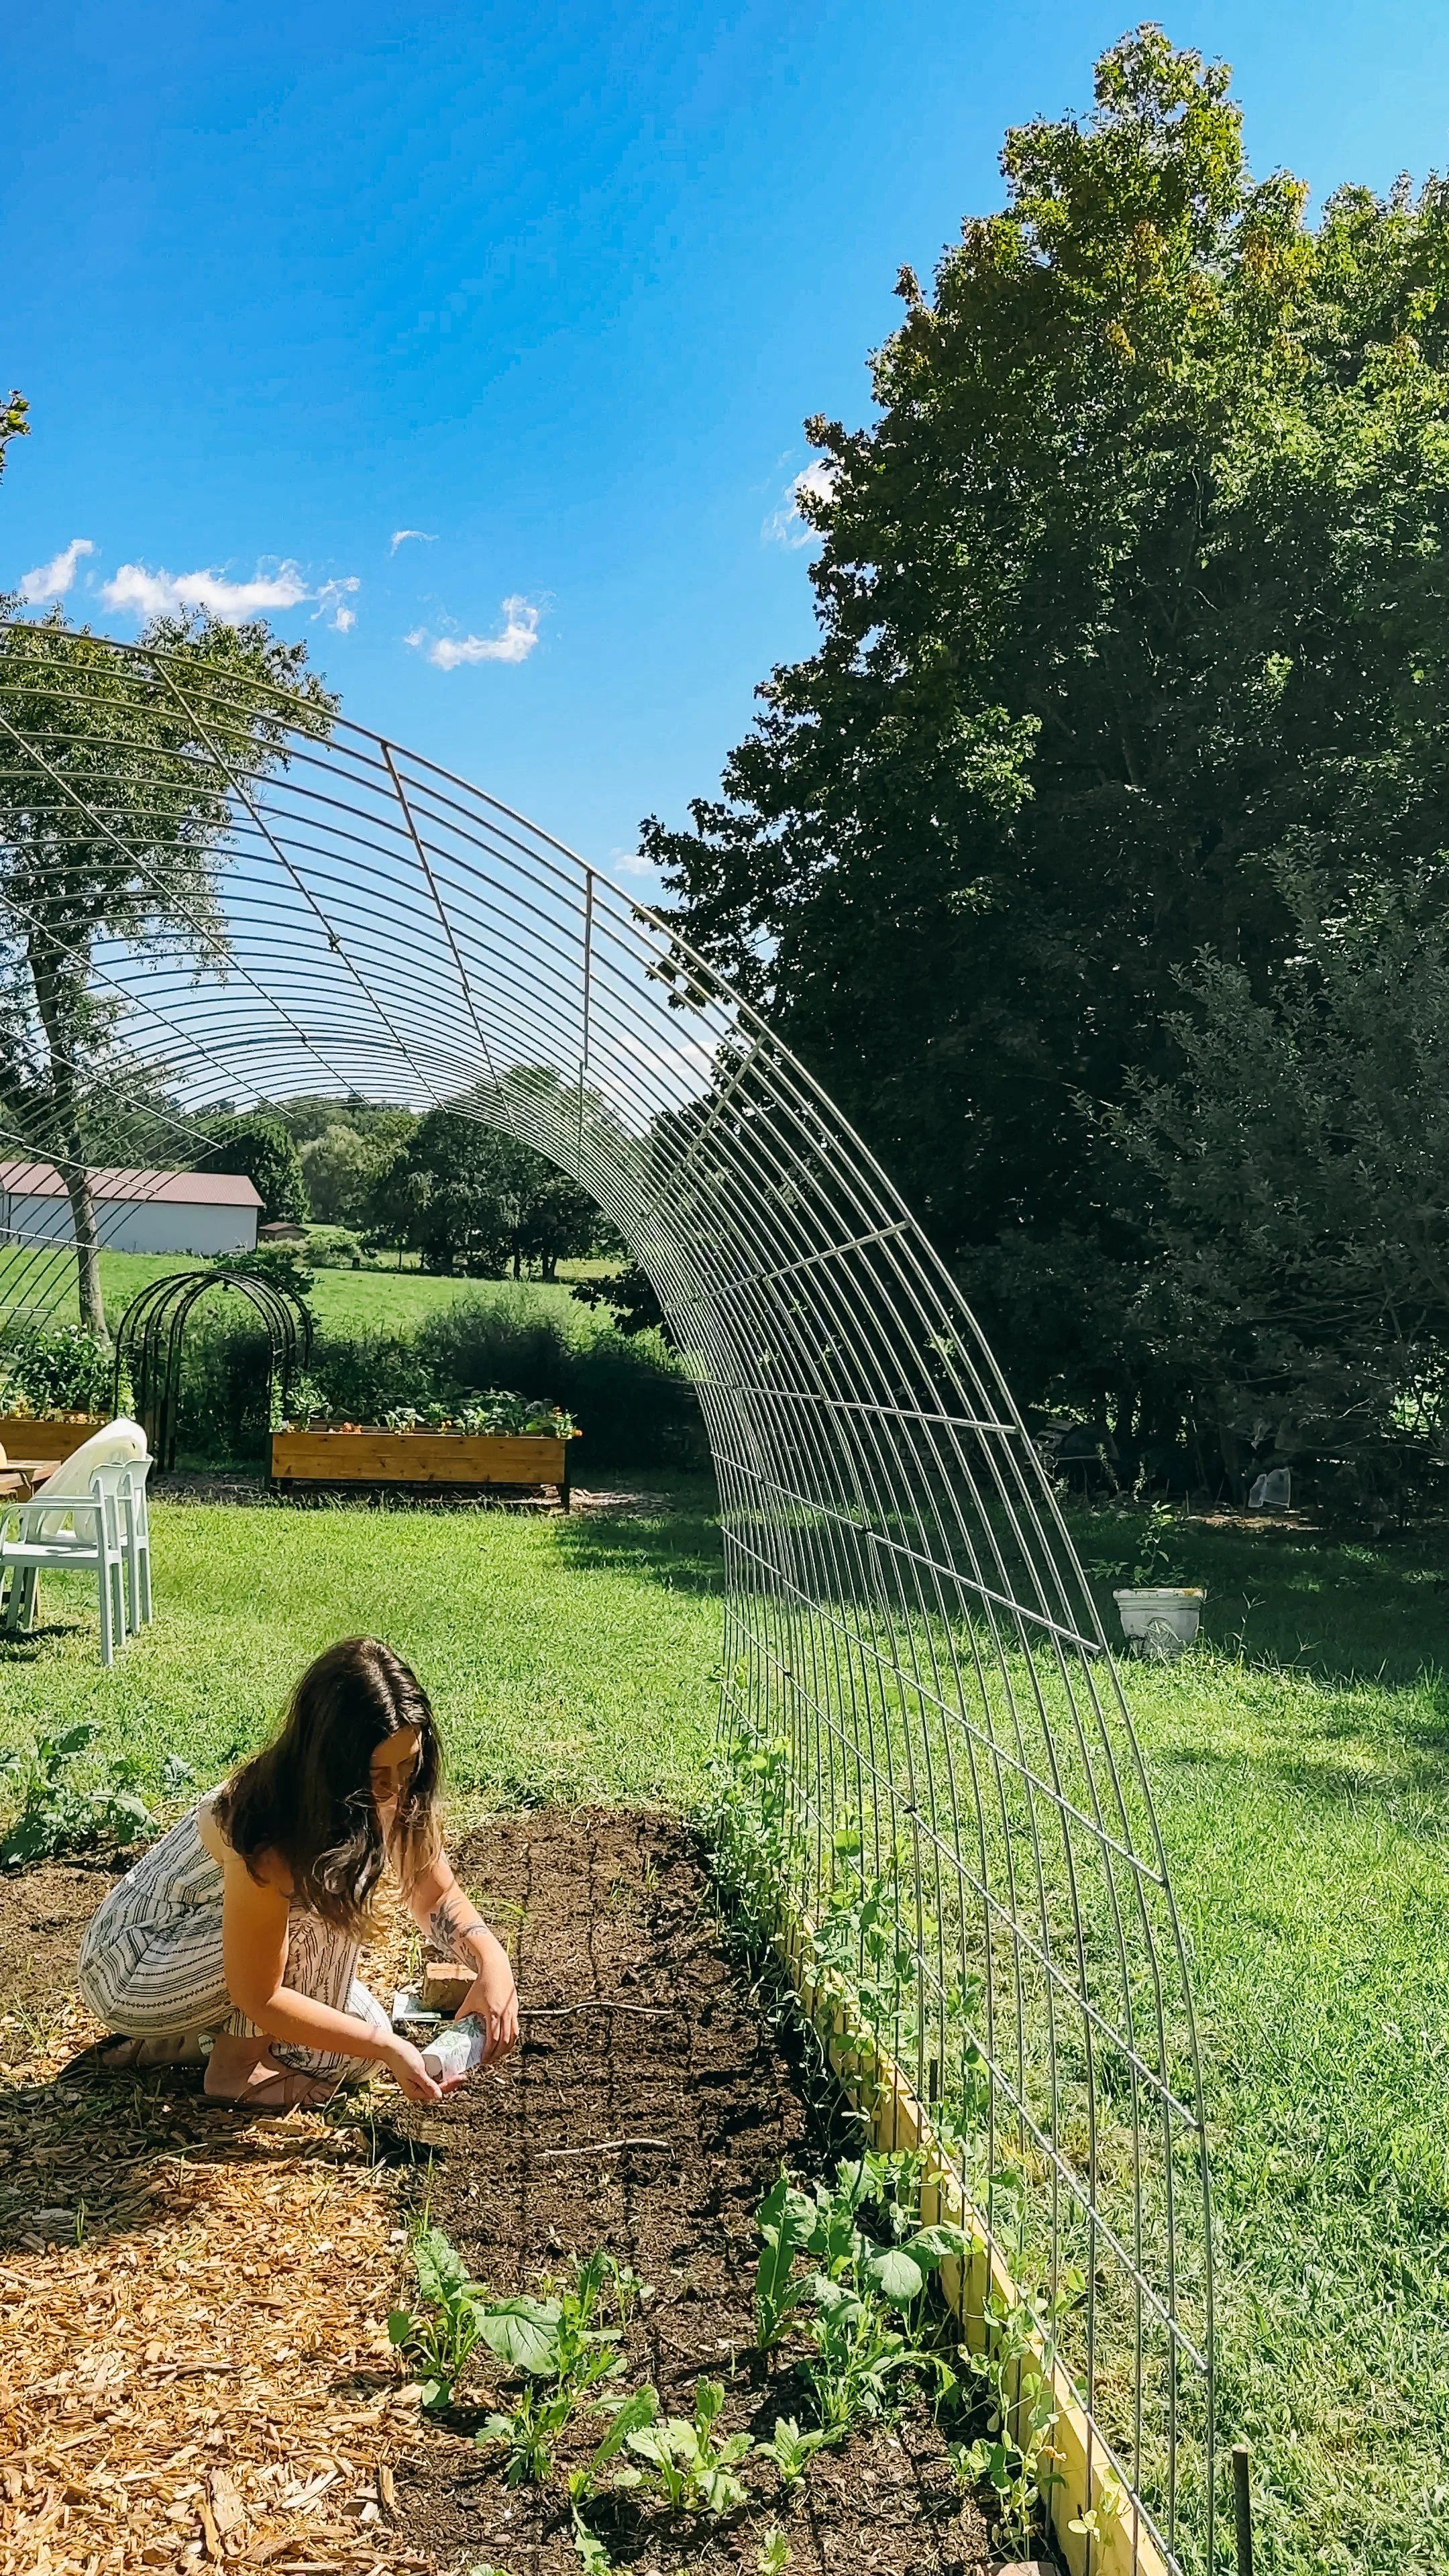
I want you to feel empowered to build your own hoop house, which meant I needed to choose a design that was easy and cheap and used the most basic materials possible. This cold hoop house will be totally off grid and scalable so you can make one any size that you want. I’ll be using sections of cattle panel to form the tunnel roof of the hoop house and holding it in place with tension only using rebar and supportive cross beams at the base. This means I won’t need to do any digging, post setting etc and the structure will be easy to remove when I’m finished with it.
diy cattle panel greenhouse plans
If you’ve always dreamed of having a greenhouse but you can’t afford it, a hoop house might be a better fit for you. Honestly, this hoop house is a temporary experiment. I have big plans for this section of the backyard and eventually will be adding a much larger permanent structure off of the main house that will actually be climate controlled. But that project is basically going to be on the scale of a full house addition in the form of a workspace/sunroom, and it’s going to require actual grading and pouring a foundation and some type of custom design that will actually sit up against the existing house.
In the meantime, I knew I wanted to keep growing food throughout the winter and I had to decide if it was worth investing thousands of dollars into a smaller greenhouse and foundation that wasn’t actually what I wanted long term.
I had all these crazy ideas of how I could heat a greenhouse structure utilizing waste exhaust heat from the pellet stove that I use to heat my house to make a thermal sink, and I still think that would be such a fun project to experiment with and utilize passive heat for a greenhouse, but I really wanted to show a super accessible way that you could create a barebones setup that pretty much anyone could build regardless of skill level or budget first, and prove that concept works before scaling it up to something that is commonly used and known to work but not super accessible to everyone.
There’s kind of this divide with garden content creators that I personally have trouble deciding which side I’m on, between those gardeners who are kind of like, make do and mend so they have this ingenuity and kind of macgyver attitude and they’ll use whatever they have on hand to make a project work for them within a really limited budget and they’re less concerned with how the final end result actually looks and I so admire this - it’s more sustainable and makes it possible for people to garden who otherwise might not be able to afford it, but my issue with it is that these DIYs are usually way more labor intensive and for myself personally dealing with chronic pain from my arthritis I’m often put in the position of having to decide if these types of energy expenditures are something that I can physically handle.
So there’s the financial privilege aspect of it where these DIYers are providing more accessible options for people who have those budget limitations but then on the flip side there’s the ableist privilege aspect of it where those DIY options aren’t always physically available to those of us with disabilities. And this came into play a ton with my raised bed build where I built raised beds to waist height so I wouldn’t need to bend down, because I get comments all of the time that container gardens suck and why don’t I just garden in the ground from people who obviously aren’t thinking from the perspective of others having different levels of physical ability from them.
Of course this played a huge part in my thought process while I was trying to decide whether I should build a greenhouse or not. And the reality is that it’s a much more labor AND money intensive project to build a greenhouse, you need to grade land and pour a foundation and mount glass panels. So it became clear to me that that is going to be a project for the professionals, and cutting corners with some sort of smaller greenhouse structure wasn’t going to give me the result I want and would have still been a pretty decent investment to create something that could actually support life in our cold climate.
So that brings me to the hoop house. I’ve said before that there are a ton of different ways to build a hoop house using kits or from scratch. But even these kits require you to bend your own metal pipes and set posts and all these bigger construction tasks that I knew wouldn’t be possible for me physically with my arthritis. And actually here’s where I need to give another shout-out because I stumbled across Briana from Blossom and Branch farm’s cattle panel tunnel that she converts into a covered hoop house for the winter. Her build looked super simple which is exactly what I needed and then things just kind of spiraled from there when it became clear that this method of using cattle panel would be not only physically accessible but financially super affordable too.
The method I finally settled on using the rebar to anchor the cattle panels is actually covered in detail on Homesteading Family’s page. Their tunnels are MUCH longer than what I’ll be doing with just three panels but the concept is the same. So just another shout out there because I want to make sure I’m giving credit where it’s due - I did not invent these ideas, just putting my own spin on it.
So at the end of the day would I love to have a huge beautiful climate controlled glass greenhouse? Of course! I’m a very visual person and I’m not super thrilled about adding a plastic covered tunnel to the garden. But sometimes big goals require that we take small steps first and this hoop house is the beginning of something big.
Where To Put Your diy cattle panel Greenhouse: Don’t Skip This Step If You Want To Grow Food All Winter
If you want to grow food all winter proper planning can make or break your chances of success so let’s dive into exactly what you need to do to get ready for tons of winter harvests.
With a diy cattle panel greenhouse especially for winter growing, you’ll notice that almost all of the time growers orient these with the ends on an east-west axis and there’s a pretty good reason for this - it follows the sun to provide maximum passive heating because the long side is going to be getting the most southern exposure which is the line that the sun travels along throughout the day.
Once you have your orientation the next most important thing to consider is any shade that will be present. This is less of a concern in the winter when the trees are bare with no leaves, but it’s important to keep in mind that the sun is going to be traveling across the sky much lower than it does in the summer months, which means they could block that southern side of your hoop house from actually receiving direct sunlight and create shade that will cool your hoop house. So I do have a pretty heavy treeline, but I know from living here for two decades now that the shade isn’t really going to reach out over the spot I’ve selected.
The last consideration is going to be the grade of the land. I do have a pretty steep slope where my greenhouse is located, as the house is set into a hill. At this point grading the land isn’t an option. I am a little concerned about how the drainage is going to be at this spot because it kind of sits on a lower tier, but this section also has a slope of its own and again, from living here I know that it’s not a particularly muddy area so we’re going to try and see what happens. This will be good to observe for future more permanent greenhouse plans as well.
Now that we’ve got an idea of where the best location is, you need to figure out how big your hoop house is going to be because this is probably going to be limited by the area you have to work with.
In my case the overall width is going to be limited again because of the materials I’ve chosen to use. If you want something wider than 7 feet and you’re going to use cattle panel like I am, you’re going to end up sacrificing headspace for standing up and are probably better off going with a more traditional hoop house structure using bent metal pipes. And unless you’re willing to cut the cattle panel down which comes with some risks since the sharp metal edges could snag on your greenhouse plastic and cause tears, you’re also stuck to increments of about 4 feet or whatever the width of your chosen panels is. So that’s how I landed on the 7x12 foot structure for my own build, because that is the length of three cattle panels when they’re butted up to each other.
How to Build a DIY Cattle Panel greenhouse
You can build your own diy cattle panel greenhouse with these plans easily in an afternoon with just the help of one other person, and you don’t need any special skills or carpentry experience either. The hardest part is honestly just getting the cattle panel - they are huge, so unless you have a truck you’ll probably need to rent something or have them delivered.
SUPPLIES
16’ Cattle Panel (3)
½” Steel Rebar (8)
12’x6” Wood Boards (2)
Heavy Duty Zip Ties (UV Stabilized)
Greenhouse Plastic (6mil UV Stabilized)
Self-Adhesive Zipper
Tarp Clips
Lightweight Row Cover (I used Agribon-19)
INSTRUCTIONS:
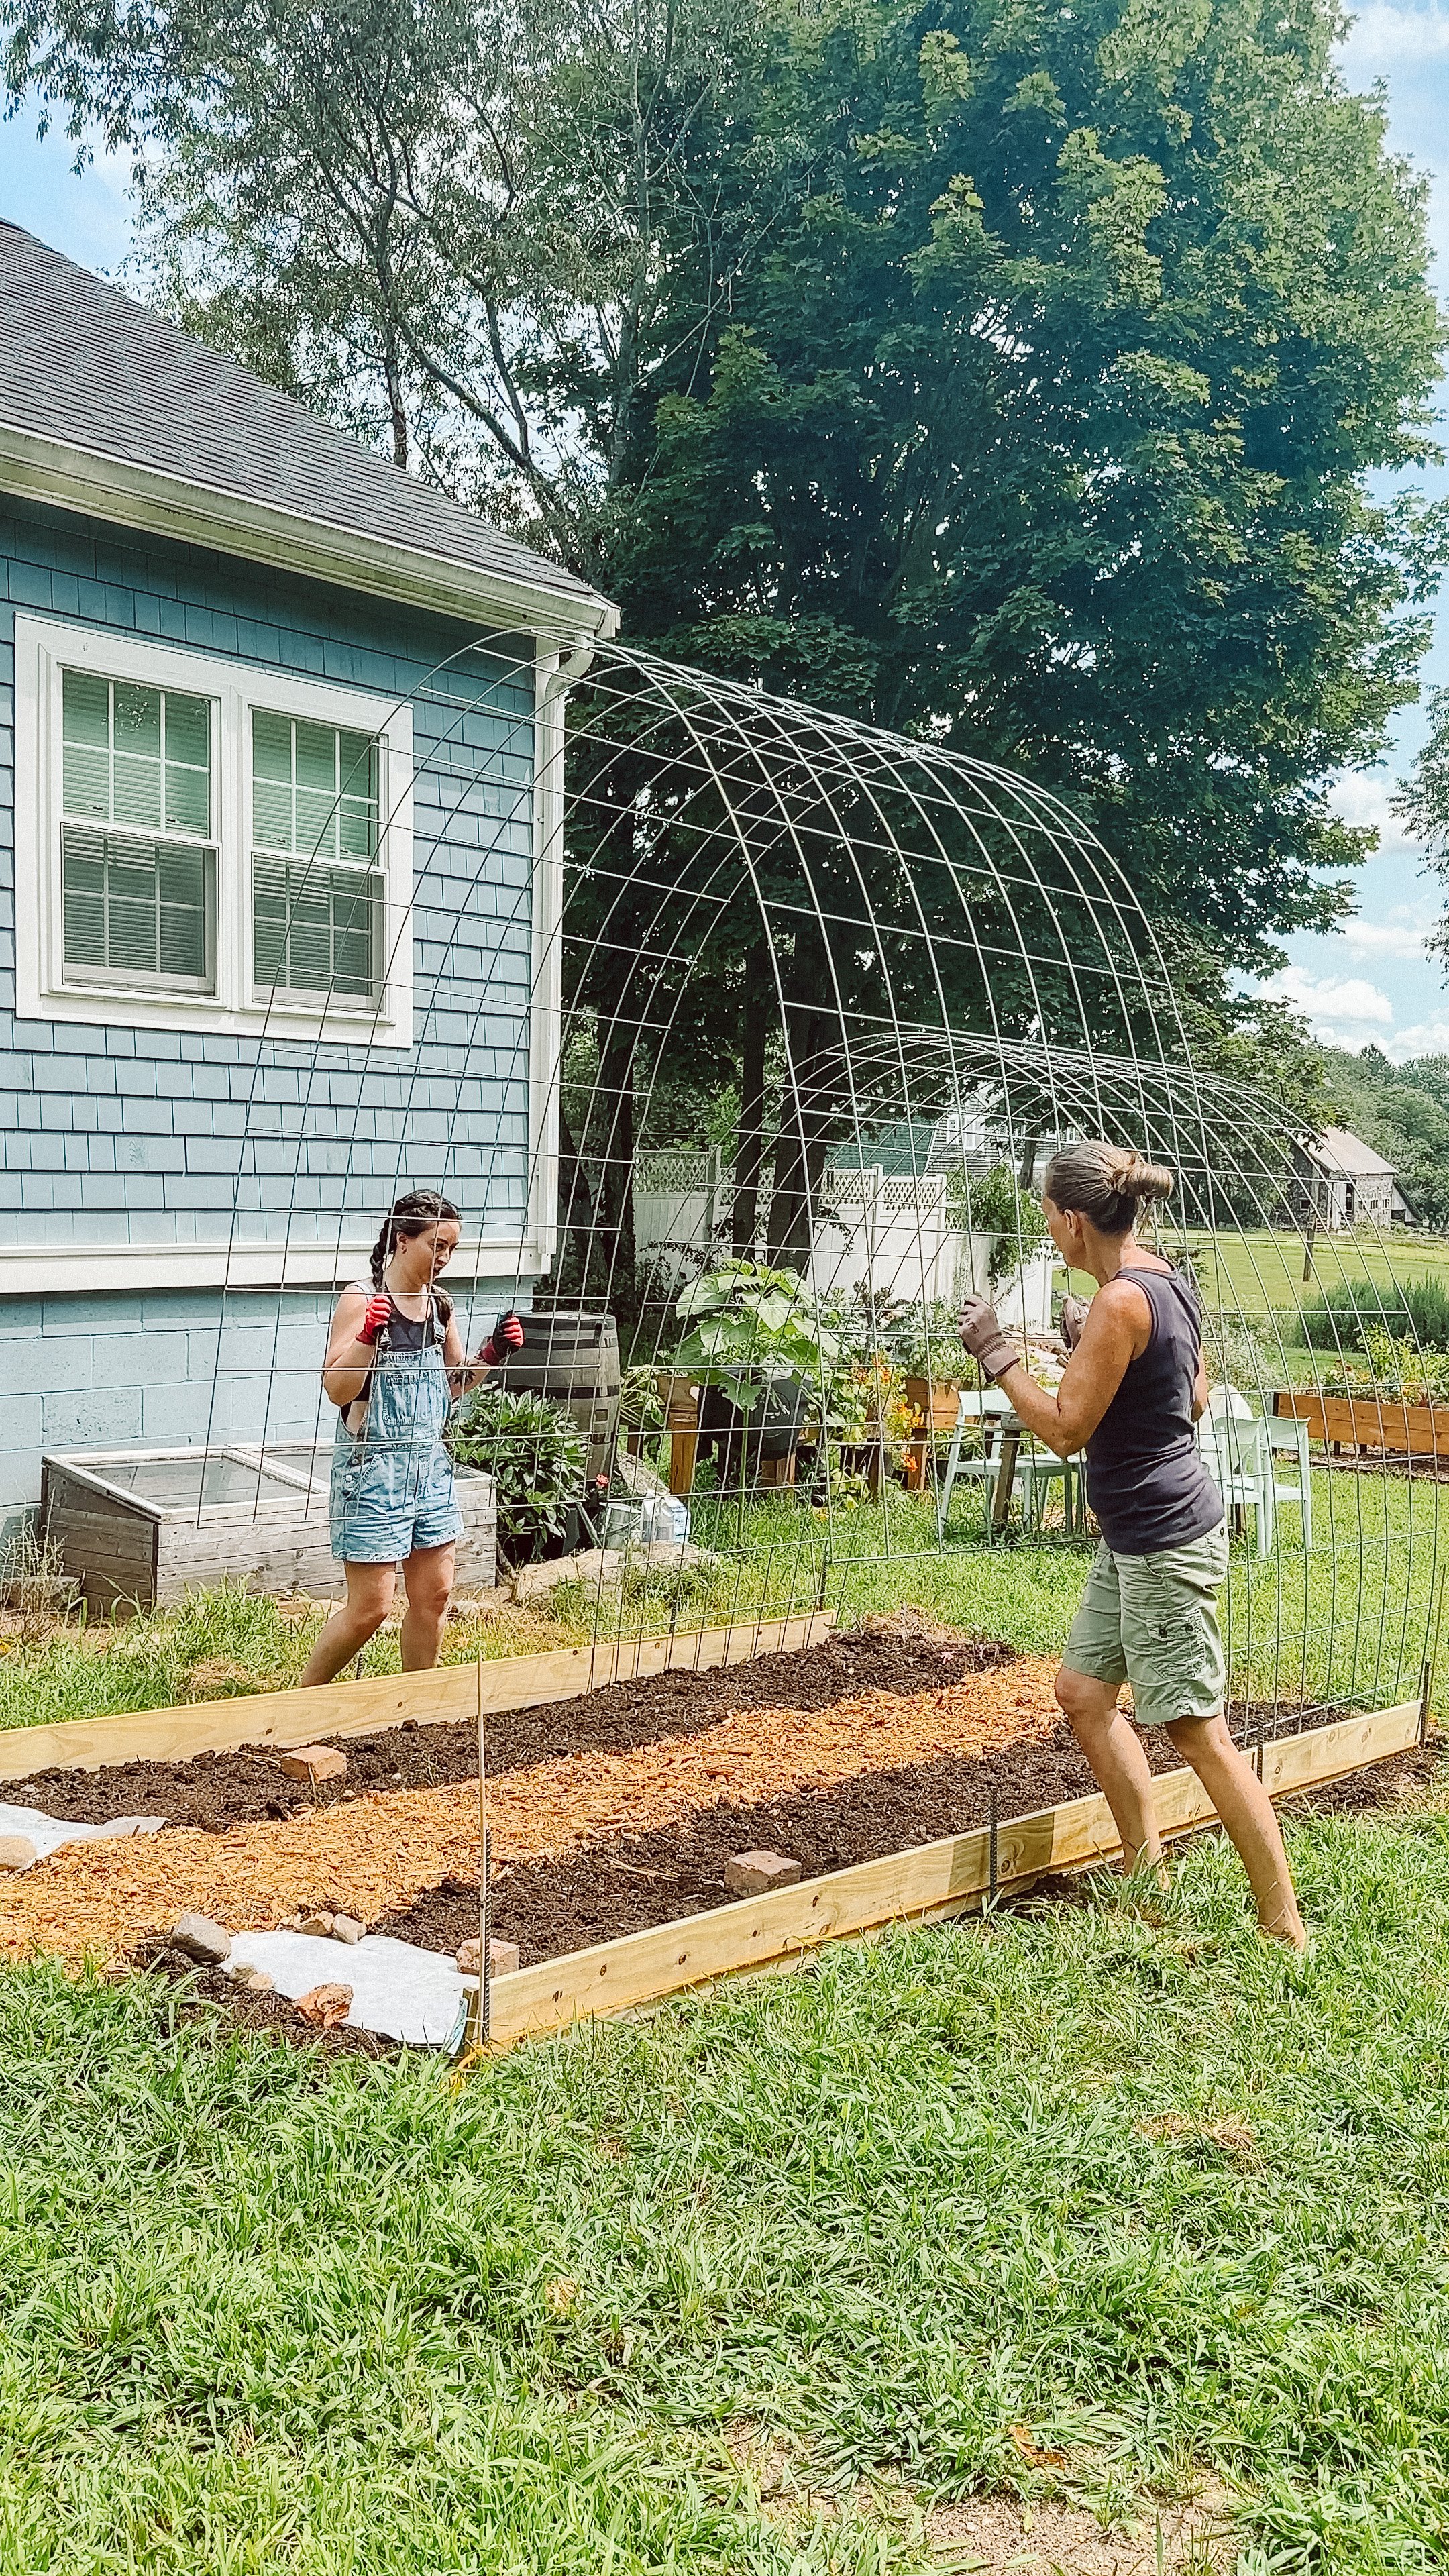
Prep soil
Assuming this is a new garden bed, you’ll need to prep the soil. After marking out my corners, I laid a tarp over the grass for two weeks to kill it, dug out the roots with a shovel and amended with compost.
Set rebar
Using a mallet, drive the rebar posts into the four corners and every 3 feet along the long edges
Set boards
The wood boards just rest up against the rebar on the inside edge.
Set panels
With assistance, lift one short end of the cattle panel to your hips. Slowly walk towards each other to bend the panel into an upside down U shape. Once the panel is bent, walk over to the wood baseboards you set into place and press the panel until it fits in between the wood. Slowly release the panels, allowing the tension to hold the panels in place against the wood. Repeat with all panels.
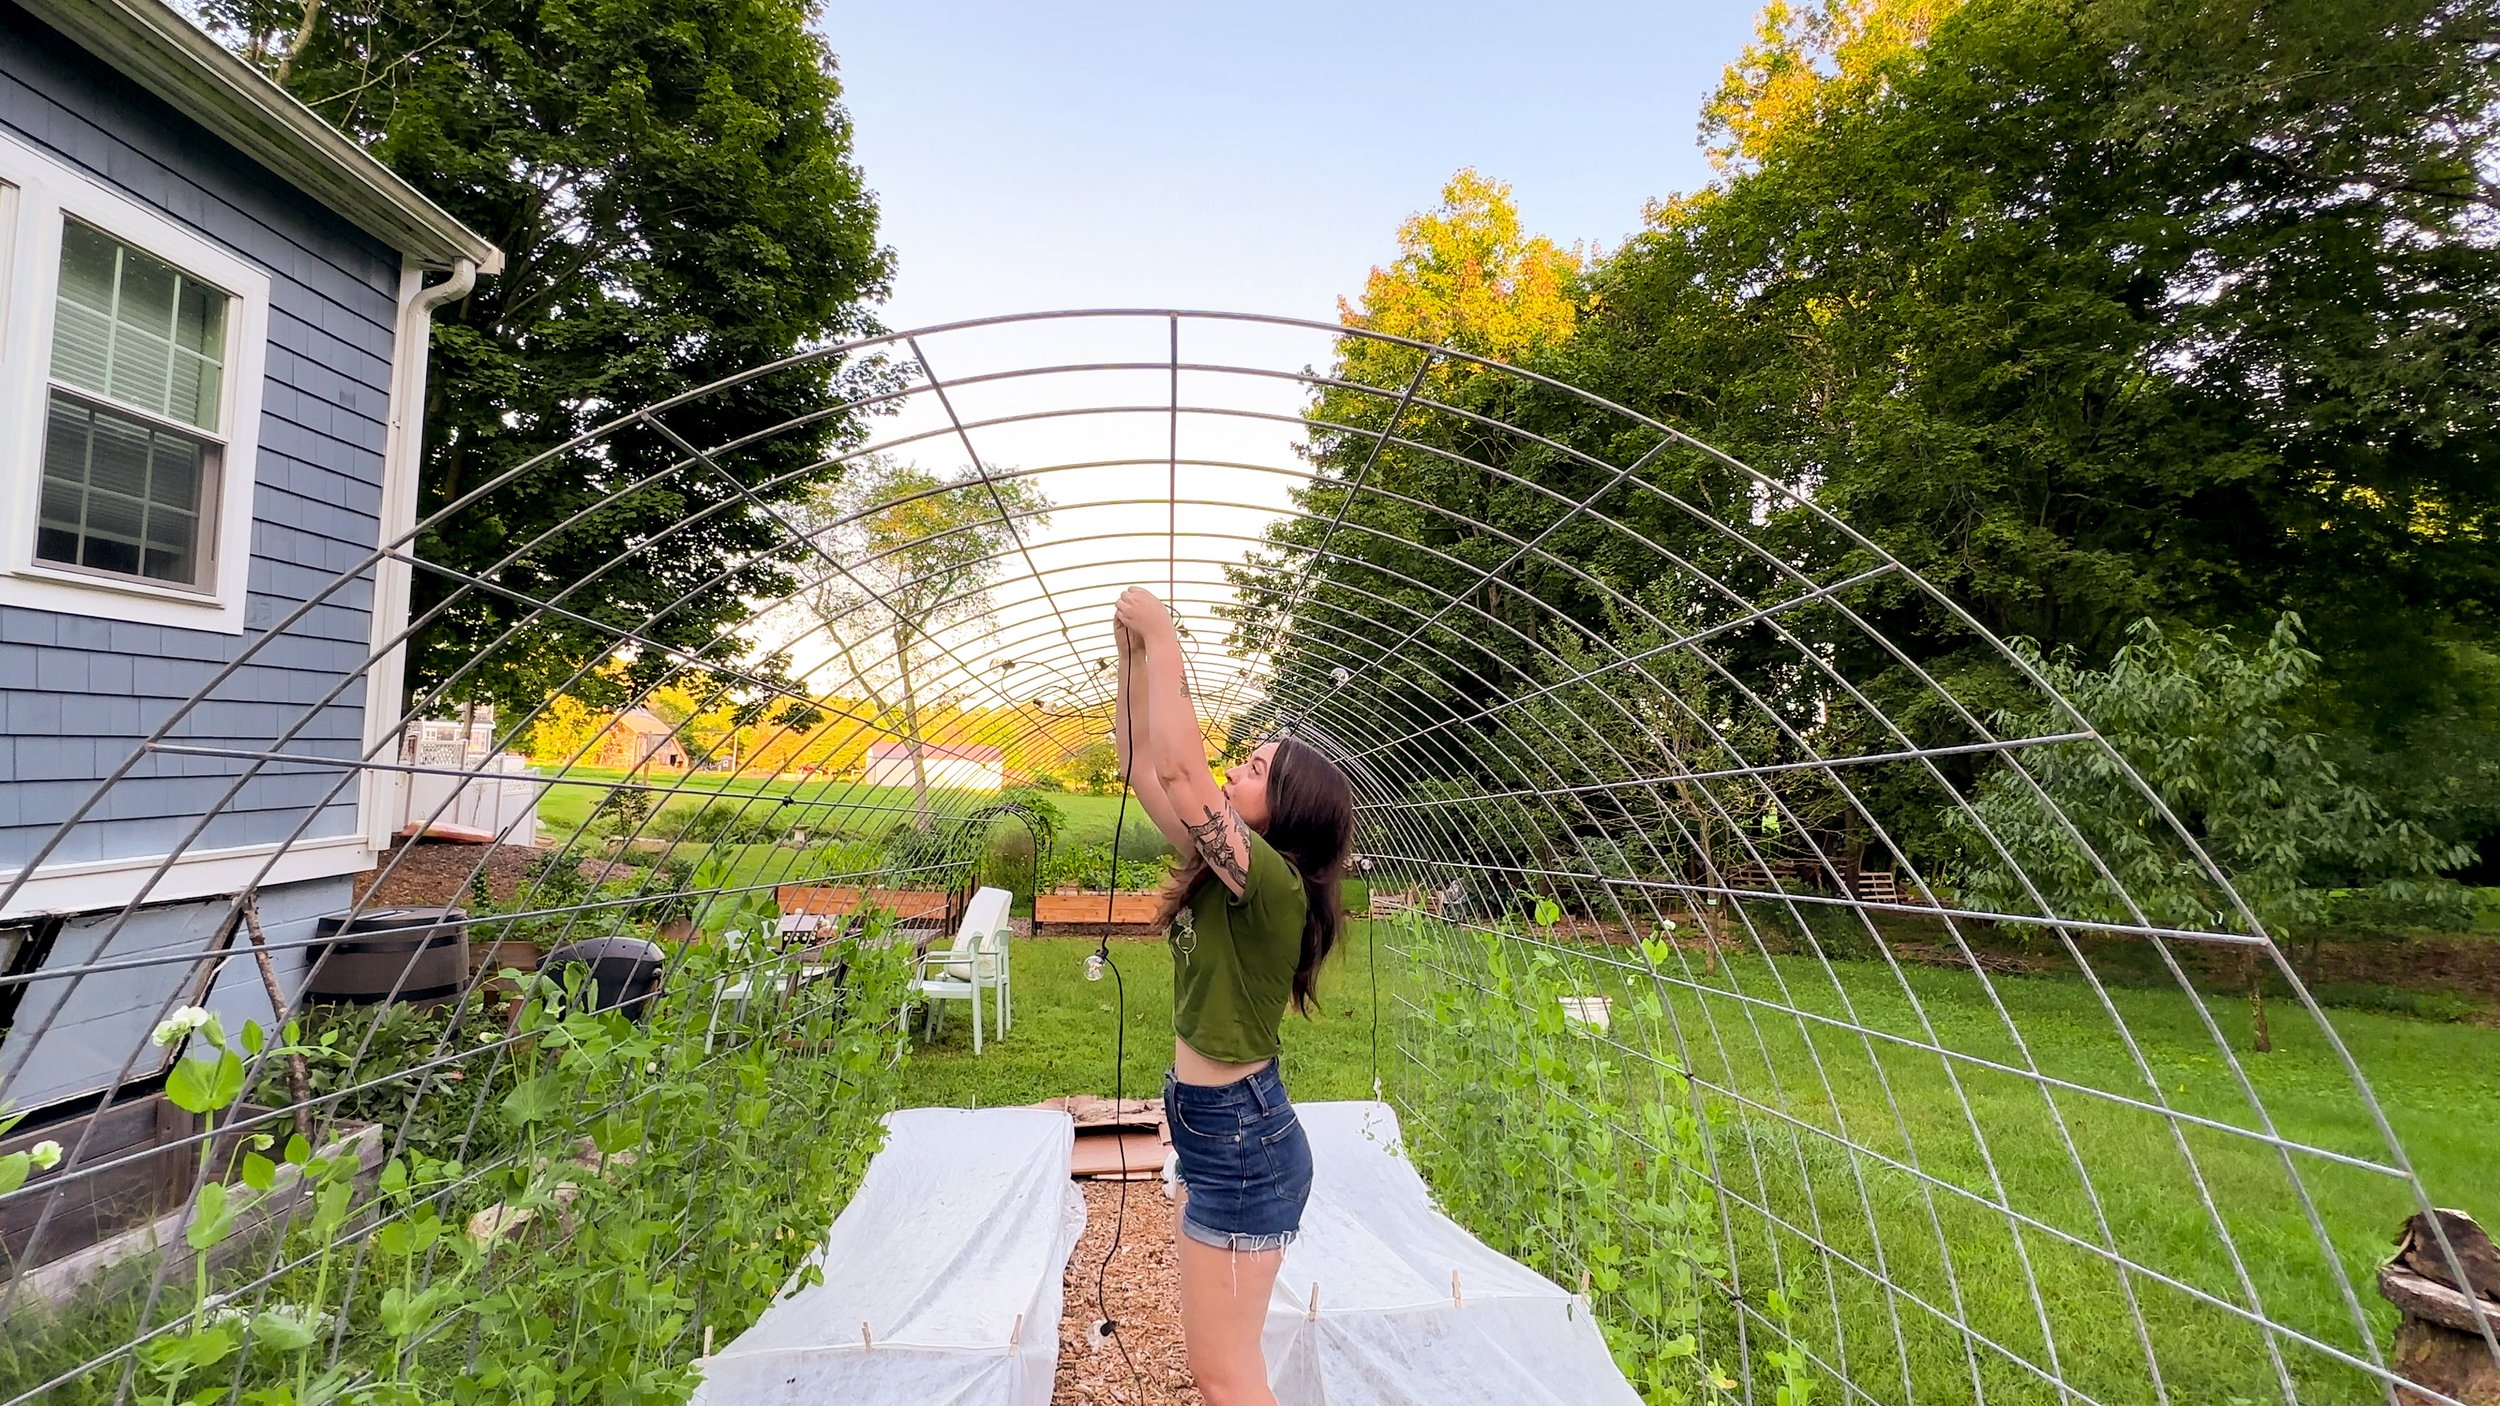
Using the heavy duty zip ties, connect the panels to each other. I used one zip tie every other open square. You can also zip tie the panels to the rebar stakes to anchor it to the ground.
Add greenhouse plastic
Unroll your plastic and lay across the top of your cattle panel. Secure the edges with the tarp clips and cut away excess. To form the end walls and door, cut panels to fit the opening leaving excess to overlap at the edges and secure to the edge of the cattle panel. On the door end, attach the adhesive zipper in the center and cut your doorway opening using the tool provided in the zipper kit. Bury the long edge of the greenhouse plastic along the length of the greenhouse on the outside by digging a furrow four inches deep, laying the extra plastic in the furrow and replacing the soil to secure it.
If you’re a visual learner I have a whole video walkthrough showing how to build a diy cattle panel greenhouse yourself with these plans on my YouTube channel. Watch now:
What To Grow in A Winter Garden

What food can you harvest from your garden when the soil is only 32 degrees fahrenheit? The list is longer than you’d think. A lot of your favorite fall crops can survive down to these temps, and actually the issue isn’t so much the temperature that kills plants but a lack of daylight hours and the stress caused by wind chill. This is why I said harvest and not grow - at a certain point in the year when your daylight hours go below 10 hours a day, plant growth is going to stop. Now this doesn’t mean the plant will die - but it isn’t getting enough energy from that sunlight to produce new growth. So we aren’t technically GROWING in the winter, but HARVESTING plants that we grew in the fall. Which means timing this planting is super important. So let's dive into exactly what I’ve decided to try to grow in the hoop house this winter, including one I swore I would never grow:
Gai Choy Mustard
This mustard matures in 40-60 days and grows anywhere from six to ten inches wide and ten to twelve inches tall. This is a head forming traditional Chinese mustard with a mild flavor when it’s young.
Bloomsdale Spinach
This is a dependable, open pollinated variety that matures in 28-45 days and grows about six to eight inches tall with dark green, thick and curly leaves. It’s a prolific grower with tender leaves and rich flavor.
Common Sorrel
This green has been popular in France and England for centuries but for some reason it isn’t as popular in the states. It matures in 60 days with bright green crinkled leaves that have a lemony spinach flavor.
Easter Egg Radish
This blend has red, white, pink purple and bi colored radishes that mature in just 30 days. Easter egg is a mild and crisp radish that forms small one inch globe shaped roots, so if you don’t like the spiciness of other radishes you may want to try this one.
French breakfast radish
These radishes are super mild - almost sweet and mature in 28 days. The root is scarlet with a white tip about 1 inch around and 2 or 3 inches long.
Spanish black radish
This is an extra large medium spicy radish that matures in 60-70 days with a black exterior and white interior. The globes are about 3-4 inches in diameter when mature. Since this is a winter radish it needs shortening day length and cool temps to mature, so this one gets planted later than the other radish varieties I’m growing.
Bok Choy Choko
I can’t live without this for my stir fries and this variety is so good and tender when harvested when it’s only about four inches tall. It matures in around 50 days and has smooth, leafy blades in a cluster with crisp, pale green stems. Choko was bred to be small and heat tolerant.
Big Seeded Mache
Mache can survive temperatures down to ten degrees fahrenheit and matures in 60 days. It’ll grow to be about six inches tall and eight inches in diameter with dark green, spoon shaped soft leaves in a loose rosette.
Tokyo Long White Bunching Scallion
These Japanese scallions are long, slender, mild and mature in 65 days. They are sweet enough to use in pretty much anything from salads, soups, and stir-fry dishes and grow about 16-18 inches tall.
Olesh Tres Fine Endive
This is a mildly bitter flavored green with a really interesting frilly texture that matures in 42-70 days. It grows about six inches wide and tall in rosettes with broad crinkled green leaves.
Ruby Red Swiss Chard
Chard can withstand moderate freezes and matures in 50-60 days, growing about 24 inches tall and eighteen inches wide with dark green crinkled leaves, red veins and stalks. I use this the same way I use spinach
Danvers Carrot
This variety was actually created an hour from where I live way back in the day when growers were looking for a carrot with improved yield, color and uniformity. It matures in about 65 days. It’s a sweet classic carrot that’s resistant to cracks and splits and roots grow about six inches long.
Astro Arugula
I said I would never grow this, but there’s very few foods I actively dislike and I have a personal rule that I re-try foods I hate about once a year in different forms or varieties and since arugula is so cold hardy, I had to bite the bullet with this and try a new type to see if I can learn to love it. Astro matures in 32-55 days and supposedly has more of a mild flavor than other varieties when the plants are young so I’m hopeful.
Mizuna Mustard
This tender Japanese mustard is milder than other varieties and ready to harvest in 30-50 days. It can grow up to a foot tall and wide but it’s usually harvested when it’s smaller.
Rosette Tatsoi
This beautiful leafy green is more flavorful than traditional bok choy and matures in 45 days. It is super cold tolerant down to 15 degrees fahrenheit and can be harvested even in the snow. It grows pretty low and wide with spoon shaped dark green thick leaves in a rosette.
Tendergreen Mustard
This is also called mustard spinach, but it’s not actually mustard OR spinach. It’s super easy to grow, hardy and productive and matures fast in 30 days to be about two feet tall and up to two feet wide with smooth dark green glossy leaves.