
BACKYARD GARDENING MADE SIMPLE

Garden Planning Part 3: How To Start Seeds Indoors
Wondering how to start seeds for your garden indoors? Here’s exactly what you need and how to do it - from grow lights to seed cells.
The Cottage Peach is reader-supported. When you purchase through links on our site, we may earn an affiliate commission at no additional cost to you. All opinions are our own.
This is part three of my garden planning guide. For part one all about deciding what to plant, click here. For part two, all about planning your garden layout, click here. For part four, how to companion plant, click here.
Today we’ll cover when to start seeds indoors, how to germinate seeds, my favorite seed starting supplies and more.
I love growing my vegetable garden from seeds. What could be more gratifying than watching your plants grow from one tiny seed into a full grown plant ready to harvest? It is so fulfilling to nurture and care for these tiny bits of life and bring them to maturity.
I also love to feel the tie back to my ancestors through this process of growing. I know that not too many generations ago, my relatives would have tended their own little garden to support their family and put food on the table. I have combed through old family photos endlessly searching for evidence of this connection, but so much was lost through time. Considering industrial agriculture is a fairly modern concept though, it’s safe to say that the vast majority of our relatives have grown food at some point in their past. I feel this connection and find my way back to these ancestral roots through the soil.
How to start seeds Indoors
Let’s start with the basics: For many plants, you don’t need even technically need grow lights to start seeds for your garden. You can use winter sowing in milk jugs outdoors, or try starting seeds in egg cartons and even toilet paper rolls. I’ve tried all of these with mixed results. My method of choice used to be soil blocking. Soil blocking is just compressing soil into cubes using a mold and planting directly into that cube without any additional containers. Then you can bottom water those seedlings and build nice strong root structures with zero waste. This method words great for producing strong plants, but it comes with a learning curve that can make it frustrating as you need exactly the right type of soil, and I find it really hurts my hands and is too strenuous.
I’ve been starting seeds using seed cells and trays, but often these are not built to last, and in order to keep plastic out of our landfills and reduce the frustration that comes with cracking cells and flimsy trays, I’ve upgraded my seed starting setup with these extra durable seed starting trays.
Each individual cell in these trays features an air pruning side slot on all four corners to discourage root circling and encourage better root growth. The bottoms of each cell are also open providing air pruning at the lower end of each cell. Large, convenient finger holes in the bottom of each cell make it easy to remove seedlings when you're ready to transplant.
Tap Here To Shop Epic Gardening - Use Code TheCottagePeach5
If you’re growing heat loving crops like peppers and eggplant, you should also grab a heat mat for each tray.
So now that you have your tools, how do you know when to start planting seeds? Start too early, and your plants will outgrow their indoor containers before it is warm enough to move them outdoors. Start your seeds too late, and your plants won’t be mature by your last frost date. That last frost date is exactly where we will start our seed starting journey. This one is easy, I promise; you already know your grow zone from our previous post, so just Google “Last frost date + (your grow zone)” to find out when it’s safe to plant outdoors in your area, since this is the last date when all danger of a freeze has passed.
Next, go back to your list of everything you will be growing and open up Google. Search for each plant name + “when to plant”. For direct sown plants (that means we just put the seed directly into the soil outdoors) this will most often just be “after last frost” (unless it’s a cold hardy plant like spinach or kale which can usually be started a lot earlier) but for plants that need to be started indoors in order to mature before that last frost date, it will say something like “start indoors 8 weeks before last frost” Next to each line write down the planting timing.
The benefit of using a spreadsheet when you are learning how to start seeds is that you can then sort the data in your list by the planting date instead of whatever order you had originally written them down in. This creates a planting schedule for starting plants from seed with just a click of a button. Otherwise you’re going to have to manually organize your list by planting date so you know what dates to do which tasks.
Should you use potting soil or seed starting soil?
Potting soil and seed starting soil are both designed to provide a suitable growing medium for plants, but they have some key differences based on the needs of plants at different stages of growth. Potting soil is a general-purpose mix that is formulated to support the growth of established plants, both indoors and outdoors. It often contains a blend of ingredients such as peat moss, perlite, vermiculite, pine bark, and sometimes added fertilizers. Potting soil may have added nutrients to support the nutritional needs of mature plants. Some formulations include slow-release fertilizers that provide nutrients over an extended period. Potting soil tends to have a coarser texture compared to seed starting soil. This coarser texture helps with drainage, aeration, and provides stability for larger plants.
Seed starting soil is specifically designed for germinating seeds. It typically consists of a lightweight and fine-textured blend, often containing ingredients like peat moss, vermiculite, and perlite. Seed starting soil is often sterile, which helps prevent damping off and other soil-borne diseases that can affect germinating seeds and young seedlings. Seed starting soil is formulated to retain moisture well, providing the consistent moisture levels necessary for seed germination. This helps seeds absorb water and initiate the germination process. Seed starting soil usually has minimal nutrients because seeds initially rely on the nutrients stored within them. As the seedlings grow and develop true leaves, additional nutrients may need to be provided through fertilization. Seed starting soil has a finer texture compared to potting soil. This fine texture allows seeds to make good contact with the soil, facilitating germination.
Use seed starting soil when germinating seeds in trays or small containers. The fine texture and sterile nature help create an ideal environment for germination. Once seedlings have developed a few sets of true leaves, you can transplant them into larger containers with potting soil, which provides the nutrients and structure needed for more mature plants.
What grow light should you use for starting seeds?
Don’t overcomplicate this. Grab some LED strip grow lights like these, and a couple of timers to turn them on automatically. Unless you are going to grow your plants indoors for their entire lifecycle and need them to flower/fruit without sunlight, you do not need to worry about the specific spectrum of light you’re using nearly as much.
How many hours of light do seedlings need?
You should set your grow light timer to give your seedlings 12-18 hours of light per day. I usually set mine for 16 hours.
What is germination?
Germination the development of a plant from a seed or spore after a period of dormancy. Most of the time, your seeds will germinate (or sprout) themselves simply by being activated through the process of hydration. So, you’ll put your seed into the soil at the recommended depth, cover with soil and keep damp, and this increase in the moisture content will trigger the germination of the seed. However, it’s important to check the germination requirements for any seed you haven’t grown before. Some, such as peppers, require a higher temperature in order to germinate successfully. Others like spinach and lettuce prefer a cooler temperature to germinate. Some seeds will just be duds and never germinate - that’s why you’ll often plant multiple seeds in one cell and thin them later, to hedge your bets. You can improve the rate of germination of certain plants like peas, beans, pumpkins and other winter squash by soaking them prior to planting. But, to be honest, since I have fatigue from my arthritis I don’t usually do this step and it’s usually just fine as long as you have quality seeds.
How do you prevent damping off?
Damping off is a common problem when starting seeds, and it is caused by various types of fungi that attack young seedlings, causing them to rot at the soil line. To prevent damping off, you can take several precautions. Start with a high-quality, sterile seed starting mix. Sterilized soil helps eliminate the presence of damping off-causing fungi. Ensure that the containers or seed trays you use are clean and have been properly washed or sterilized before planting. This reduces the chances of introducing harmful fungi. Overwatering can create a favorable environment for damping off fungi. Water the seedlings from the bottom to keep the surface of the soil dry. Use a tray underneath the pots and allow the soil to wick up water as needed. Adequate air circulation helps prevent the buildup of humidity around the seedlings. Use a fan on low speed or open windows to provide ventilation, especially if you are growing seedlings indoors. You should also aim to maintain a moderate humidity level. High humidity can contribute to the growth of damping off fungi. Proper ventilation and spacing between seedlings can help manage humidity levels.
By implementing these practices, you can reduce the risk of damping off and give your seedlings a healthy start. If you notice any signs of damping off, remove affected seedlings immediately to prevent the spread of the fungus.
Thinning seedlings
Thinning seedlings is an important step in the early stages of plant growth to ensure that the remaining seedlings have enough space, nutrients, and sunlight to develop into strong, healthy plants. Allow the seedlings to grow to a height where they have at least two sets of “true leaves”. True leaves are the leaves that follow the initial seed leaves (cotyledons) and have the characteristics of the plant species. Identify the strongest and healthiest seedlings. Look for seedlings with vigorous growth, a good color, and well-developed leaves. This does not necessarily mean the tallest - a short, stocky seedling is a better choice than a thin, leggy one. Instead of pulling out the excess seedlings, which can disturb the roots of neighboring plants, use clean scissors or small pruners to cut the unwanted seedlings at soil level. This ensures minimal disruption to the roots of the remaining seedlings. If you are thinning edible plants like lettuce or carrots, you can eat the thinned seedlings. Thinning can be a way to enjoy some early greens from your garden. Otherwise, just toss them in your compost.
Starting a GArden Checklist
Pick and order your seeds (don’t forget to check out this blog post if you get stuck)
Plan your garden layout (see this post for my tips)
Write down the planting dates for every plant on your list - both the seed starting date and the date to transplant
Gather your supplies; soil, seeds, cell containers to grow in or a soil blocker and trays, a trowel, a tarp to keep your work area clean, and your light source
Work down your list of seeds from the first planting date to the last
Presoak any seeds that require it for germination
Plant your seeds at the recommended depth
Keep the soil moist at all times - you can cover with any clear material to keep the environment damp until the seeds sprout
Build strength in your seedlings stems by gently running your hands across the surface of your plants daily, and keep a fan on to prevent damping off/mold
Harden off your seedlings by bringing them outdoors to a protected spot out of direct sunlight and wind (up against your house will do). Start with one hour for the first few days, then increase it by an hour every day until they are able to stay outdoors for all daylight hours
Transplant your mature seedlings into the garden when it is safe to do so, usually after your average last frost date
What else do you want to know about starting seeds indoors?


Grow Food Outdoors All Year Long With Cold Frame Gardening
Living with arthritis as a gardener, I have formed a close bond with the land in order to better support my body. My immune system requires careful tending, and I find myself craving dark leafy greens, hearty soups and protein rich comfort foods as the weather turns cold. But in a cruel twist of fate, when my body craves these deeply nutritious foods most, the bitter cold of our New England winters do not accommodate a growing season which would allow me to cultivate all of the produce I wish to grow deep in December.
So how do we ask the land to sustain us through its deep hibernation? The answer may be found in the form of a simple wooden box called a cold frame.
As cold and snowy weather descends upon us here in the Northeast, I find my achy joints actively calling out for more attention. Living with arthritis as a gardener, I have formed a close bond with the land in order to better support my body. My immune system requires careful tending, and I find myself craving dark leafy greens, hearty soups and protein rich comfort foods as the weather turns cold. But in a cruel twist of fate, when my body craves these deeply nutritious foods most, the bitter cold of our New England winters do not accommodate a growing season which would allow me to cultivate all of the produce I wish to grow deep in December.
So how do we ask the land to sustain us through its deep hibernation? The answer may be found in the form of a simple wooden box called a cold frame.
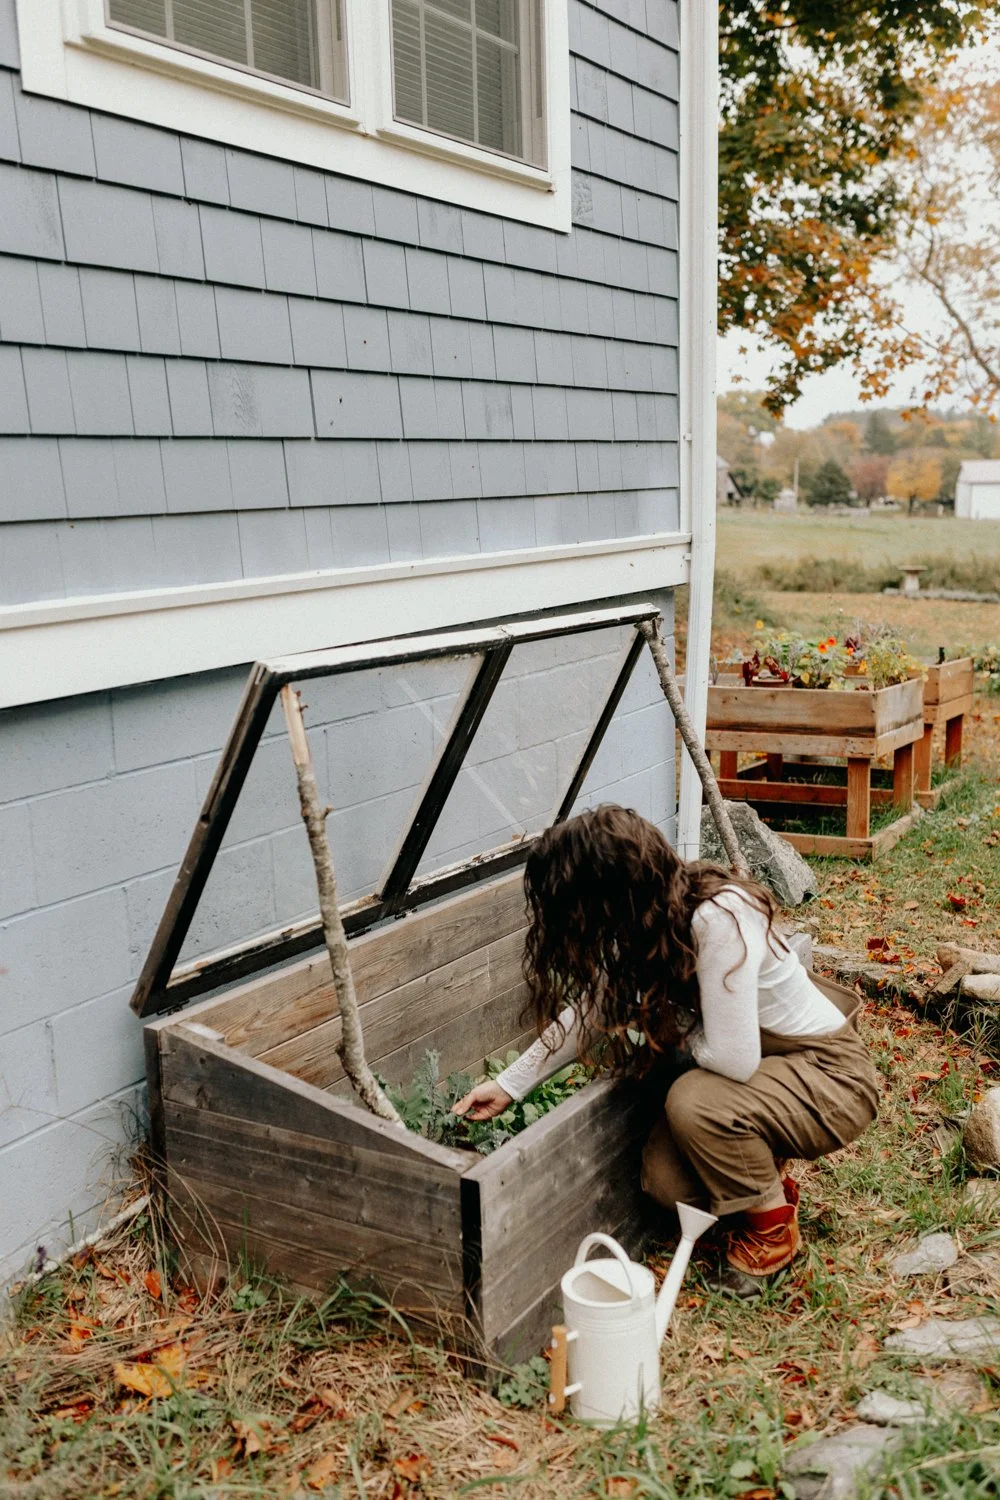
This rustic frame set into the earth, snuggled up against the sunny south wall of our home provides us ample opportunities to tend, grow and gather even in the darkest days of winter. It can feel like pure magic to enjoy a diverse variety of produce even as we are cozy in our blankets beside the fire.
How does a cold frame work?
A cold frame works by creating something like a mini-greenhouse, trapping warm air through solarization inside of the box and insulating the plants within from the worst that winter has to offer. We control the temperature inside of the cold frame with a simple vent - the hinged lid can be propped open with different sized sticks to allow excess heat to escape on warmer days, but for the most part in our deep New England winters the lid stays firmly shut until we trudge through the knee deep snow to harvest.
Like many things in life, we cannot expect to circumvent nature entirely for our own benefit. Nothing in nature blooms all year. Try to plant delicate heat loving peppers, for example, and you will be met with disappointment. Similarly, the plants enjoy a slower season in winter, much the way we humans do. If you’re not convinced, I’d ask you to consider this: if the trees can take a break, so can you.
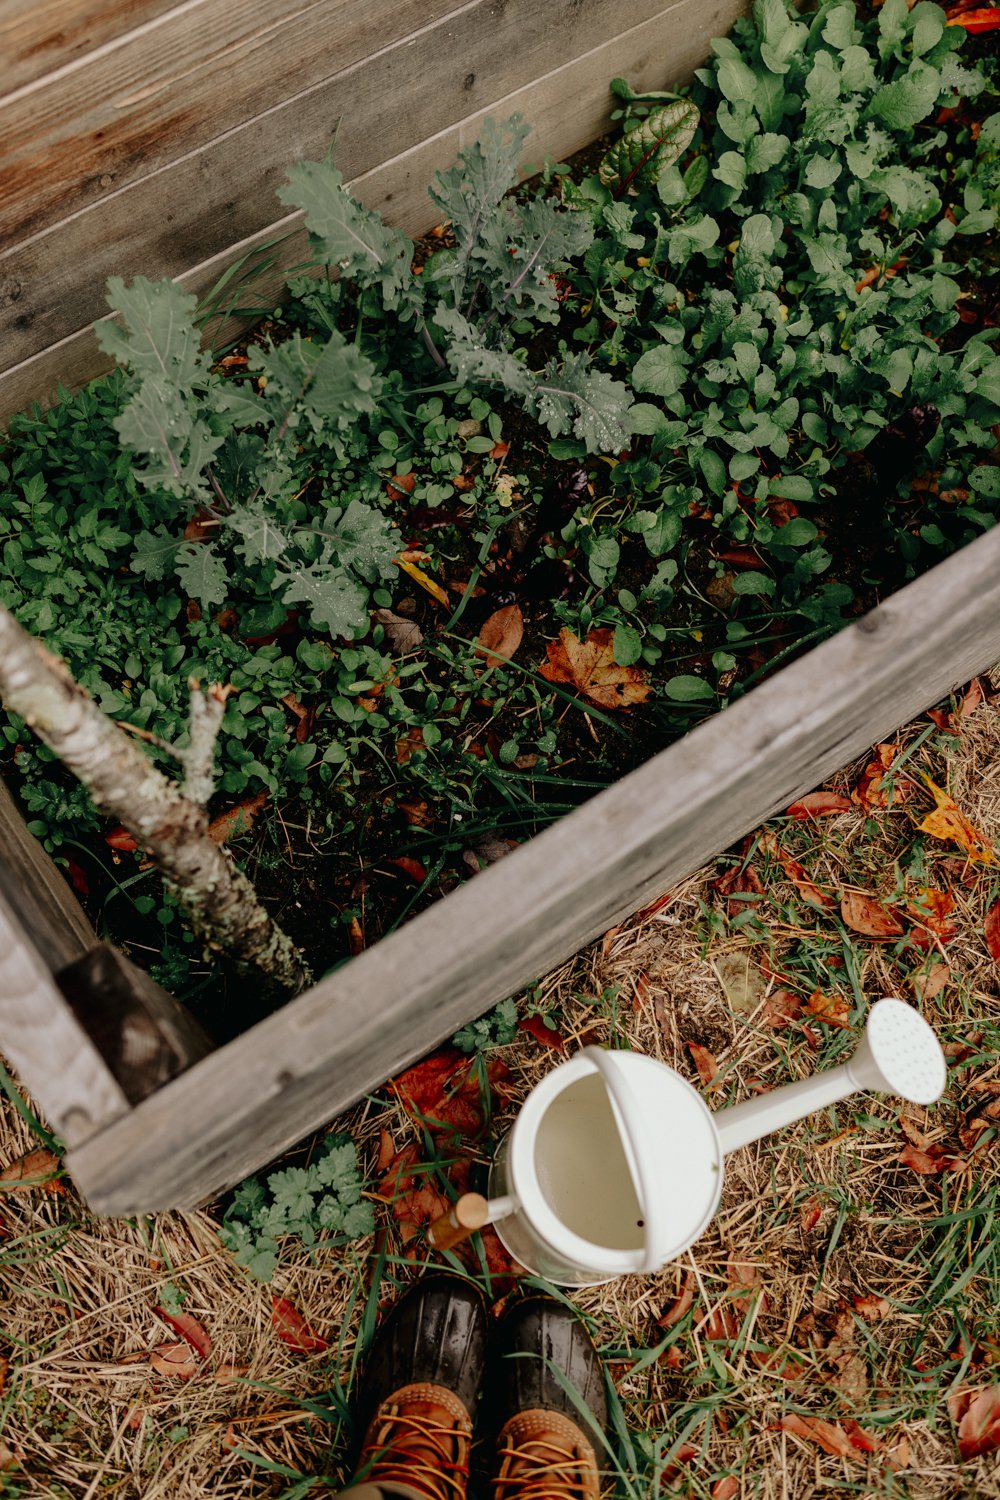
A cold frame is a lesson in slowing down and radically accepting things as they are. Your kale, radishes and lettuce will grow and thrive at a slower pace than you can expect in warmer seasons. The harvests are fewer, but more rewarding for the mere fact that they exist at all. And while a cold frame requires a certain amount of upkeep and planning in the beginning, this slowed down nature means that watering and weeding becomes virtually unnecessary in the coldest months.
Now, if you live in a climate that does not experience a cold winter season you may think a cold frame is unnecessary. Although, they continue to be useful even into the spring season here in New England since they make the perfect protected nursery in which to harden off your summer seedlings each spring. And if you can easily build one for cheap or free using reclaimed materials, why not give it a try?
Where should you put a cold frame?
You’ll want to choose a location for your cold frame that is protected from north winds and generally sunny. This means the best spot for your cold frame will have no shade from any trees, and preferably be placed with the back wall of the cold frame up against the south side of your house, shed or barn. If you don’t have a spot like this available, then anywhere without shade will do. You’ll just need to spend some extra effort properly insulating your box from the winds.
Speaking of howling winds, so long as it is protected from those north winds we discussed you shouldn’t worry yourself too much about creating something airtight. Your cold frame is not a greenhouse, and so we don’t expect it to function quite the same. Build your frame to be thick and sturdy, but don’t worry about every little seam and crack.
How to build a cold frame
If you have the time and physical ability, building a cold frame yourself is absolutely the most economical solution. Purchasing one ready-made can cost you anywhere from $60-$500 and quality issues on the low end of that budget will prevent you from getting many years of use out of it. Meanwhile, if you build one yourself it can be done for far less than the low end of that range and produce an end result that will be sturdy enough to continue providing shelter to your winter crop for years to come. While old windows can be fragile and prone to breaking, when they can be found for free I still find it a better option than a new piece of corrugated plexiglass.
We built our cold frame just as the first leaves began dusting the earth, making their final descent from the branches above. Pulling out the old wooden windows and reclaimed lumber from our basement, I didn’t really have a plan. This is the nature of projects on our little homestead - in order to put to rest my fears and limiting beliefs, I have a tendency to turn a blind eye to the specifics and figure things out as I go. “I’m just going to build a big rectangle, the size of the two windows combined, and stick the windows on top” I confidently told myself. It’s safe to say I don’t have a ton of confidence when it comes to building things, but I was betting that between the two of us, we could figure it out. A chill wind traveled across the field. I adjusted my hat over my cold ears and set to work.
This method of trial and error has generally served me quite well on this journey, and I’ve found it to be essential to growing plants in particular. A fussy Nasturtium in Georgia, for example, is going to have very different needs that one planted in Vermont. So why overwhelm ourselves with tips and tricks from every gardener in the land when we could simply plant, observe, expect failure and experiment until things go right?
You can use many different materials to build a cold frame - but the very best materials are the ones you already have. Our little pile of scrap lumber provided nearly everything we needed to create a sloped box on which to mount our hinges and old wooden windows.
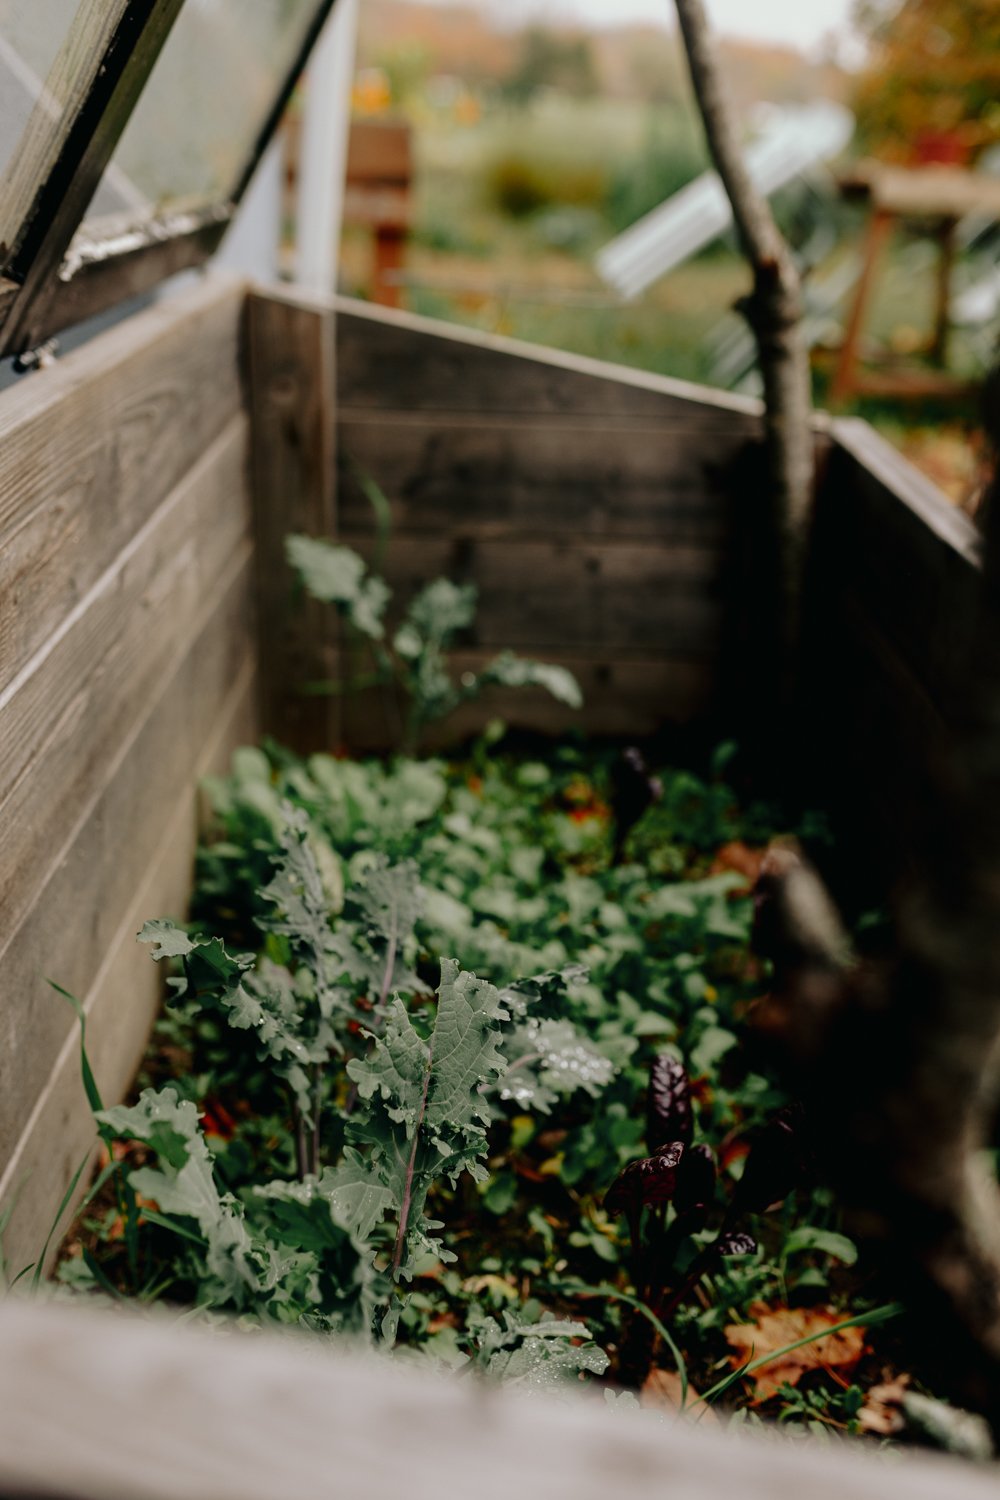
The result was…lopsided. For some reason, the box wasn’t sitting level on the earth, the wood having twisted under tension at some point, unnoticed by our novice eyes. The old windows we used for a lid were chipping questionably safe paint flakes every time we opened and closed the hinges. But it was finished, and it was free, and so - in the ground it went. I packed straw around the exterior to fill in the gaps where the frame didn’t meet the soil and added extra in the space between the wall and the cold frame, set my plants in the earth and held my breath that I would discover an abundance of fresh food beneath the glass in a couple of months.
I suppose I shouldn’t have led with such an obvious spoiler, but the cold frame did work, and an abundance we did have, regardless of our lack of building skills. And so as its lessons compounded the cold frame became something more than a simple box to grow in. The weathered wood shines like a beacon, a reminder to ourselves that we can accomplish more than we think, and done is better than perfect.
What Can you grow in a cold frame?
Kale
Swiss Chard
Spinach
Radishes
Lettuce
Beets
Carrots
Arugula
Kohlrabi
Scallions
Parsley
Mustard
Best cold frames to buy
Don’t want to build your own cold frame? There are many pre-made options available that are built to last. I suggest looking for a cold frame that has a rot-resistant cedar base and shatterproof polycarbonate lid. If you already have raised beds, then a plant protection tent may be the best option for you as you can simply convert your raised beds into a cold frame for the winter months and then remove the tent structure in the summer heat. Here’s my recommendations for the best pre-made cold frames and tent frames you can buy:
The 3-Season Garden Protection Tent from Gardener’s Supply makes it easy to access plants within your raised bed and includes two covers and durable powder-coated steel frame. This tent provides 70% light transmission, 40" of head room at the peak, and has roll-up end windows for ventilation. A second cover protects against ravenous summer bugs and scorching sun. Three zippered doors on each cover provide easy access for tending and harvesting. Tie-downs secure the covers to the steel frame. Click to Shop
The Cedar Cold Frame from Gardener’s Supply is an attractive cold frame with a narrow footprint. The base is made from rot-resistant lumber with aluminum corners. The top is made with polycarbonate panels that diffuse light so plants don't "cook," and there are adjustable braces to hold panels at various intervals for ventilation. Click to Shop
Will you try cold frame gardening this year? Have you used a cold frame already? Comment and let me know!

10 Zero Waste Gardening Tools and Ideas
In all areas of our lives, from our hobbies to our habits, we have opportunities to either increase or reduce our impact on the environment and the effects of climate change. While the burden of fixing our climate crisis should not fall on the individual but the corporations that are responsible for the vast majority of damage done, every little bit you are able to do can help. The best part is, most of the ways we can reduce or eliminate our waste in gardening come at no additional effort or cost - it simply comes down to intentionally deciding on the plastic free or secondhand option instead (which is often cheaper anyway)

The Cottage Peach is reader-supported. When you purchase through links on our site, we may earn an affiliate commission at no additional cost to you. All opinions are our own.
In all areas of our lives, from our hobbies to our habits, we have opportunities to create or reduce our impact on the environment and the effects of climate change. While the burden of fixing our climate crisis should not fall on the individual but the corporations that are responsible for the vast majority of damage done, every little bit you are able to do can help. The best part is, most of the ways we can reduce or eliminate our waste in gardening come at no additional effort or cost - it simply comes down to intentionally deciding on the plastic free or secondhand option instead (which is often cheaper anyway)
What does zero waste mean? What is zero waste?
Zero waste is the principle or practice of sustainable living in which the participant commits to reducing or eliminating streams of waste in various aspects of their lives. This can include reducing water consumption, shopping the bulk food bins or repurposing household items at the end of their “useful” life, to name a few.
The concept of zero waste living can sound intimidating or difficult, but more often than not it is nothing more than a simple shift in your awareness and intention. It also does not mean you must completely eliminate all sources of waste in your life - despite the word “zero”, it is not an all or nothing game.
What kinds of waste are there?
Waste comes in all forms, in all areas of our lives. While the majority of waste filling landfills is produced by industrial operations, domestically, we waste food, water, energy, paper, packaging, furniture, clothes, computers, tires, appliances and more in unimaginable amounts. Americans send nearly 150 million tons of trash to landfills each year instead of recycling it, and we’re running out of space.
Where does waste go?
Waste goes into landfills, which typically cause the destruction of natural wildlife habitats in their construction. They are often lined in plastic. The average landfill size is 600 acres. With over 3,000 active landfills in the United States, as much as 1,800,000 acres of habitat have been lost. When waste breaks down in a landfill, methane gas is released. Methane is 84 times more effective at absorbing the sun’s heat than carbon dioxide, making it one of the most potent greenhouse gases and a huge contributor to climate change.
Food can’t break down in a landfill
Food waste needs oxygen in order to break down properly. Due to the fact that landfills are so tightly packed with waste of all kinds, food waste is often suffocated to the point where it cannot break down into the individual nutrients it is composed of and be reabsorbed into the earth, regenerating the soil. What happens if food doesn’t break down? It rots. When food rots in a landfill, it produces huge amounts of methane — a greenhouse gas at least 28 times as potent as carbon dioxide.
Here’s what the FDA has to say about the impacts of food waste:
“Food loss and waste is estimated to be roughly one third of the food intended for human consumption in the United States. When food is discarded, all inputs used in producing, processing, transporting, preparing, and storing discarded food are also wasted. Food loss and waste also exacerbates the climate change crisis with its significant greenhouse gas (GHG) footprint. Production, transportation, and handling of food generate significant Carbon Dioxide (CO2) emissions and when food ends up in landfills, it generates methane, an even more potent greenhouse gas.”
This is why zero waste food is so important, and we can do this easily with composting! (More information on that below)
Ways to incorporate zero waste principles into your garden
We live in an era that romanticizes convenience in all forms. Of course it’s easy to see where these ideas might apply to a zero waste home, but this also extends to our hobbies, including gardening. You can’t visit the local garden center without being bombarded with gadgets and tools promising to make garden tasks easier, faster or better. But the fact is that humans have been gardening successfully for hundreds of years, without many of these interventions. Certainly there are tools that make gardening more accessible for those of us with chronic illness or pain that find it challenging, but here I’m primarily referring to situations where there is a perfectly good alternative with less packaging, that is made without plastic which can never break down once it reaches the end of its useful life.
I’m sure you’ve heard this before, but the key concepts behind achieving a zero waste lifestyle are to reduce, recycle and repurpose. But how do you apply these concepts in the garden?
I recommend intentionally shifting your mindset.
When something breaks and needs to be replaced in the garden, first ask yourself “Can this be repaired?” if not, ask “can it be repurposed?” and if you still cannot find a use for the broken item, ask “can it be recycled?”
With these three simple questions, you’ll be well on your way to intentionally incorporating zero waste practices into your garden routine. But here’s a few ideas for zero waste gardening to get you started:

Reuse food containers for produce storage
Pop your zucchini in an old bread bag, pureed pumpkin in salsa jars and fresh picked berries in plastic yogurt tubs - all of which make excellent replacements for disposable freezer bags or plastic wrap. You’re keeping those items out of the waste stream AND preventing the addition of another piece of waste from the disposable products you skip using.
Wrap produce in damp cloths
Not only are you avoiding the use of disposable cling wrap, you’ll extend the life of your vegetables and avoid having to send them to the compost all together. In fact, learning the best storage methods for every fruit or vegetable that you grow is the best way to reduce food waste.
Save shower water for plants
Before you close this page in disgust, I’m not saying you have to save your DIRTY shower water. But how long are you running that shower before you even get in? Simply place an empty 5 gallon bucket under the faucet until you’re ready to get in, then pour that excess water on your garden beds when you go out to water.
Make vegetable stock
By being proactive and saving any cut offs from your carrot and onion ends, as well as any whole vegetables you won’t be able to use before they go bad and freezing until you have a full gallon bag to work with you can make simple and nutritious vegetable stock - just add your collected scraps to a pot of boiling water and simmer covered for 1-4 hours.
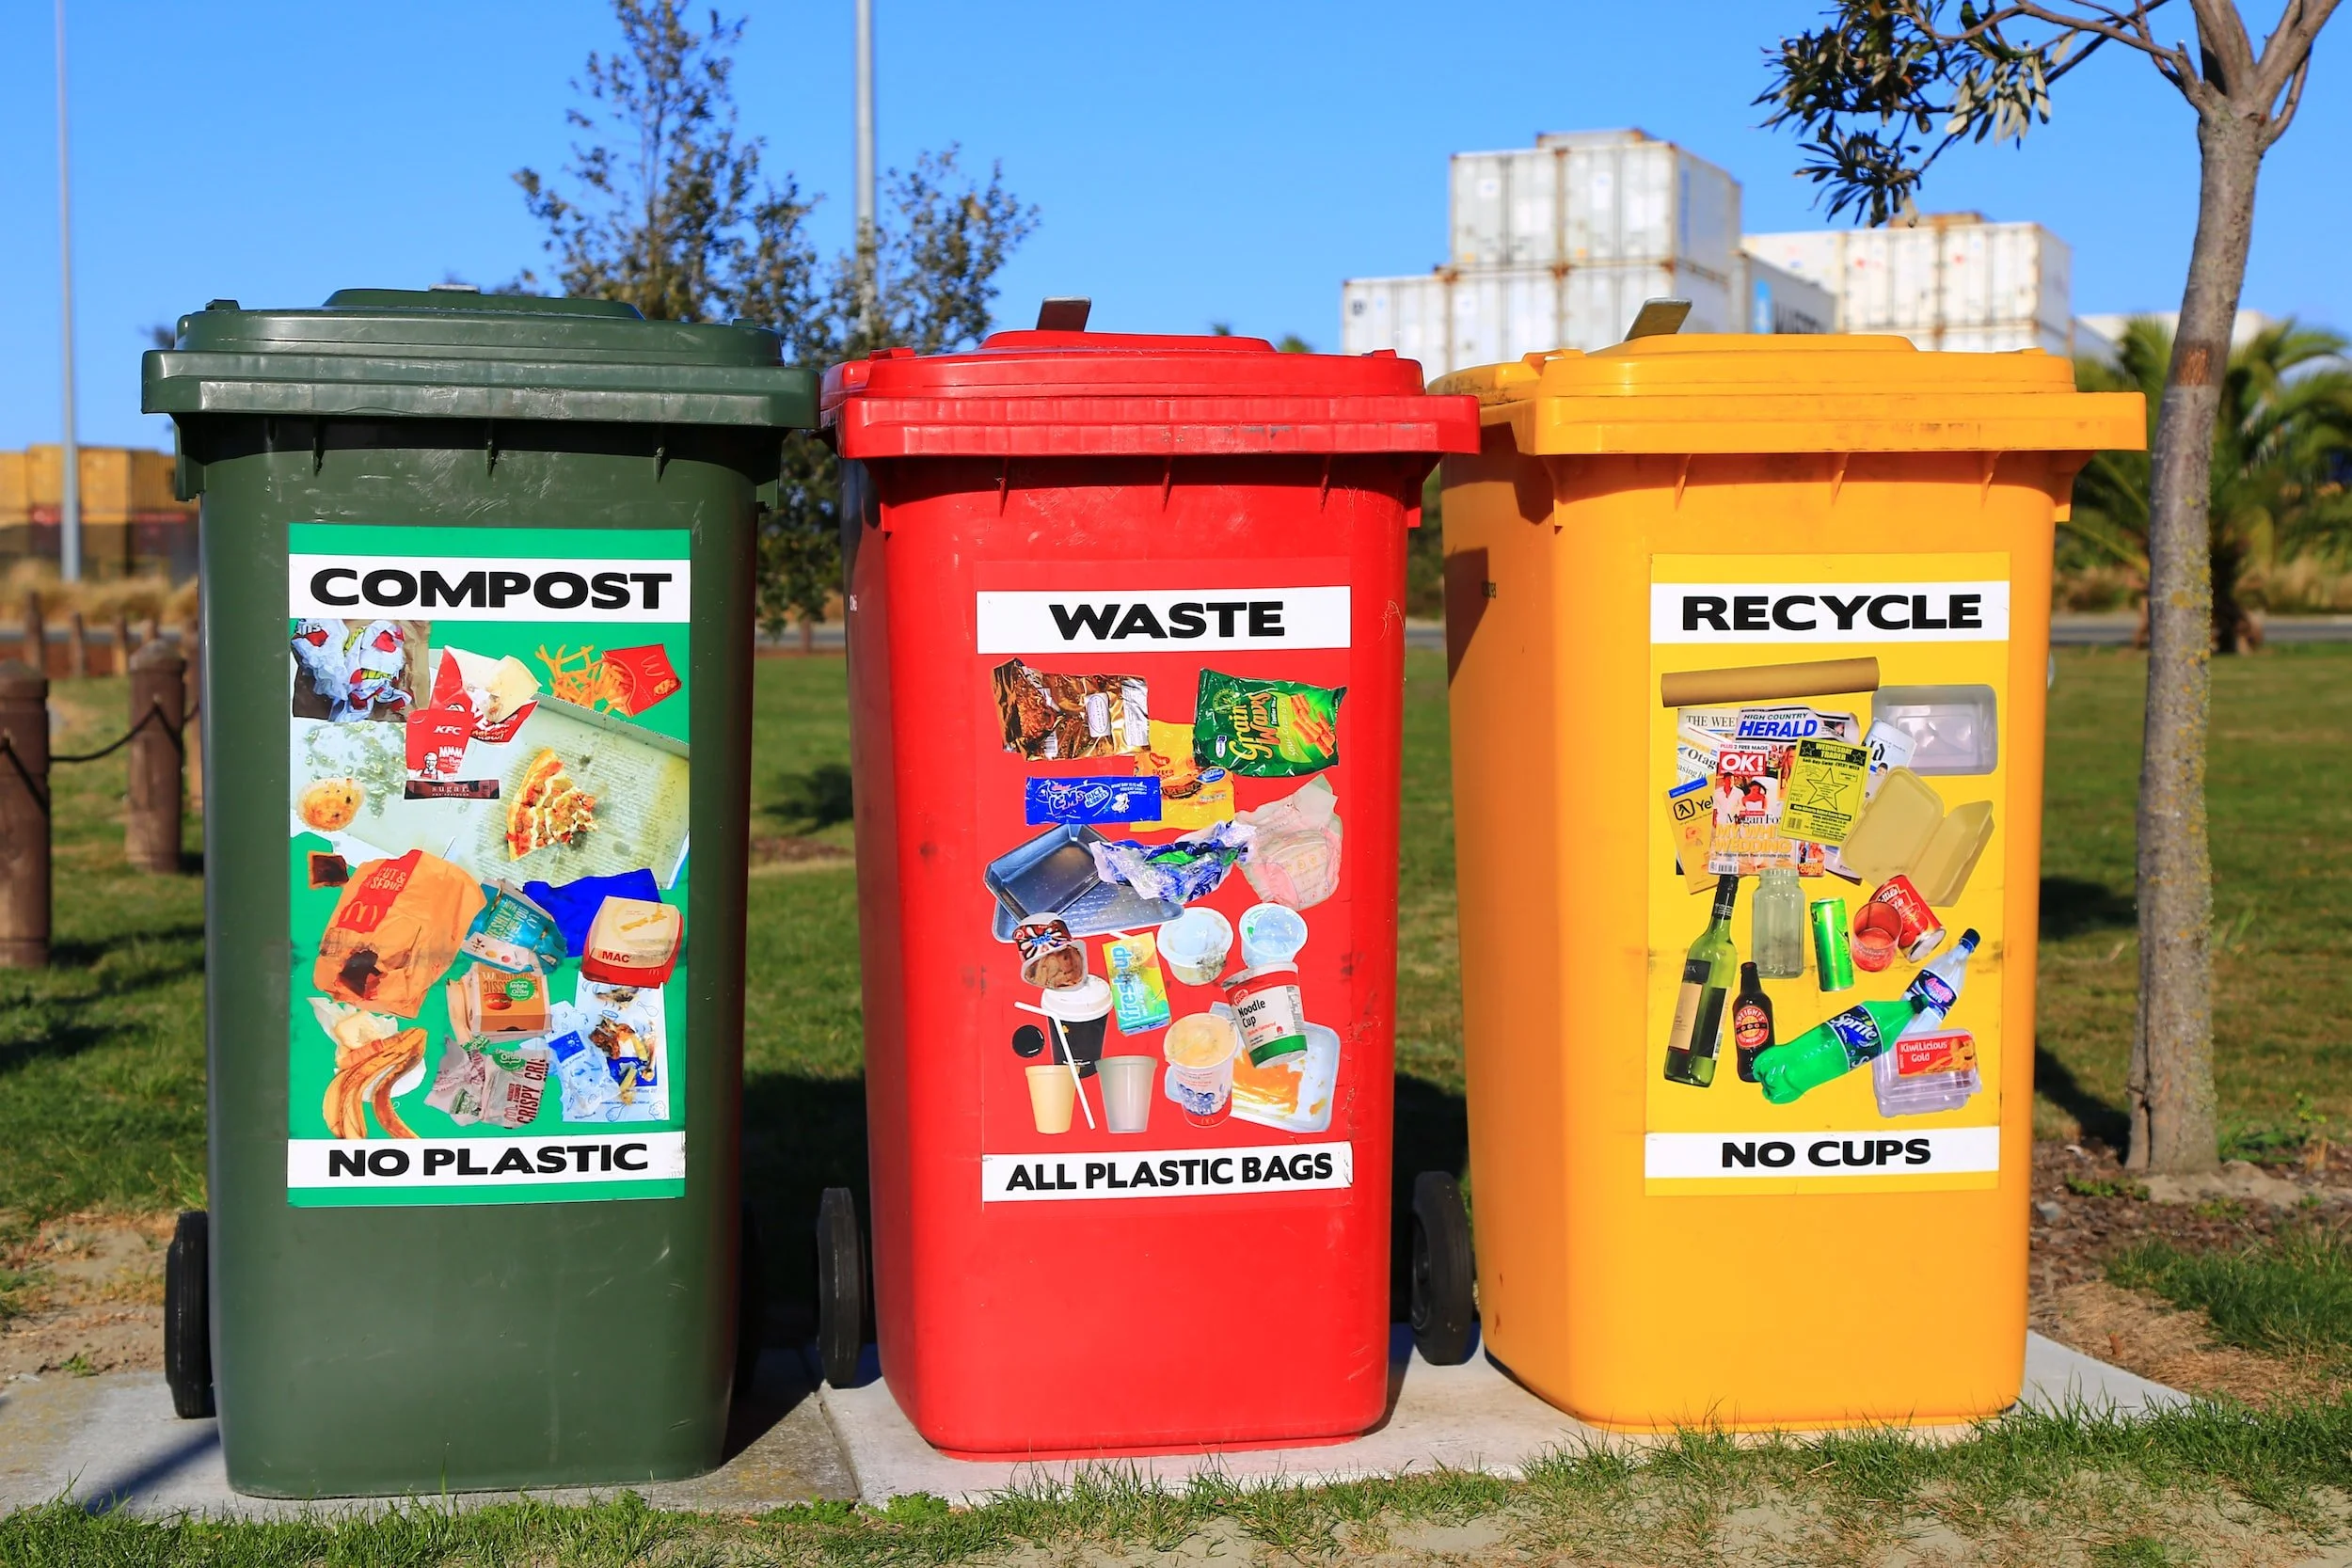
Compost
Landfills lack the oxygen that compostable items need to fully decompose. By putting biodegradable items into the compost instead of the trash, you can save huge amounts of waste from the landfill. We have an outdoor compost pile as well as Lomi - an indoor countertop composter that allows us to compost all sorts of things we couldn’t put in a regular compost pile including meat, dairy and bioplastic packaging which would take years to fully decompose in a traditional compost pile.
Save cardboard for kindling/weed barrier
Any child who has ever built a fort out of a box will tell you that cardboard has infinite uses, and the garden is no exception.
Buy second hand garden clothing/tools
When you choose second hand gardening tools, hats and aprons you’re keeping precious items from the landfill, giving them a new life and best of all these items have generally already withstood the test of time, so you can count on them to last.
Take care of what you have to make tools last
Once you have those second hand tools, make sure and do your research on the best way to maintain them. Click here for my post all about the best ways to maintain your gardening tools.
Repurpose branches for stakes/trellis
Nobody likes a plastic trellis, and even the pretty wooden ones available at garden centers hardly last me one season. Building a natural trellis using sticks and branches is simple and rewarding, and fits in well with the natural landscape you’re working in. Plus, at the end of the year you can just chuck them back in the woods if they’re broken or place aside to reuse again.
Use jute twine instead of nylon
According to GoodOnYou, producing nylon creates nitrous oxide, a greenhouse gas that is 300 times more potent than carbon dioxide…Manufacturing nylon is a very thirsty process; large amounts of water are used for cooling the fibers, which can be a source of environmental contamination and pollution. Treehugger says that nylon production is associated with the same negative environmental impacts as fossil fuels, including exacerbating the climate crisis. It’s safe to say that nylon is definitely not biodegradable, unlike its natural cousin jute twine. Because jute is compostable and biodegradable and requires fewer resources to grow and produce, it is considered a future-proof sustainable fiber.